2008 FJR CLUTCH PLAT SOAK PROCEDURE
Before disassembly run engine until crankcase/clutch cover is warm to the touch.
DISASSEMBLY
1. Remove right fairing and side cover. (optional)
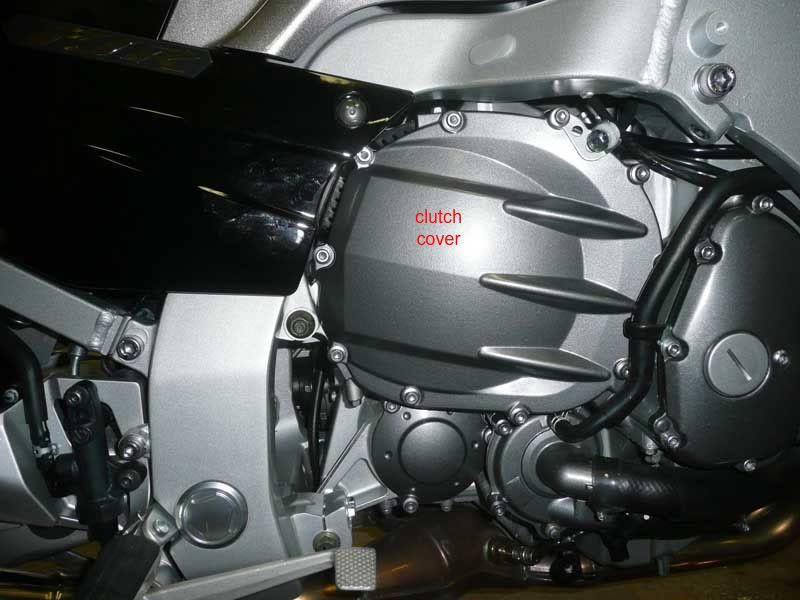
2. Remove crankcase/clutch cover, 10 allen head bolts. ( pic 1)
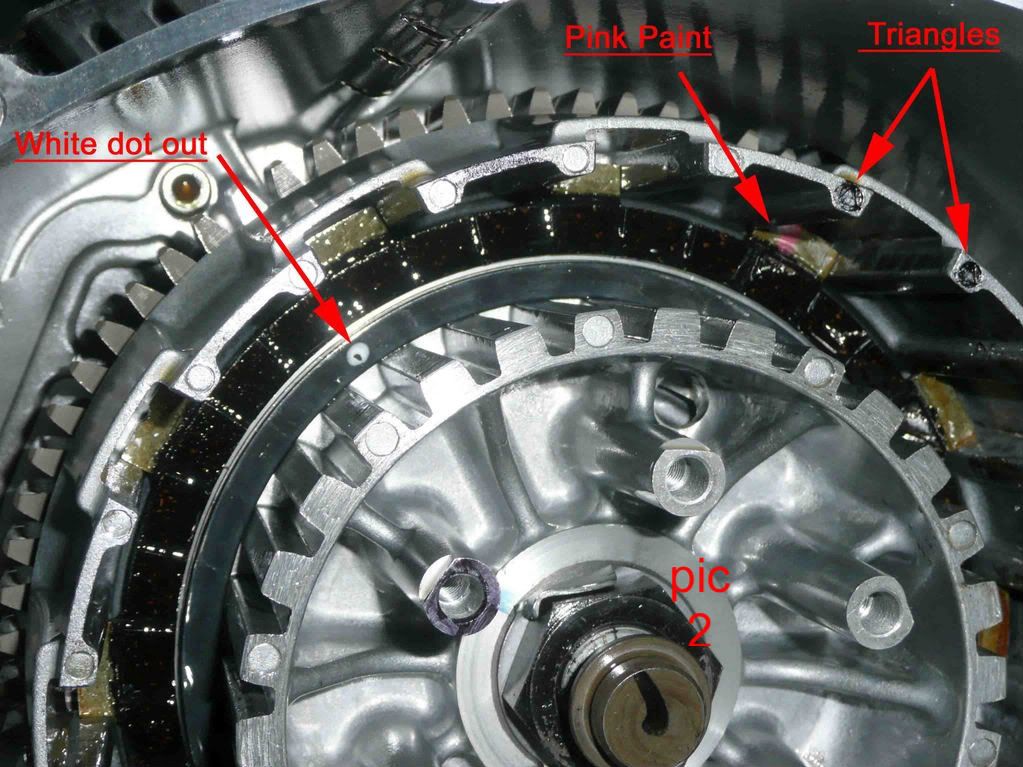
3. Before removing 6 hex bolts, observe pink index lines on lined clutch plates ear
Notice, there are two triangles embossed on the clutch basket and the ear on the lined plate
with the pink line is centered between the triangles. (pic 2 )
4. Loosen the 6 hex head bolts in a criss-cross pattern until all fasteners are loose.
5. Remove retainer plate and 6 bolts
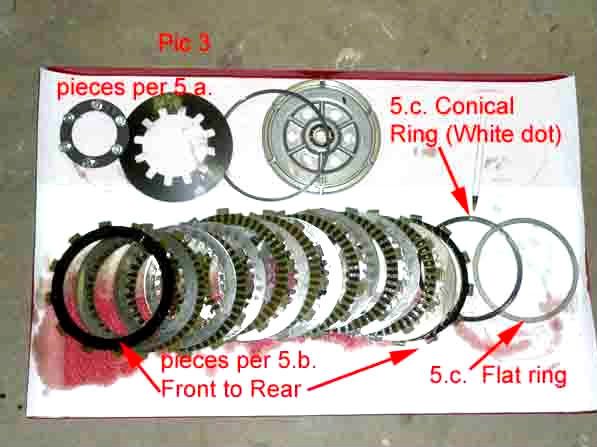
a. clutch spring, clutch spring plate, and pressure plate. (pic 3 parts are located at
the top of tray)
b. remove clutch plates in order, note lined plate alternates with steel plate.
(pic 3 clutch located on the bottom of tray)
c. after the last steel plate is removed there are two approx 5” diameter rings.
One is conical with a white identifying dot and the other flat. (pic 3)
6. Soak clutches in clean engine oil. Cut open a plastic anti-freeze container and
place clutches vertically in order of disassembly.
ASSEMBLY
If you mixed up the lined clutch plates, there are 3 different types.
The lining on the first and last plate are identical. The 7 lined plates
between the first and last are identical. ID of first lined plate installed 5.31 “.
The remaining have an ID of 4.88”.
1. Install 5” flat ring then 5” conical ring white dot faces out. (pic 3 pen shows white dot)
2. Install lined plate with 5.31” ID then steel, alternate stack up until all clutches are installed.
3. Install pressure plate, spring plate, clutch spring, retainer plate and bolts.
4. Snug bolts in a criss-cross pattern until seated. (torque bolts to 8 Nm, 5.8 ft/lb)
5. Install cover with gasket. (torque bolts to12 Nm, 8.7 ft/lb)
Gasket part # 5JW-15461-11
Photos by Mel
Post clutch discussion by Bill and Mel
(Two car guys) DISCLAIMER: “ We know nothing”
The clutch plates are indeed wet plates but are not submerged in oil. The clutch is mounted above the crank. Unless there is an internal lube hole in the clutch basket, the clutch plates are lubed by splash from the crank and rod. The clutch basket prevents an excessive amount of oil being deposited on the plates. The black material in the bottom of the clutch basket is clutch plate lining. This occurs from seating plates together and sometimes slipping the clutch. Disassembly of my clutch revealed oil on the first lined plate removed and the last lined plate in the stack-up. The seven plates in between were dry.
When installing new clutch plates the technician would install the plates at random and runout would also be random unless you (Mel) measured runout for each plate and select fit them. Thus reducing clutch drag. (Mel has done this on his dirt bike, Bill will not) Unless runout is excessive, I doubt that any clutch drag will occur.
There are two 5” rings at the bottom of the clutch basket, one is flat and the other conical with a white dot that faces out. The rings dampen the clutch apply; if you wanted to change your clutch feel, different hardened rings could be installed, provided the clearance between pressure plate and clutch disc remains the same.
The pink paint on the lined plates indexes between two triangles embossed on the clutch basket. However, there are other paint marks on the lined plates. We believe the indexing is an attempt to achieve zero runout on plate stack-up resulting in less clutch drag. The diaphragm spring (belleville spring) is a good attempt to distribute pressure evenly to the stack-up.
Probably the best solution for FJR Yamaha clutch problem is a redesign. Clutches should be lubricated in a remote sump independent of the engine oil. OR use a single disc dry clutch.
SORRY for the length of the post (I needed to vent)
Remember, keep rubber side down
Bill


Last edited by a moderator:


