Battery Voltages - what is good vs. bad?

Yamaha FJR Motorcycle Forum

Help Support Yamaha FJR Motorcycle Forum:

This site may earn a commission from merchant affiliate links, including eBay, Amazon, and others.
I suggest you best check your fuel pump right off the bat. Ol' skooterG just proved that a ****** up pump will decimate a battery. In his spare time he splits atoms.
Care to elaborate on that?

I've just checked the stator coil o/p:

Phase 1 - phase 2 => 21.5 VAC

Phase 1 - phase 3 => 15.0 VAC

Phase 2 - phase 3 => 0.6 VAC

The ****** thing is, all the coils have continuity to ground!!! ALL read ~0.8 ohms to ground!!!

 
Help!
Today my FJR was acting up. It's been a long-standing problem that has gotten progressively worse, but for this thread I am want to concentrate on the battery.

Here's the deal: 2004 FJR1300. 162,000 miles. New battery put in at 149k, 5 months ago. I have had an intermittent starting issue since May or so, both with the previous battery and the now current one. It got better for a while with the new battery, but it's been getting worse for a while again. Today I go to start my FJR for the first time today and I get only a few slow cranks from the starter. Sounds like the battery is dead. It's cold for around here, about 45 degrees. I rode the bike yesterday with no issues. Due to the 'issue' I have been periodically checking battery voltage and it's about 13.25V after sitting for several hours. A-Ok.

So after this happens today, I get the multi-meter out and the battery reads 12.85V. Over the next 15 minutes or so it rises back up to 13.05V.

I turn the ignition 'on'. After fuel pump cycles, I measure voltage now at 12.80V with ignition and the tail and side marker lights on. After 30 seconds or so, it's reading 12.57V and still slowly going down.

Turn everything off. After 10 minutes I get 13.04V. After over an hour I get 13.09V.

So now I meaure while cranking. The engine started pretty quickly, but I got a reading of 11.10V and 10.8V or so.

Immediately after starting, I am reading 13.90V which quickly raises to 14.0V

After idling a few minutes, 14.14V. Reving engine give 14.17V

So I do a bit of riding. I get a no-start episode which I will detail in another thread. After repeated cranking, battery is pretty low. Clock resets and I have to push start the FJR as battery won't turn it over anymore. I ride about 10 miles home and when I get there, I measure 13.91-13.94V while idling. After I shut it off, battery reads 13.70V and is going down quick.

After an hour and a half, battery is at 13.20V.

So! Everything above looks fairly normal to my un-trained eye - at least concerning battery voltage. I suspect my 'issue' may be a worn out starter or something else, but I am trying to eliminate the battery as a problem. Even though it's only 5 months old, I know of other 'new' batteries that have failed rather quckly.

So what do you experts think? How valuable is a load test? It seems the reading I got above, particularly after the initial slow cranking look pretty good. What saytheth you all?

Any help is greatly appreciated.

Oh BTW, while doing all this today I measured the g/f's BMW F65GS voltage. Bike is 3 and half months old, and was last ridden a week ago. 12.88V.

And I am using a small portable RatShack multimeter. Good enough, right?
Since you have the battery out once or twice, do you happen to know what the size (model number) you have? I ask because I too had the same problem while riding out of state and boughth a battery from a dealer. 500 miles later, I found out that the battery is too big for what I have in my 2003. I'll post details on another thread.
Its GT14B-4. If you want a pic of it, let me know.

 
I've just checked the stator coil o/p:
Phase 1 - phase 2 => 21.5 VAC

Phase 1 - phase 3 => 15.0 VAC

Phase 2 - phase 3 => 0.6 VAC

The ****** thing is, all the coils have continuity to ground!!! ALL read ~0.8 ohms to ground!!!
1. Was this measured with the stator plug unplugged from the regulator/rectifier?

2. Did you use a digital multimeter (DMM)?

3. Did you measure this from any white wire to any other white wire? Good job.

4. Was the engine running at 5k rpm?

With the stator plug unplugged, using a DMM, the engine @ 5k rpm, any white wire to any other white wire should be >50 VAC with a target of 60 VAC. All phases should read very nearly identical voltages. If you met all 4 conditions and got the readings quoted, you have broken stator wires or a toasted stator.

A general purpose DMM is not capable of making an accurate enough ohm measurement to diagnose a stator (IMO), the lead resistance of the meter is equal to or higher than the stator resistance.

 
Last edited by a moderator:
I've just checked the stator coil o/p:
Phase 1 - phase 2 => 21.5 VAC

Phase 1 - phase 3 => 15.0 VAC

Phase 2 - phase 3 => 0.6 VAC

The ****** thing is, all the coils have continuity to ground!!! ALL read ~0.8 ohms to ground!!!
1. Was this measured with the stator plug unplugged from the regulator/rectifier?

2. Did you use a digital multimeter (DMM)?

3. Did you measure this from any white wire to any other white wire?

4. Was the engine running at 5k rpm?

With the stator plug unplugged, using a DMM, the engine @ 5k rpm, any white wire to any other white wire should be >50 VAC with a target of 60 VAC. All phases should read very nearly identical voltages. If you met all 4 conditions and got the readings quoted, you have broken stator wires or a toasted stator.

A general purpose DMM is not capable of making an accurate enough ohm measurement to diagnose a stator (IMO), the lead resistance of the meter is equal to or higher than the stator resistance.
1. Yes, measured from the socket disconnected from the rectifier.

2. Yes, its a digital multimeter by Sound Tech model EM390 (it only cost me SGD$15.00)

3. Yes, I measured it at the stator plug which is fed by 3 white wires.

4. Nope, its 1 am and I don't want my nieghbours to thrown stuff at me. I measured it at idle.

But I reckon they should have the same reading (VAC) right? So its alright to conclude the culprit is my stator coils?

:p Its 1am over here and I cant rev it up to 5000rpm. Don't wanna have pots and pans thrown at me by my neighbours.

 
...1. Yes, measured from the socket disconnected from the rectifier.

...

3. Yes, I measured it at the stator plug which is fed by 3 white wires.

...

But I reckon they should have the same reading (VAC) right? So its alright to conclude the culprit is my stator coils?
You don't make it clear (at least to me). You must measure between two white wires, not between a white wire and chassis, then the reading between any two white wires should be the same (within a few percent).

 
...3. Yes, I measured it at the stator plug which is fed by 3 white wires...
You don't make it clear (at least to me). You must measure between two white wires, not between a white wire and chassis, then the reading between any two white wires should be the same (within a few percent).
I missed it in my first read, omnislash does say:

Phase 1 - phase 2 => 21.5 VAC
Phase 1 - phase 3 => 15.0 VAC

Phase 2 - phase 3 => 0.6 VAC
I take this to mean that he did measure phase to phase. I would like to see the stator voltage taken at 5k rpm but the voltage variation phase to phase is so large that it does sound like he has one bad phase and one partly shorted phase.

In a couple of previous discussions about the stator it was noted that one area of the stator gets significantly hotter than the rest and most likely is where the stator failures are happening. One phase toasts completely and wounds the adjacent phase. All the pictures of various stators shows the hot spot.

Off to see if I can quickly find the posts... [SIZE=12pt]zzzz[/SIZE][SIZE=10pt]iiii[/SIZE][SIZE=8pt]ppp[/SIZE]

Edited: Good stator thread

And, to add:

[SIZE=18pt]Nobody panic, the failure rate of the FJR stator is pretty low and probably is within the norm for current motorcycles used for Sport/Touring [/SIZE] :D My stator and a couple of other stator failures are Electrosport stators.

 
Last edited by a moderator:
...
Phase 1 - phase 2 => 21.5 VAC
...

I take this to mean that he did measure phase to phase. I would like to see the stator voltage taken at 5k rpm but the voltage variation phase to phase is so large that it does sound like he has one bad phase and one partly shorted phase.

...
Sorry, missed that, saw the bit that said:

the ****** thing is, all the coils have continuity to ground!!! ALL read ~0.8 ohms to ground!!!
which led me to think the voltage measurements were to ground.

But any continuity to ground would seem to indicate faulty windings (or faulty insulation).

 
But any continuity to ground would seem to indicate faulty windings (or faulty insulation).
+1. Although not specified in the FSM, it appears that there is no intentional ground in the stator.
There is no ground at the stator, it is a straight 3 phase AC alternator. The only time ground comes into play at the stator is when the winding insulation fails and the winding shorts to a stator pole, which is in turn is grounded to the engine via the mounting bolts. The R/R creates a ground that floats in respect to everything except the battery's negative terminal.

 
Last edited by a moderator:
Thanx guys!

I did the reading at close to 5000RPM

Phase 1 - phase 2 => 80+ VAC

Phase 1 - phase 3 => >50 VAC

Phase 2 - phase 3 => 0.6 VAC

So i guess its really the coil. Going down to the distributor to get the parts. I do not need to drain the oil right?

 
No oil drain, but that cover will eat your fingers if you get them between the surfaces. With that giant magnet inside, it really really really wants to stay attached to the bike.

Also, the three bolts that hold the stator coil inside the cover are really really really tight, or perhaps red loctite'd. It may even come to an impact driver to remove them. I stripped the head on one of mine, had to drill it and extract it.

I wasn't replacing the stator, just the cover, after scraping it with Alabama gravel.

 
Last edited by a moderator:
I had better prepare some flat head screw drivers then.

Anyhow, I bought an 04 model stator 5JW-81410-10 instead of an 02's 5JW-81410-00. Based on the other "stator" thread, seems that it produces more wattage and ironically, its cheaper. The guy was kind enough to let me have it without me knowing the price difference.

 
What the hell!?

There is no way I can squeeze the socket between the frame and the engine with the main wiring harness!!! How did you guys change the stator? My only choice now is to splice them halfway....

 
Also, the three bolts that hold the stator coil inside the cover are really really really tight, or perhaps red loctite'd. It may even come to an impact driver to remove them. I stripped the head on one of mine, had to drill it and extract it.
That really prepared me. I was real careful not to round those heads.

 
What the hell!?
There is no way I can squeeze the socket between the frame and the engine with the main wiring harness!!! How did you guys change the stator? My only choice now is to splice them halfway....
Oh, try to avoid this if you can! If you must, IMO, if you can solder, do, and use shrink sleeve. If you use crimp connectors be sure to use a proper crimp tool and that the connectors are the proper amperage. Use shrink sleeve which will mechanically hold the connectors together as well as provide some weather resistance.

This may be tough without pictures. Up at the R/R I was able to start sliding the wire down the frame between the black plastic shield and the frame ('04, your non US '02 may be different). Once the wire was slipped down ?? 10 inches/25 cm ?? I found an opening big enough for the connector body to pass through. Get a good light to help you see and plan to use some patience. I ran a wire fish from the front of the motorcycle back to the stator along the path I wanted the harness to run, hooked the harness and pulled it forward then slowly worked the harness back up into place. I found that it went in easier than came out.

One caution:

Rotor.jpg


Check out the groove cut into the rotor by the stator wire's holding bracket in the bottom of the cover, the little bracket is held in place by a big Phillips screw. It came from the factory like this. I had to slightly bend the bracket and reposition it several times to keep it from hitting the rotor. Some of the early Electrosport installers reported a short squealing noise on first startup. I would guess that is the sound of the bracket lathing the rotor.

I would really suggest locktite on the internal hardware! Also, when you put in the rubber plug through which the harness feeds, I found that it works best to RTV the plug in place and let it cure before installing the cover. Be sure the flat side of the plug is flush with the edge of the cover. A dealer installed this rubber plug three times and it leaked three times, I did it three times and did not have a leak.

More power to you (so to speak ;) )

 
Last edited by a moderator:
What the hell!?
There is no way I can squeeze the socket between the frame and the engine with the main wiring harness!!! How did you guys change the stator? My only choice now is to splice them halfway....
This may be tough without pictures. Up at the R/R I was able to start sliding the wire down the frame between the black plastic shield and the frame ('04, your non US '02 may be different). Once the wire was slipped down ?? 10 inches/25 cm ?? I found an opening big enough for the connector body to pass through. Get a good light to help you see and plan to use some patience. I ran a wire fish from the front of the motorcycle back to the stator along the path I wanted the harness to run, hooked the harness and pulled it forward then slowly worked the harness back up into place. I found that it went in easier than came out.
How is that possible? Ain't your assy come as a whole? One side is crimped to the stator, the other is the socket end. What you describe above is by cutting them up right? Its too late, I cut them up and used connectors. <_<

Anyway, I thought of using RTV for the plug and loctite for the Torx screws as well but I didn't have them on hand and I really needed the bike to get to work.

I made sure I really torque the Torx screws real tight. As for the philips screw, it came off pretty easily so i guess my strength is more than enough to keep it from loosening and creating hell inside.

I didn't notice any cuts on my rotor though. The magnet really sucked as I was installing the coil cover. Hope the insulation aint damaged in the process.

But I tested it after everything and the charging is great!!! I even managed to revive my 2 yr old battery after days of trickle charging. I have a brand new one as spare now. Will monitor for oil leak for the next few days.

 
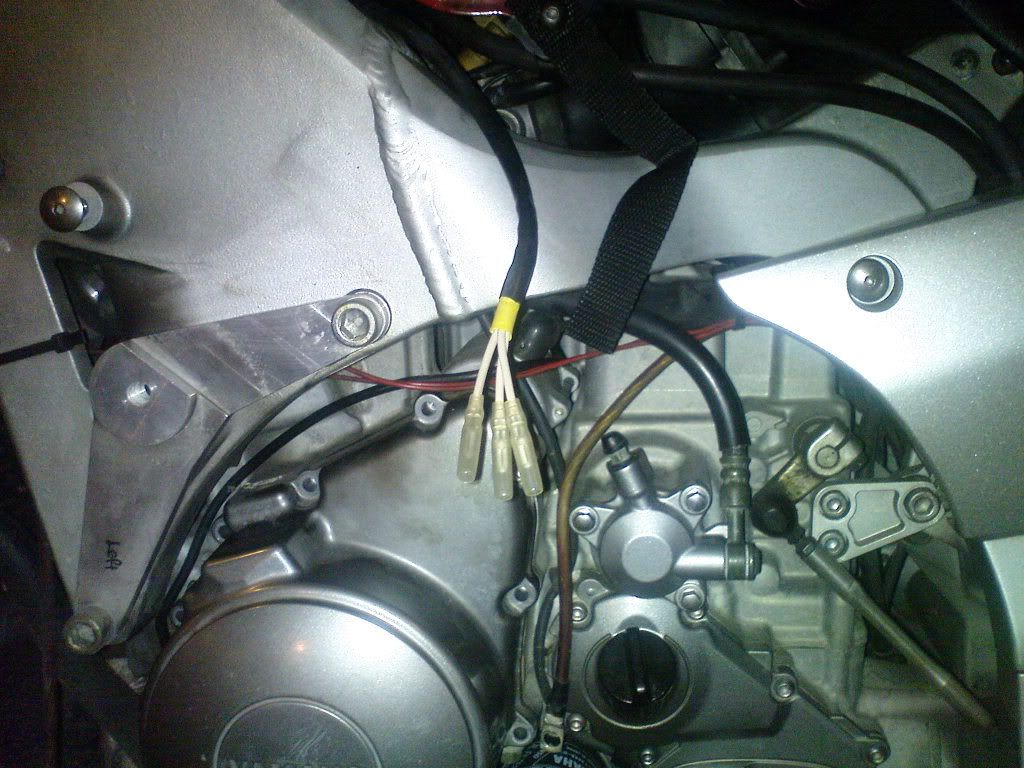
DSC00239.jpg


I didnt bother taking out the old socket. I cut it pretty close to the stator cover side and installed connectors. I did use shrink sleeve but I didnt have the right size... :(

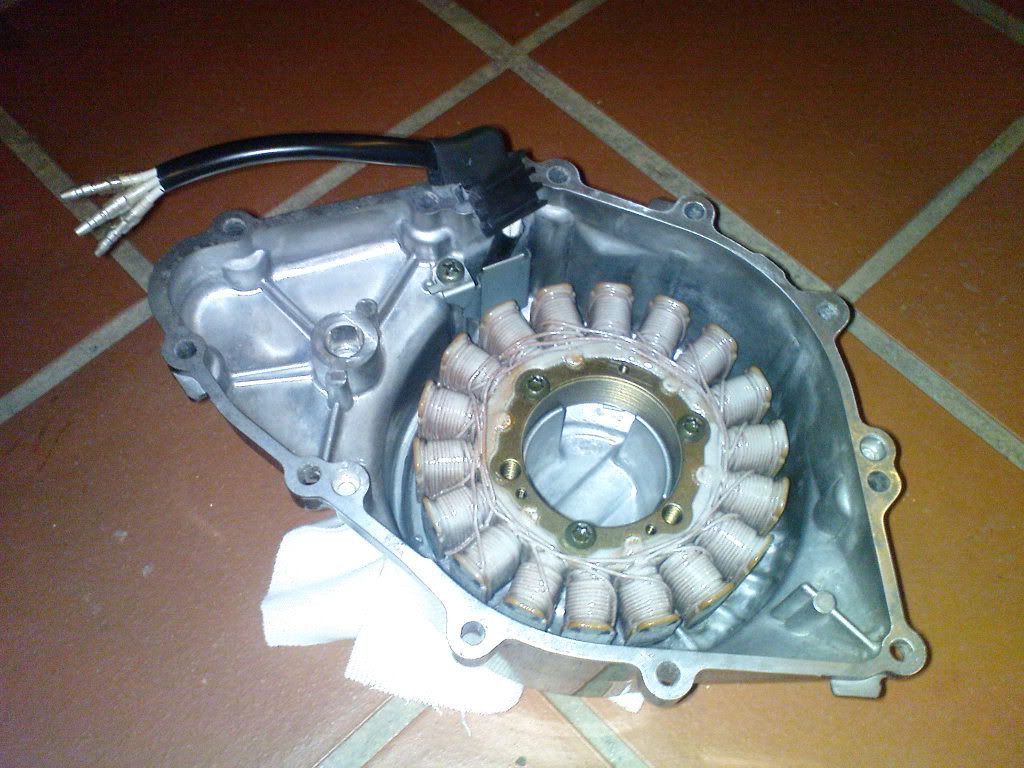
DSC00241.jpg


Did the same on the new coil.

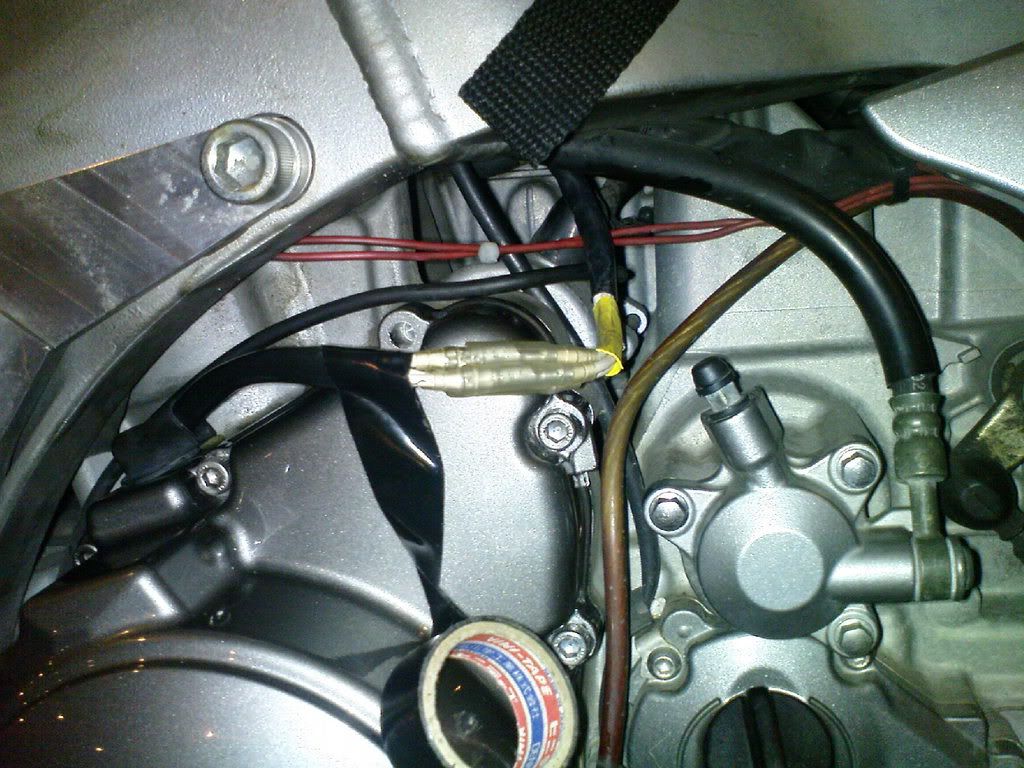
DSC00242.jpg


This is how it looks like after connecting the wires.

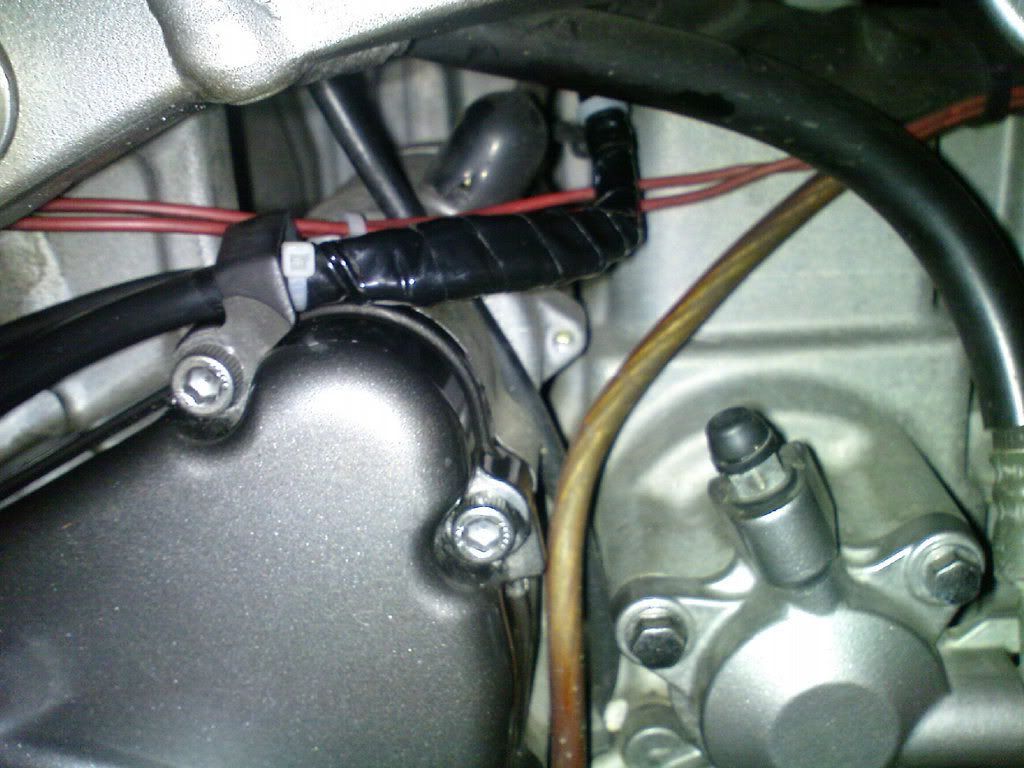
DSC00243.jpg


Final touch up using black tape and cable tie.

How is it guys?

 
Top