Cleaning Throttle Bodies

Yamaha FJR Motorcycle Forum

Help Support Yamaha FJR Motorcycle Forum:

This site may earn a commission from merchant affiliate links, including eBay, Amazon, and others.
Since your Air Injection Solenoid is sitting on a shelf someplace, take a gander into the hose that couples the AIS to the air box and see how dirty it is inside. Just saying, it would be a long path to get from the exhaust port, past the reed valves, into the air box and back out to the throttle bodies. Were it exhaust, I would have expected the coating to look more exhaustish -- kinda carbon black.
I finally got around to following up on this and what I found was that the hoses were squeeky clean inside on both ends. Now my bike only had maybe 25k miles on it when I pulled the PAIR off of it, but if this were the source you'd expect at least a little dirty / crud deposit. Sticking a clean pinky inside the tube ends, said pinky came out as pink as it went in.

So... next suspect: Crancase vent?

Here's where the hose runs from the 'case up to the clean air side of the filter box (on a 1st gen anyway...) yellow highlighted yellow. It doesn't appear that there is any sort of PCV check valve in line. Next time I'm under the tank I'll pull this hose off the front of the air box and see if there is any oily film inside the tube.

PCVHose.jpg


Last edited by a moderator:
If you pull the air filter and reach in and touch the four TB air inlet tubes you can check for any oily residue on the interior of the tubes. Also, it may be possible to reach up and touch the inlet from the crankcase breather hose too, although the TB inlet tubes may be in the way. There's also a breather/drain hose leaving the bottom of the air box. There's an in-line filter about midway down the hose which you can see near/above the swingarm pivot. Hopefully this small filter won't allow crud to enter the air box.

 
Not only that, but the breather goes in behind the filter. The filter only sees outside air coming in.

Start a trend: On a Mustang forum a bunch of guys were putting fuel filters on the PCV hose, the plastic kind you could see into, and when they turned really bad they put a new one in. The "thinking" (if there actually was any) was to keep oil out of the intake.

So who's gonna be the first to filter their breather pipe?
On my Turbo car we use a water collector from air compressors on the PCV line to keep the excess oil off the turbo blades. We just unscrew them and dump the accumulated oil out once in awhile. I could not believe the amount of oil that is collected over time in this container. I was very skeptical at first but after seeing what is collected I was sure glad it was not going onto my turbo.

Not sure if there is room or a need but I may look into it on the bike?

 
I've been meaning to pull the airbox and at least take a look at the throttle bodies on my old 1st gen. She's sitting at 90k miles and each time that I have checked the TBS I've noticed that it is always requiring a little bit of adjustment each time, and that the end result isn't as good in terms of minimizing vibration in the 4000-5000 rpm range that it once did.

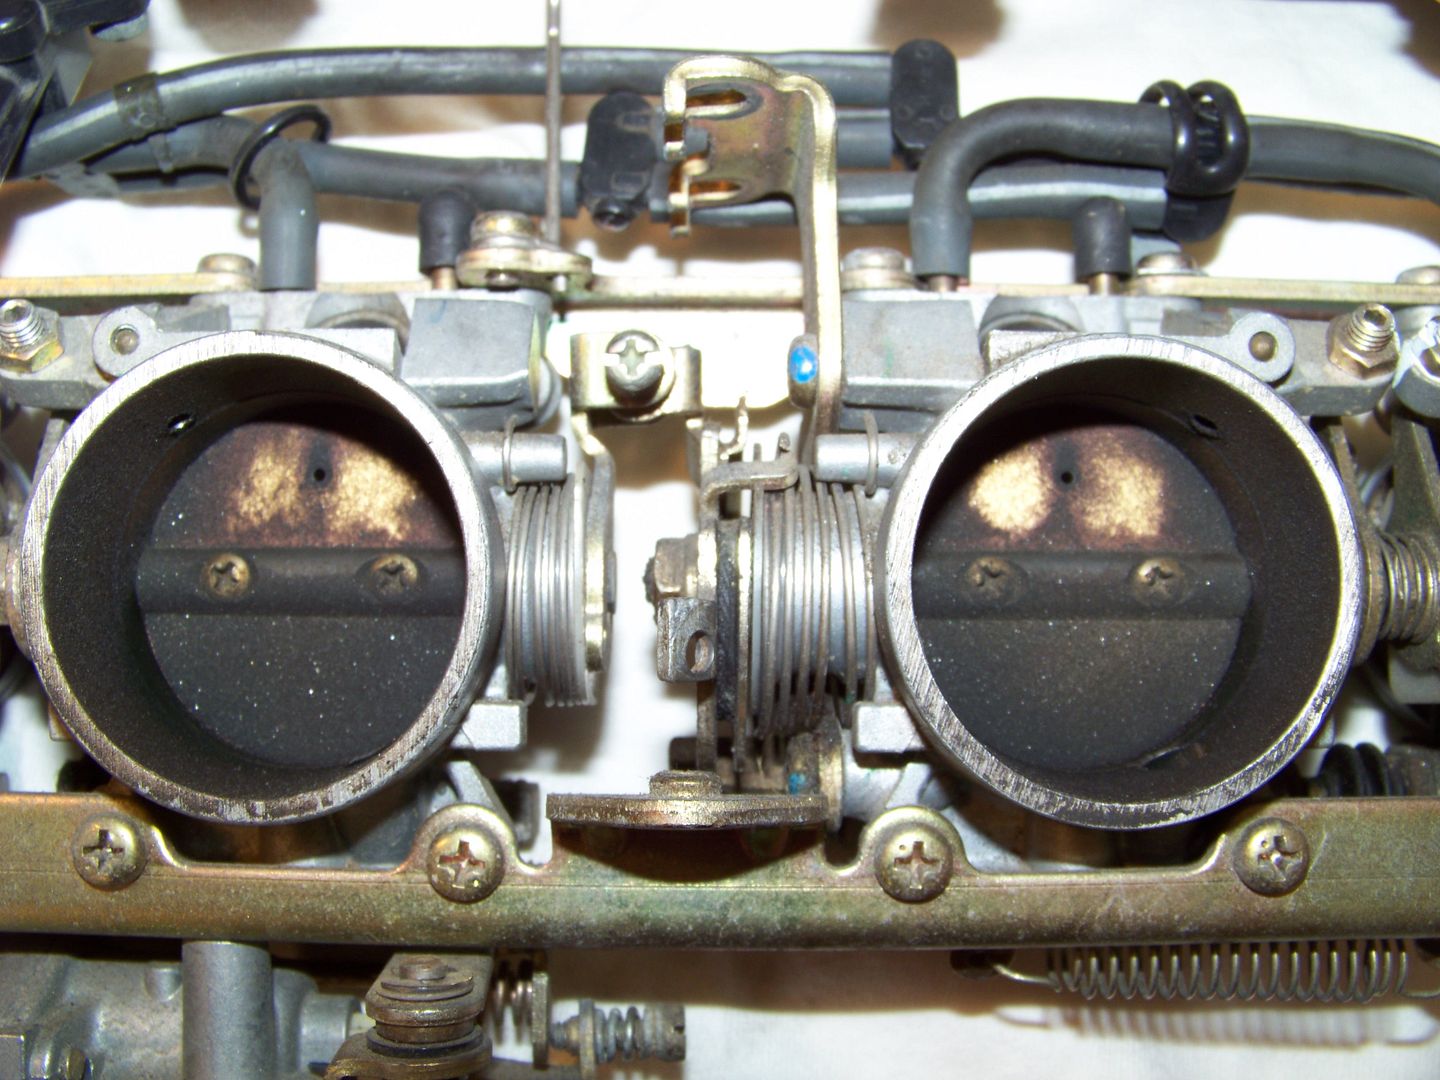
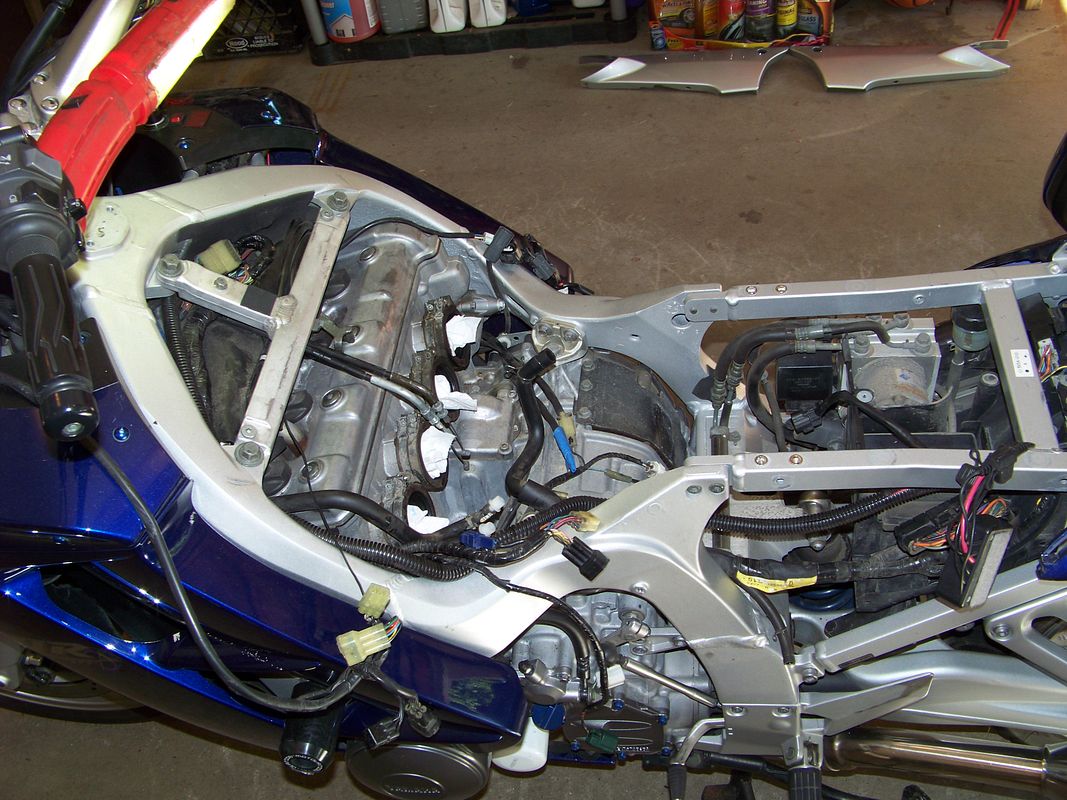
Today was the day. Pulled the tank off, Fuel rail and injectors, and the airbox and here's what I saw:

100_4467.jpg


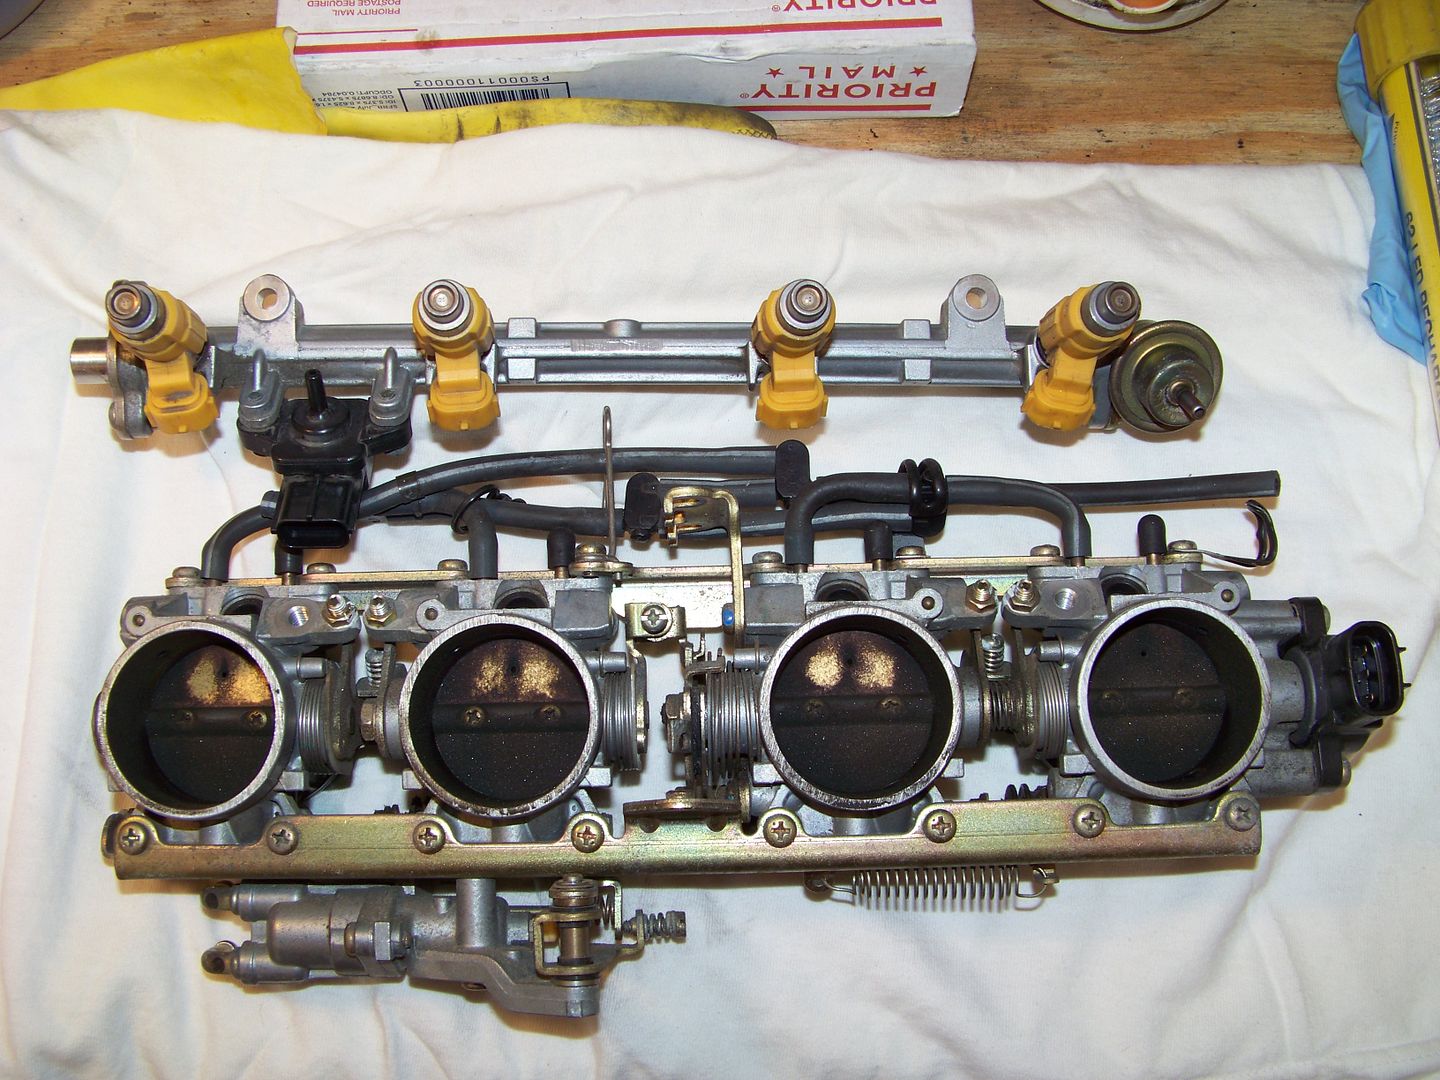
Naturally once I saw the state of those throttles I pulled the assembly off for a thorough bench cleaning...


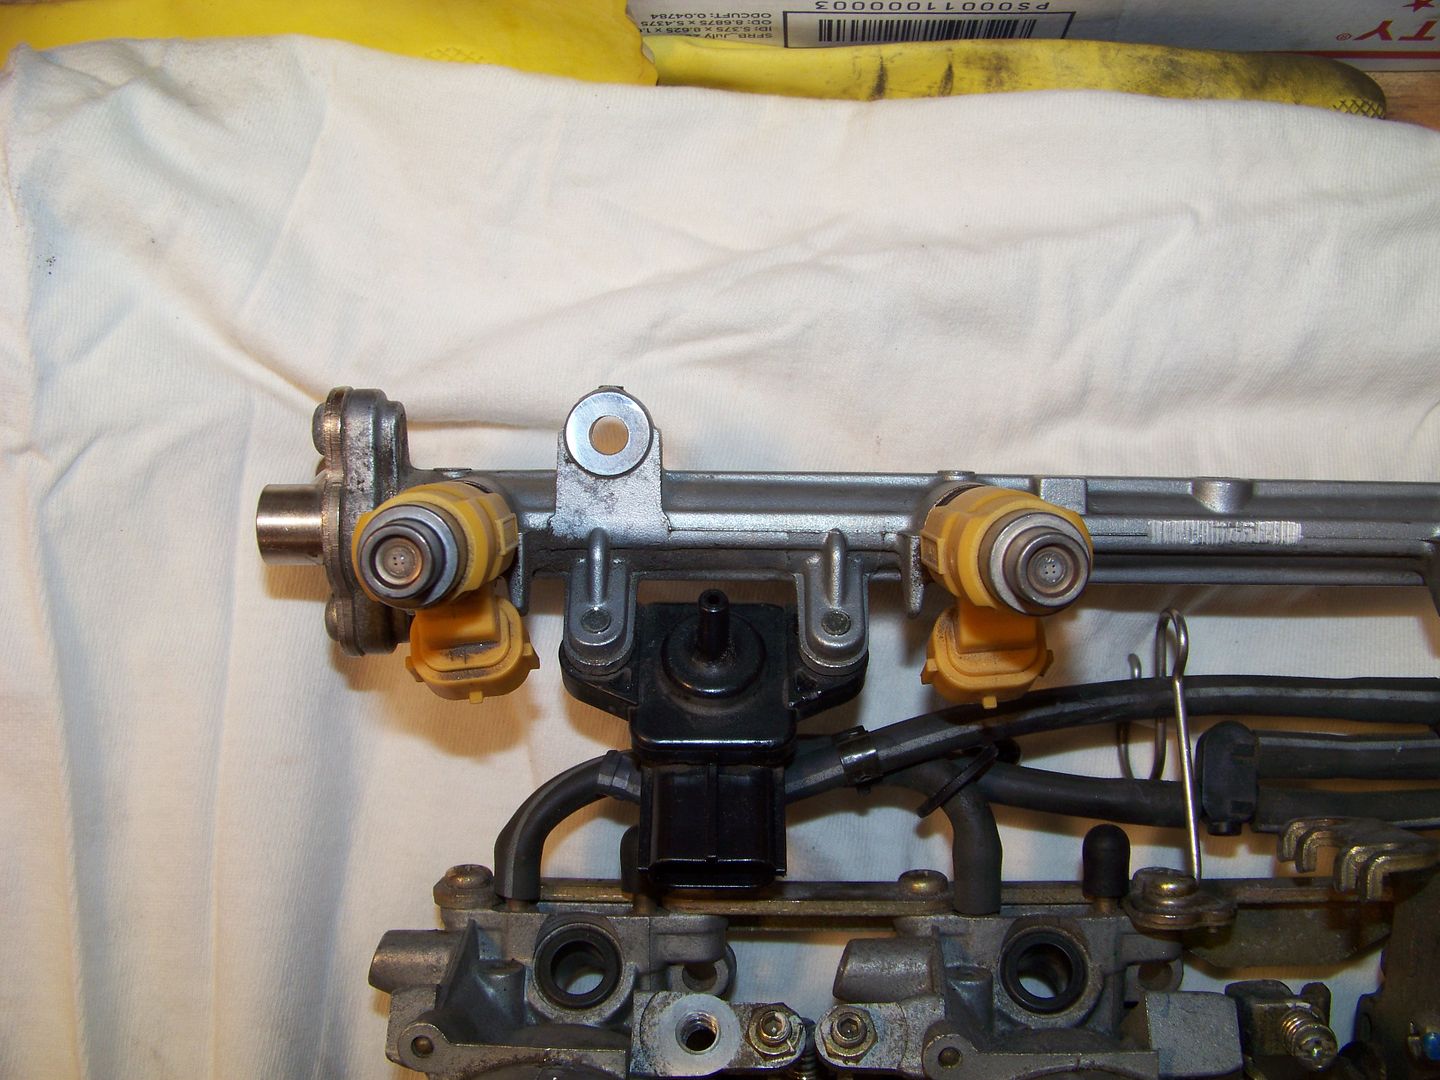
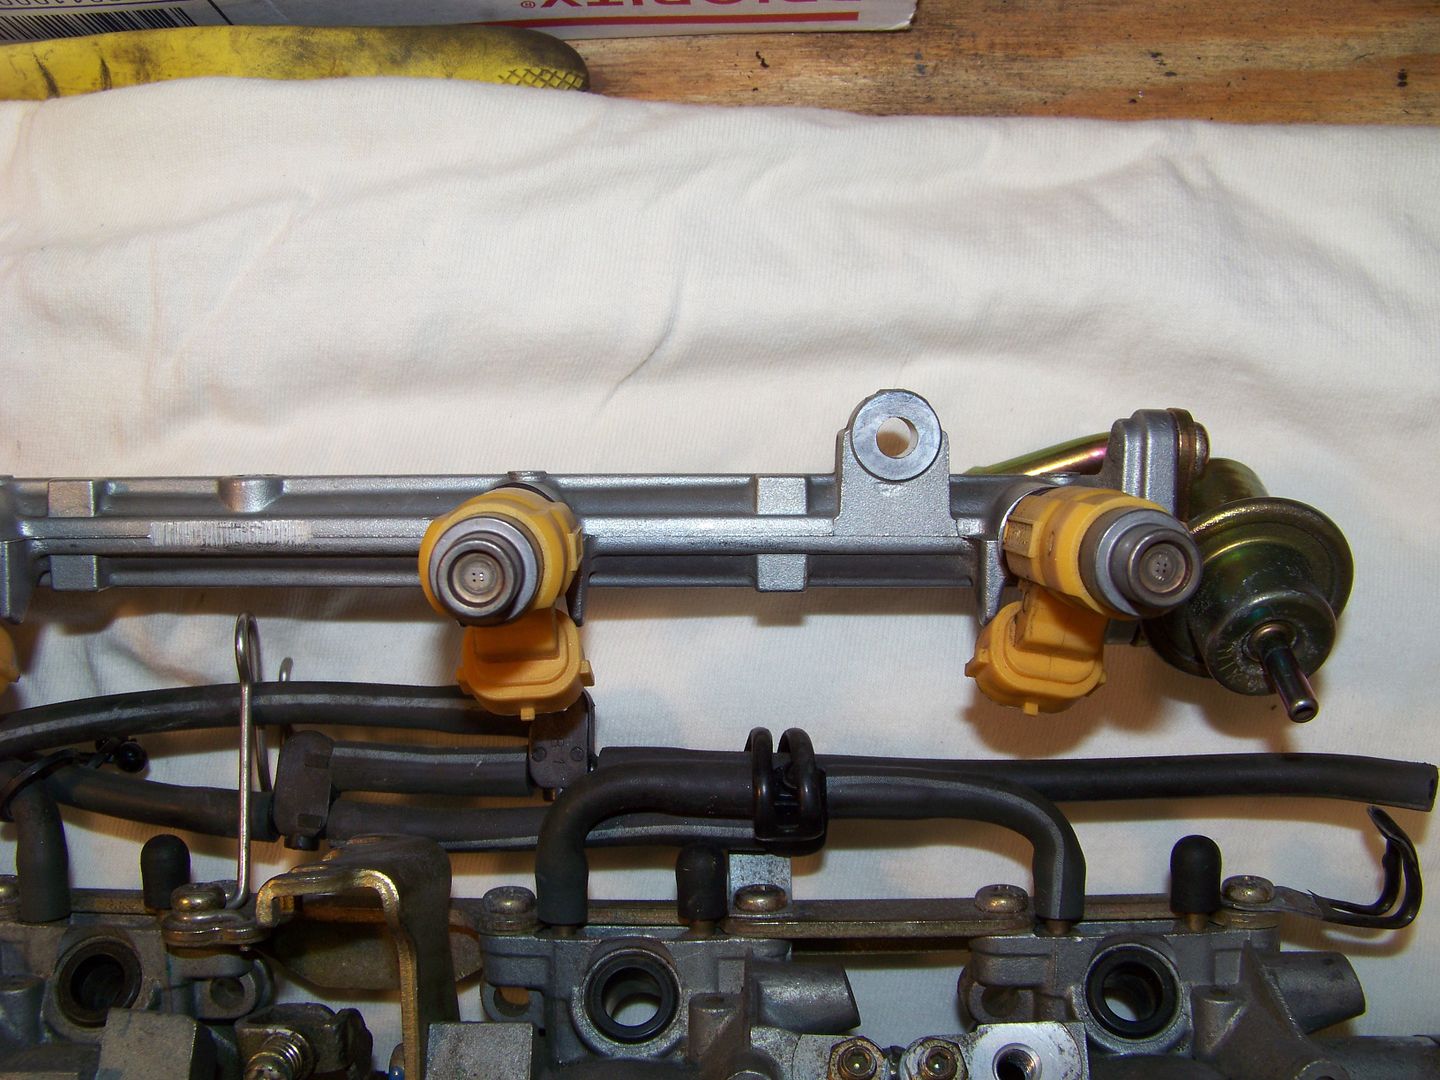
The fuel injector nozzles look pretty clean... probably because I do run a tank of seafoam mix now and then.

100_4468.jpg


100_4469.jpg


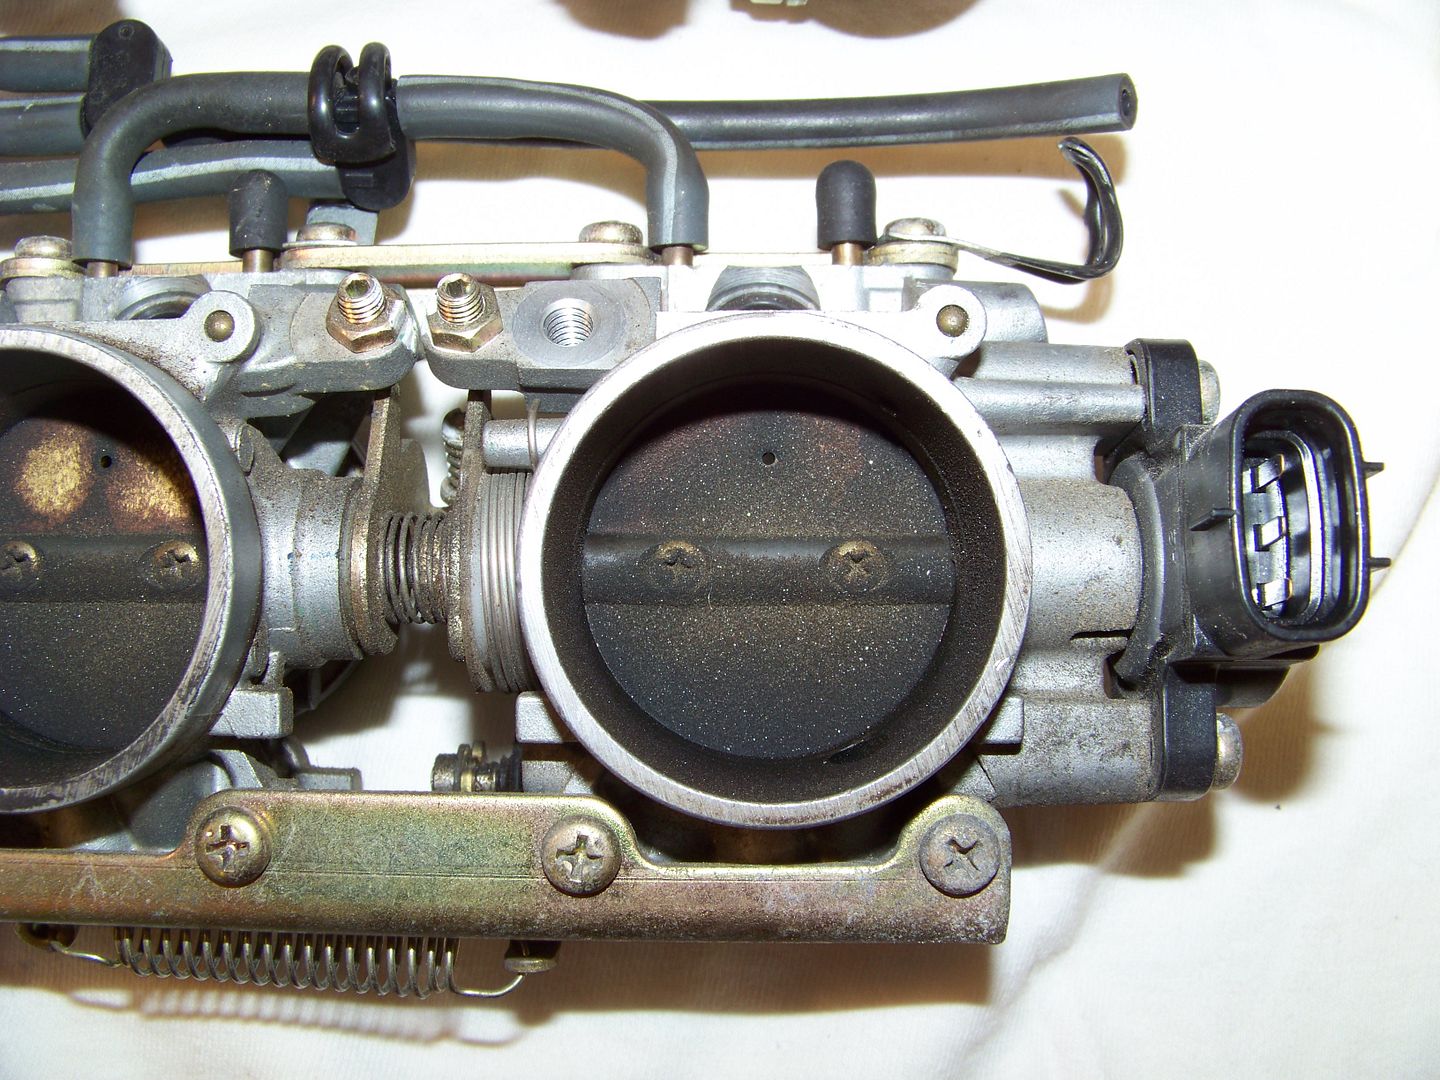
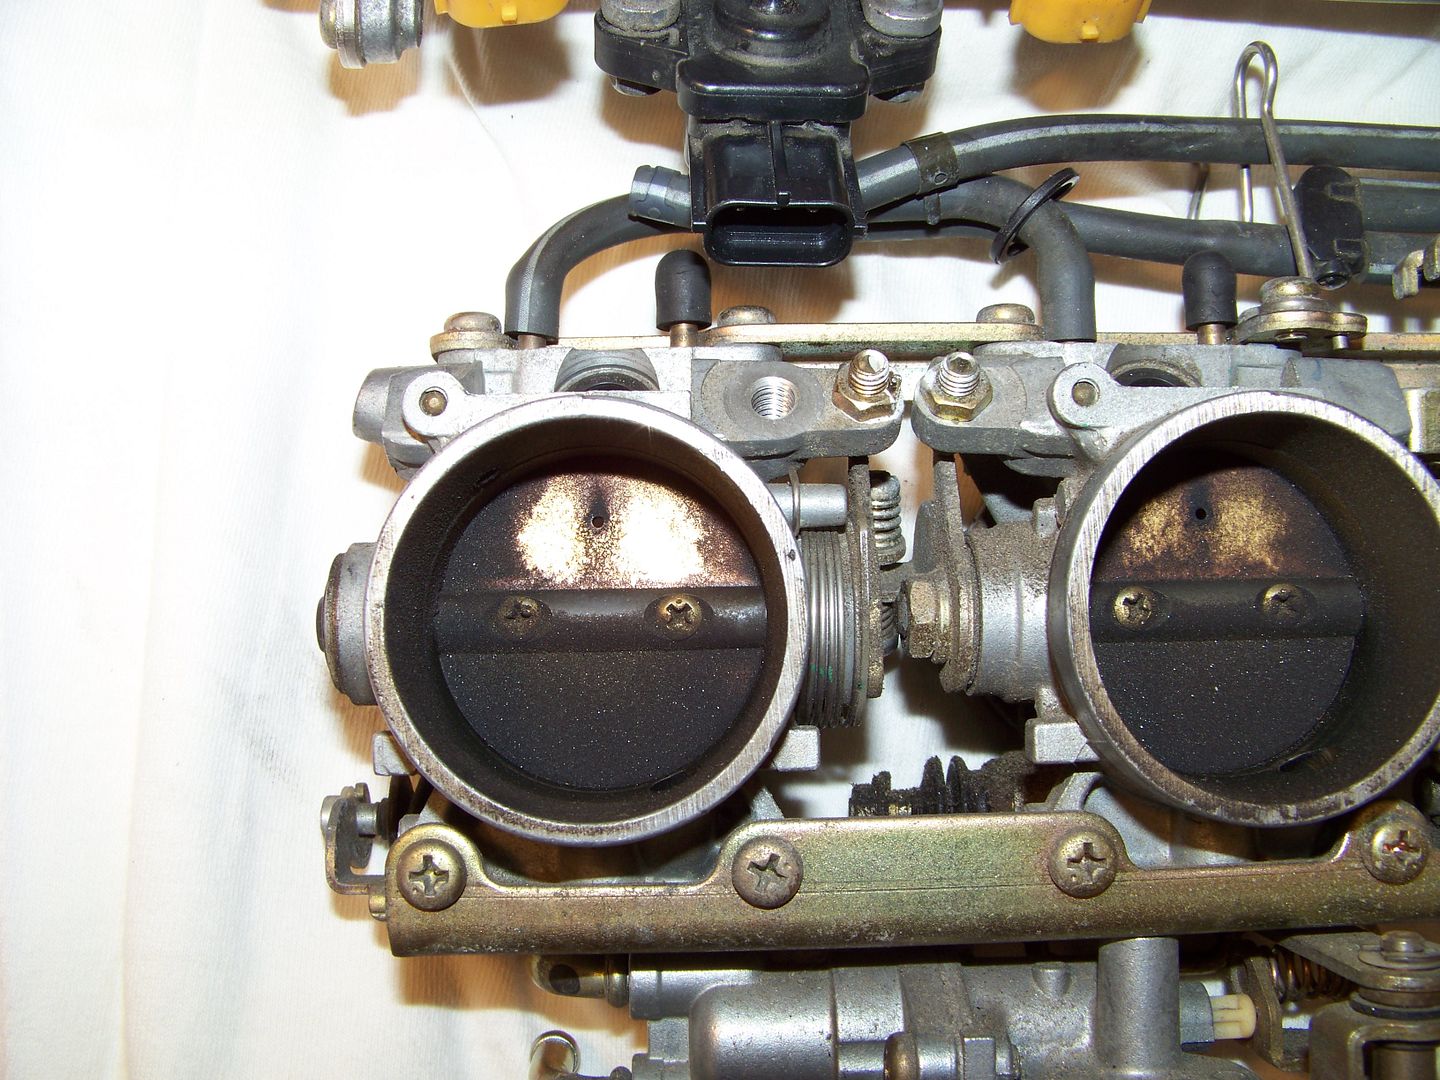
But looking closer at those butterflies was downright scary. Inlet side is caked with spooge and fine dirt:

100_4470.jpg


100_4471.jpg


100_4472.jpg


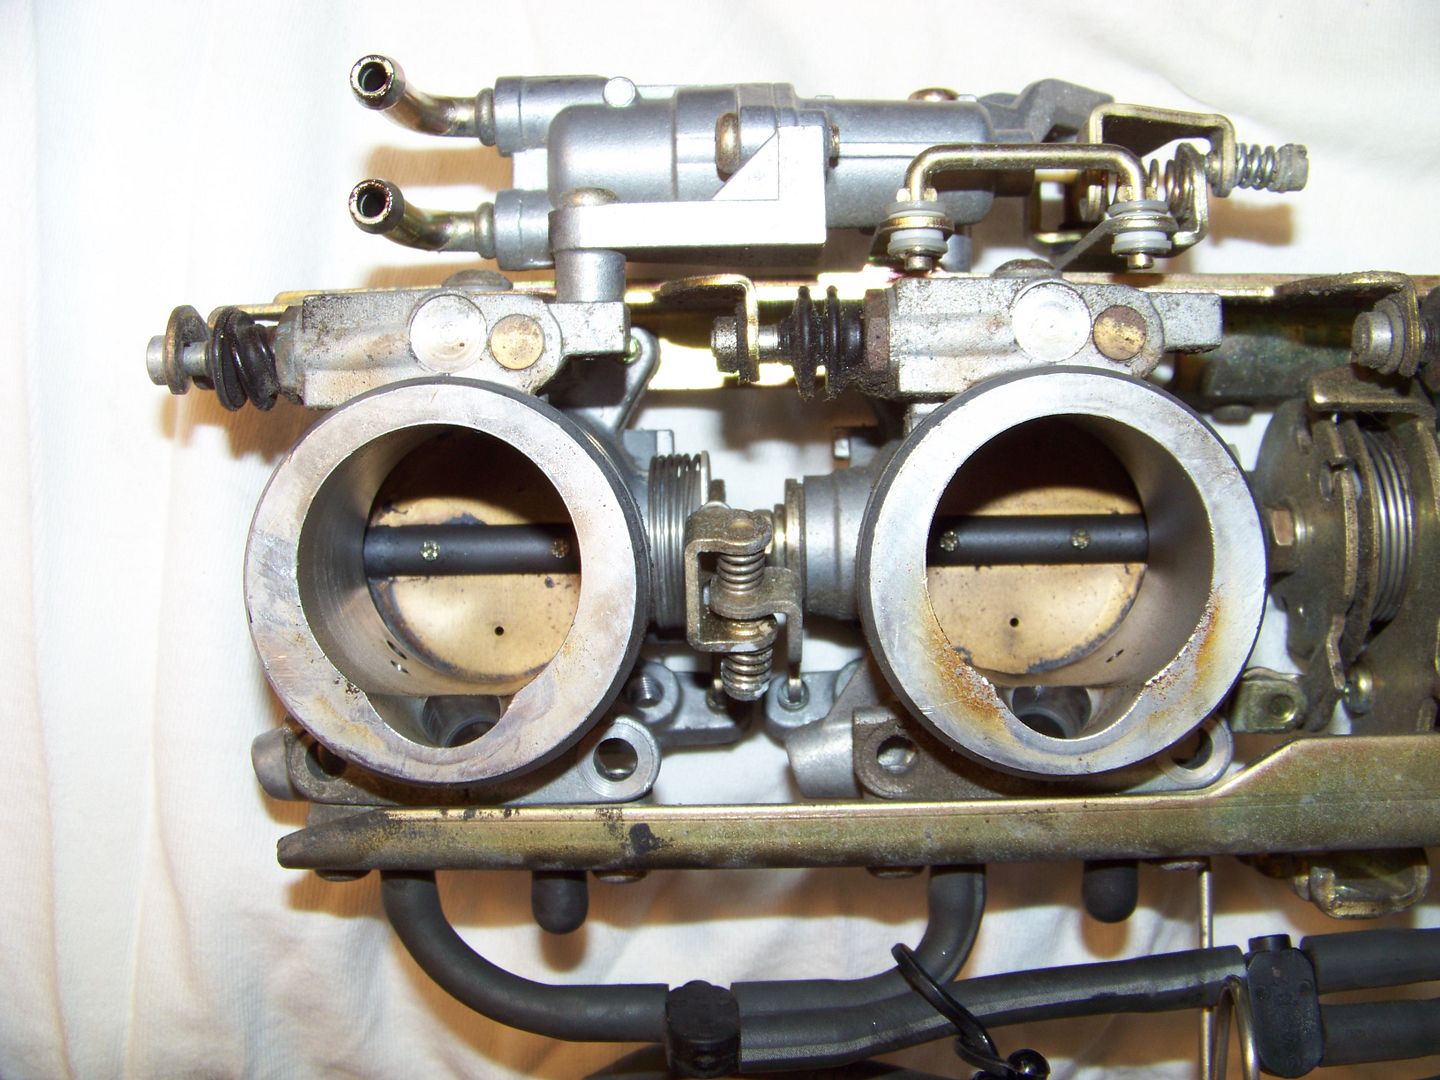
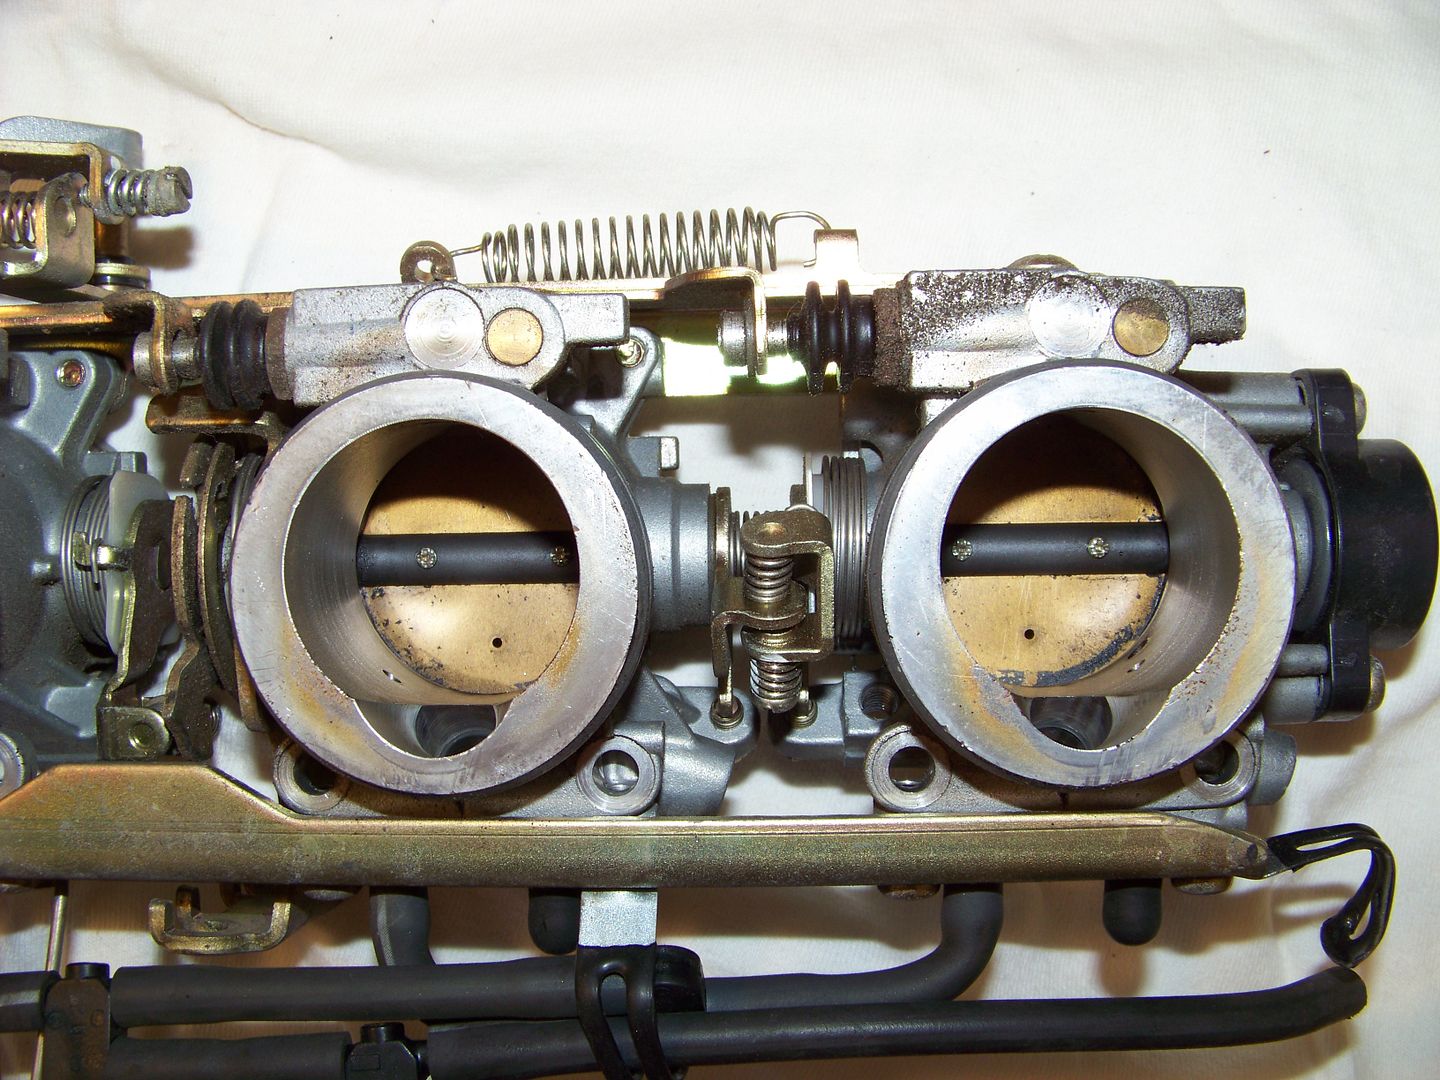
The engine side of the throttle plates did look a lot better, but the throttle bores themselves had a well developed crust all around the periphery.

100_4473.jpg


100_4474.jpg


As a point of reference, it took me only a little over an hour to get the bike stripped down this far and yank the bodies out, and that was slightly complicated by having a PCIII installed which doubles the connectors that need to be detached. Not all that daunting. Cleaning things up and putting it back together was a bit more time consuming, but quite easily do-able in a short day.


100_4475.jpg


I did not get pictures of these next observations, and for that I apologize. But I got a bit carried away in my zeal to get this nasty crap outta there and (hopefully) restore my filthy throttles. You can see that the bores in front of the butterflies are considerably larger than the bores behind them. When you open up the throttles (by hand) you'll see that just behind the throttle plates there is a curved flare down from the larger diameter at the rear to the smaller diameter at the engine.

As the plates are cracked open, and for the first 10-15 degrees or so, the upper edge of the plates stays relatively close to that curvilinearly flared surface on the upper side of the bores as the lower edge moves rearward (toward the filter). The entire surface of these flares was well coated with black spooge buildup like the forward side of the throttle plates but without the grit. I believe it was that buildup that was causing my syncing problems lately.

Before anyone jumps in and tells me that it is all my fault because I don't wind the piss outta my bike enough (which I actually do) consider this: These plates are ahead of the fuel injectors in the airstream. This buildup is NOT going to be affected by a heavy throttle hand in the least bit. And, FWIW, before my last valve check I used Seafoam Deep Creep injected from the airbox end, in an attempt to clean the throttle plates without removing the air-box. That effort was clearly futile.

So, what's up with this crap? Folks have speculated about it since the very first first gens were looked at, but nobody has had definitive evidence to say for sure. After today I think I can rectify that. After I thoroughly cleaned the throttles with carb cleaner (went through two big cans) and a soft bristled brush to scrub away the nasty deposits, and since I had the air-box off already, I decided to split the box to clean up the innards (it just has a bunch of Philips head screws holding the two halves together.

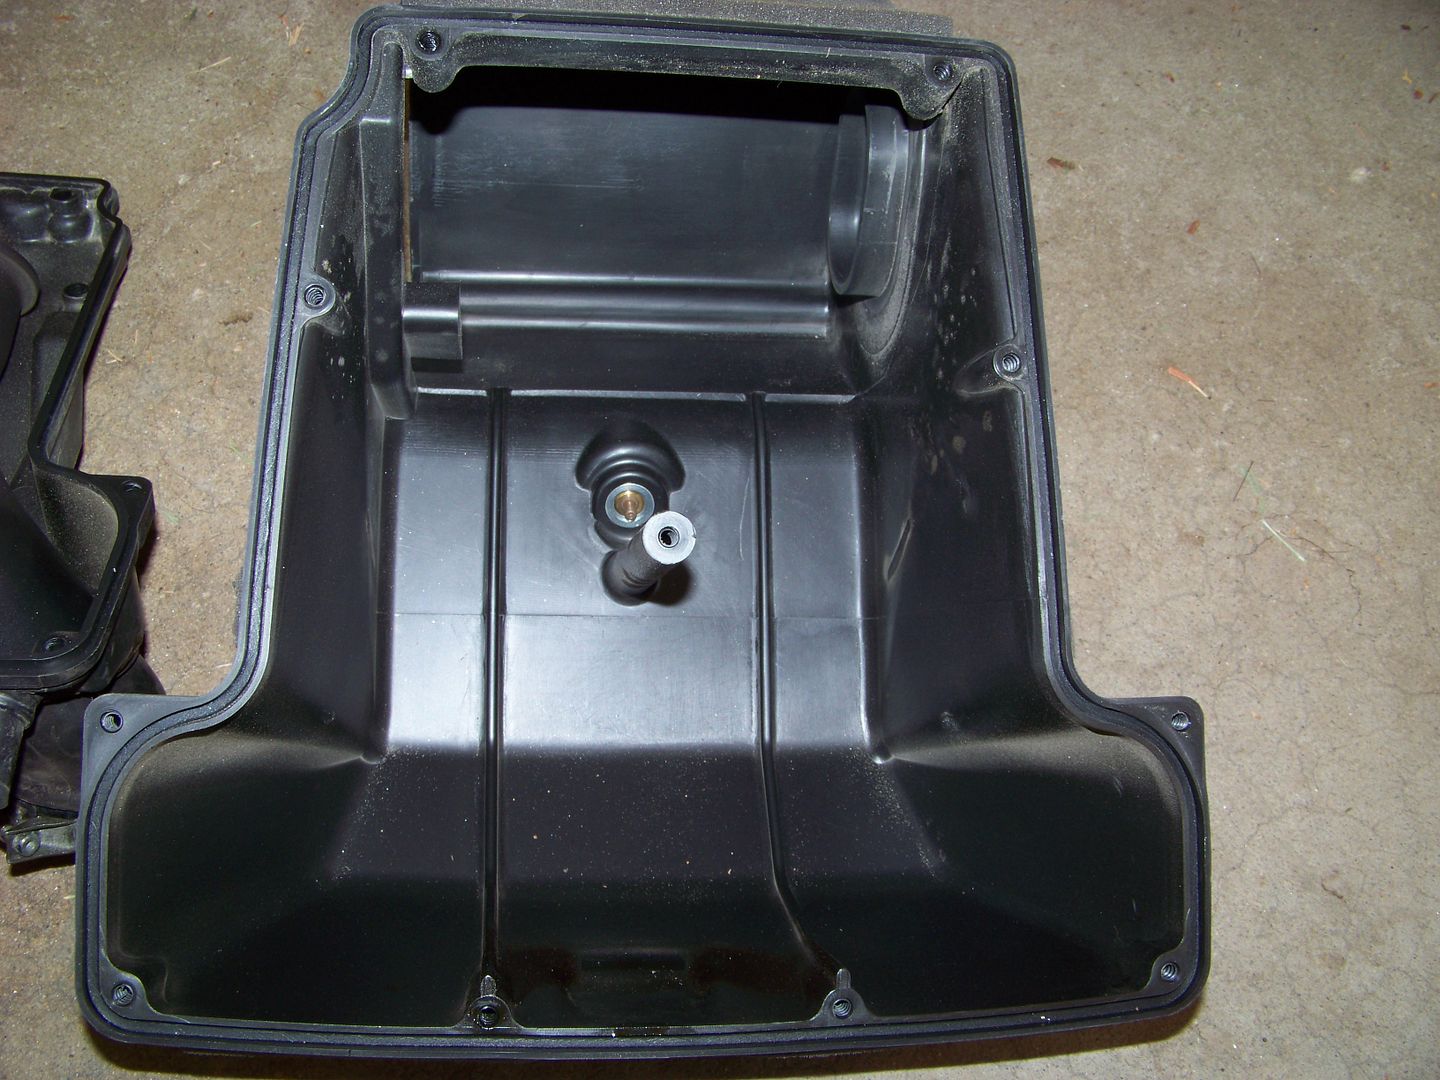
The inside of the upper half didn't look all that bad at first glance... pretty clean and dust free actually.

100_4477.jpg


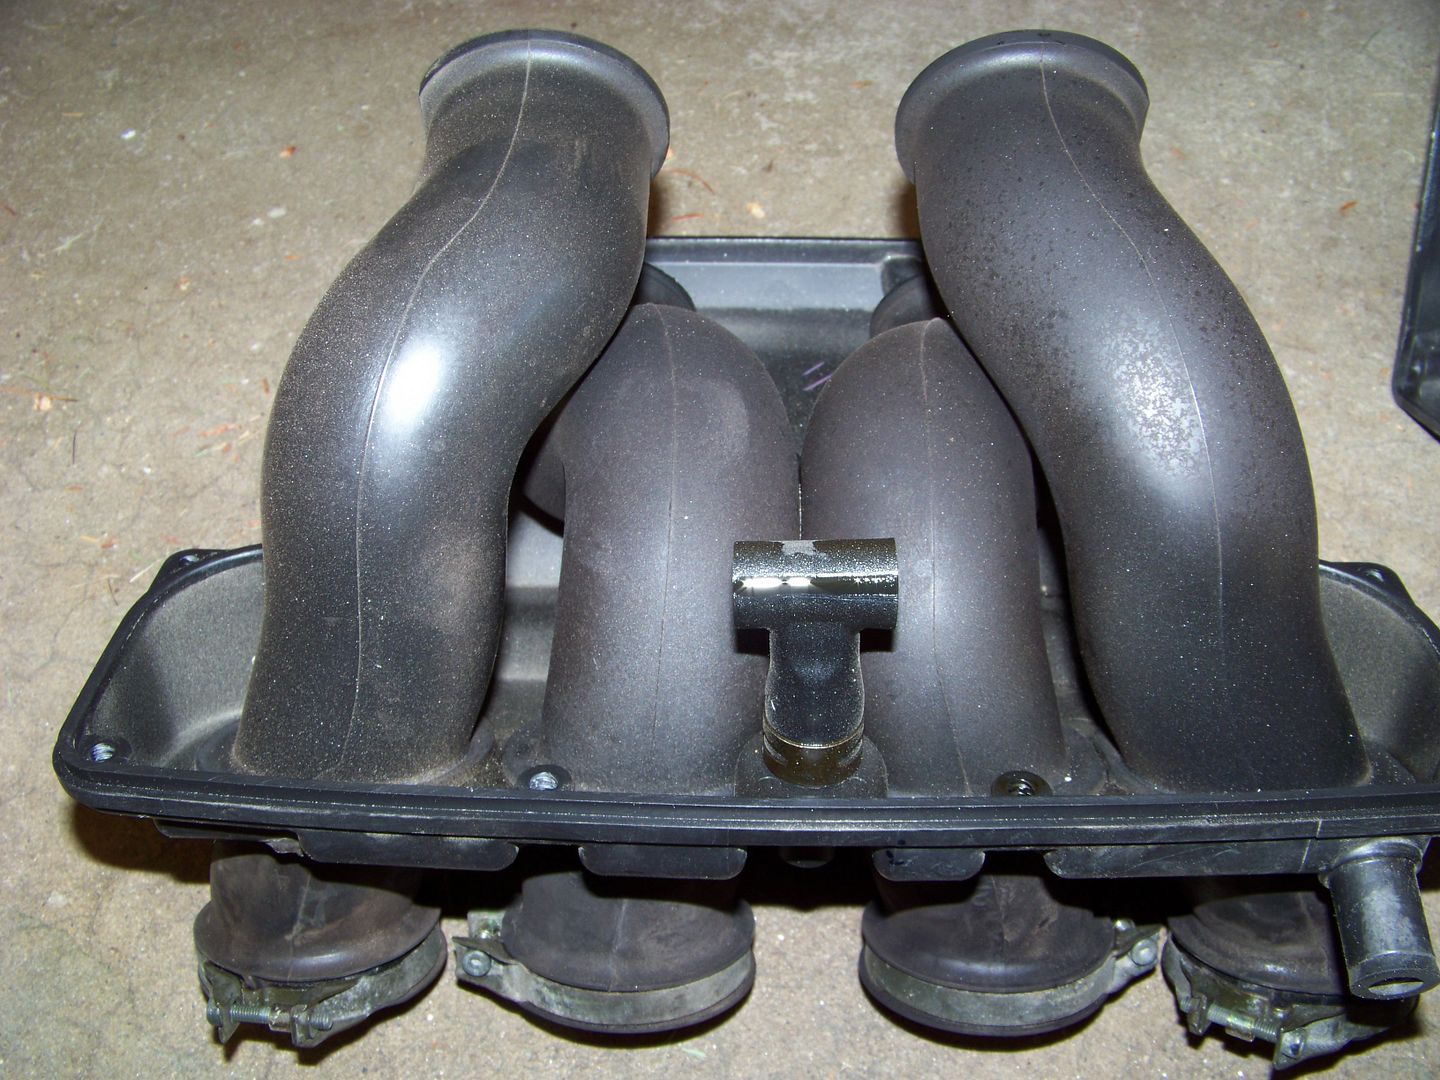
And here's the lower half of the air-box with the four rubber intake snorkels. They had only a very light dust stuck to their surfaces.

100_4476.jpg


But wait! What is that shiny dark stuff on the small tee shaped affair at the bottom of that last photo?

Ah ha! It's oil, that's what it is. And that is the port where the crankcase ventilation pipe (with no PCV valve or anything in line) hooks up coming from the crankcase.


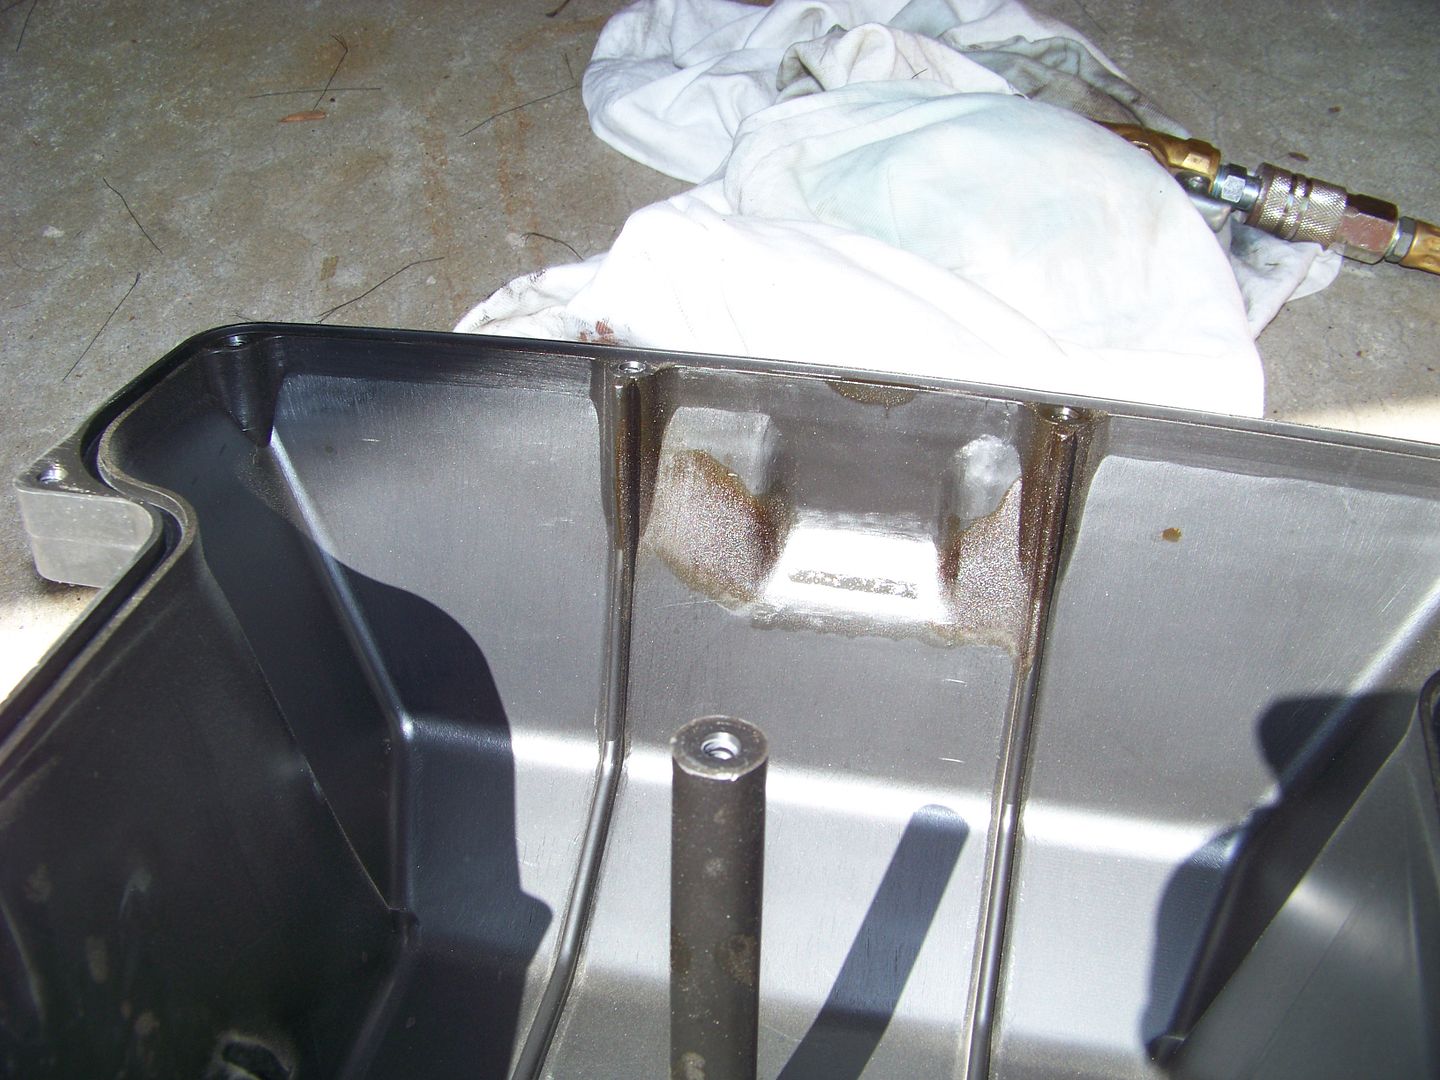
Now, going back to take a closer look at the upper half of the airbox that would be directly behind that crankcase vent tee tells the full story...

100_4478.jpg


Mystery solved, IMO. The free venting crankcase hose vents blow-by gasses and hot oil vapor into the "clean" side of the airbox. That oil vapor wets the throttle plates and any dust that makes it through (or around) the air filter sticks to the oily residue.

Obviously I cleaned everything up well before reassembling, and I just put everything back together as it was (for now anyway). I do like to ride me some dirt roads, and that is probably why my plates looks so gritty. I guess the FJR air filter media is not cut out to handle dusty air intake. Might be something to think about in the future.

Had there not been an oily deposit on the throttle plates none of the spooge would have deposited or built up, necessitating the big disassembly and cleaning. Maybe if we vented the crankcase through a small filter on the way to the air-box we could trap some of the oil vapor, as was suggested above by LAF (above), over three years ago.
wink.png


While having to do this kind of thing every ten years or so is not overly cumbersome, I was well overdue from the looks of things. And, when I got everything back together I was extremely pleased with how well the TBS rebalanced. It required considerable adjustments of the plates (with the air screws closed down per RCDUA procedure) and then after opening the 4 air screws an equal 1/2 turn each and re balancing the balance looked very good as I revved the engine up to ~4k rpm. Very little tweaking from there.

The best part was how the bike felt afterwards on the 1 hour obligatory "Test Ride." Oh my gosh, what a difference!
At 4000 - 4500 rpm there is a complete null in vibration. 4500 is 80 mph (on a 1st gen) so cruising on the interstate is totally joyful again. I'm not kidding, the vibration at 80 mph is so low you'd swear that the engine isn't even running.
lmaosmiley.gif


Last edited by a moderator:
Nice post, Fred. Now I'm going to have to do mine. Unfortunately, I don't have a carb sync tool - always managed to schedule TBS at a NERDS week. (I have only done it twice)

 
Thanks Fred. Very informative.

Are those vacuum hoses nice and flexible after 90K miles?

One wonders if the air screws and their associated flow passages are also crudded significantly? You can see a single small port up high on the side where the screw is located.

Maybe the cold idle bypasses are not too bad. May not be any oily fumes present when the valves are open.

It would seem that oily fumes could be pulled into air induction system since its inlet in the air box is so close to the oily fumes discharge. Maybe oil isn't present when the air induction valve is open.

One wonders if the inlet air temperature sensor in the box is being affected by the oil? It appears to be nice and clean.

#4 valve is particularly dirty. Maybe its air flow path in the box is a bit different.

I wonder if those throttle valves are synced in the factory simply by physical alignment? I'm skeptical they do any kind of flow testing to adjust them.

I'm curious if you removed the starter motor and inspected the internals?

 
Last edited by a moderator:
An interesting observation that in the Gen3 service manual, it states that if you can't sync the TB's, remove them and clean.

It sets out a rather good procedure.

 
Are those vacuum hoses nice and flexible after 90K miles?
Actually, yes. I inspected the hoses and they are fine. There aren't all that many of them, so replacing them would be fairly trivial. But after my sync I did notice that the (still original) vacuum caps are getting a bit loose on the nipples, and will be getting hold of some new ones ASAP.

One wonders if the air screws and their associated flow passages are also crudded significantly? You can see a single small port up high on the side where the screw is located.
Yep, I wondered that too, so while I was cleaning the bodies I inserted the straw from the carb cleaner spray can into the hole in front of each of the butterlies and squirted it watching the flow out the hole behind the valves. If there was any stuff in there, it isn't there any more.
wink.png


Maybe the cold idle bypasses are not too bad. May not be any oily fumes present when the valves are open.
Also sprayed carb cleaner in the Cold Air bypasses and manually exercised the mechanism. When you have the thing in your hand it would be very easy to adjust the cold idle, but I was/am happy with my cold start performance so I left it alone.

It would seem that oily fumes could be pulled into air induction system since its inlet in the air box is so close to the oily fumes discharge. Maybe oil isn't present when the air induction valve is open.
Forgot to mention that I removed my PAIR back at around 30k miles. That path was one of the ones sometimes blamed for the throttle bodies getting spooged up, but mine have been gone for a long time and there was still plenty of spooge.

One wonders if the inlet air temperature sensor in the box is being affected by the oil? It appears to be nice and clean.
Yes, it was nearly pristine at the back end of the air-box. I think all the oil vapors gets sucked into the engine, which I suppose was the intent of the designers. While I'm sure that this is quite green, I don't think that they expected the throttle bodies to get quite so gunked up by it.

I am still contemplating what sort of an inline filter could be inserted in the vent line to trap that oil vapor rather than just letting it **** up the intakes.

#4 valve is particularly dirty. Maybe its air flow path in the box is a bit different.
Yes, I noticed that too, but could not come up with a good reason why that happened. Not sure it matters since, had they all looked as good as #1 I still would have wanted to clean them all up.

I wonder if those throttle valves are synced in the factory simply by physical alignment? I'm skeptical they do any kind of flow testing to adjust them.
One thing that I looked at before I touched anything was how far each of the 4 valves were from the 4 stops. I've never touched those mechanical stops before so they are still a good reference on what the factory believed fully closed is. Before I even removed the throttle body the tangs were very close to the same (very small) gap from those stops, so none of the RDCUA TBS linkage adjusting had skewed the individual valves much from the rest.

I'm curious if you removed the starter motor and inspected the internals?
That, I did not do.

I did look down and saw it there, all bare and exposed with the air-box out, but my starter has never given me the least bit of a problem, knock on wood, so I opted not to mess with it. If this bites me in the ***, it isn't really that hard of a job to pull the airbox out, leaving the TBs in place.

Although the bike is accumulating serious miles, I am not a daily commuter, so I think that may be easier on the starter. Most ride days I will start the bike and then not shut it off for a good long while. The engine seems to spring to life quite easily these days, even when it is fully heat soaked, with less turns than when cold. When stone cold it is fairly consistently firing up on the 4th compression stroke (ruh-ruh-ruh-run). When warm it seems to fire up on the first or second TDC.

 
Last edited by a moderator:
Fred

What are your thoughts on the air screws and associated passages? Did you remove them and squirt stuff through to make sure they weren't gunked up? Did you start with all out 1/2 turn and set everything to #3?

 
Last edited by a moderator:
Is there not a rule against the resurrection of long dead threads?

Other than that this was fairly informative and saved me the trouble of having to drag my Nikon out since I think I may be doing this exact same task in the near future. On my last TBS I ended up with #1 air screw turned all the way in to get the vacuum measurements in sync. I have run a couple of tanks of Ring Free / gas treatment through the bike now and got my hands on a Vacuumate that will allow me to check not just the usual vacuum measurement but also has a dynamic mode that will allow analysis of possible leaks on either the intake or exhaust side.

 
...I am still contemplating what sort of an inline filter could be inserted in the vent line to trap that oil vapor rather than just letting it **** up the intakes.
For not frugal Yankee prices you can get a miniature coalescing filter that should fit in the open space around the starter, but there would have to be some provision to drain it periodically. I have used them when there could be no oil in an air compressor line and they work good.

Is there not a rule against the resurrection of long dead threads...
As long as the the necromancer is dancing with the same spirit as the zombie thread it keeps all the common information together in one place. No point in starting a new thread when there is one already developed with related information.

 
Last edited by a moderator:
what if we just used the straw tube and sprayed cleaner into the tubes from the airbox periodically. I wonder if that would help. It would definitely be a two person job to keep the bike running and get flow.

 
FredWhat are your thoughts on the air screws and associated passages? Did you remove them and squirt stuff through to make sure they weren't gunked up? Did you start with all out 1/2 turn and set everything to #3?
I did not remove the screws. I left them where they were last set, which was between 3/4 and 2 turns open. But I sprayed the carb cleaner through the air passages that they adjust, so I think that did an adequate job of cleaning those passages without removing the air screws.

After cleaning everything up I hooked up my Carbtune gauge and started the bike. The vacuums at idle were then considerably different than they had last been adjusted, ~ 4k miles ago (badly misbalanced). At that point I went through my standard RDCUA TBS Procedure, which entails closing all 4 air screws fully, adjusting the butterfly linkage for even vacuum at idle (made some fairly big adjustments here), then revving the engine and observing any mis-balances at ~ 4k rpm and re-tweaking the linkage to null that out. This part took very minor adjustment.

Then I opened all 4 air screws only 1/2 turn CW and adjusted the idle to 1100 rpm. I chose only 1/2 turn open because I want to keep the bypass air to a minimum so I have to open the throttle plates more at idle. (N.B.: second gens don't work this way, they have bypasses for the idle adjuster too)

From there I adjusted all the ones with higher vacuums down to the lowest one (forget which that was), which means that you be opening the screw for that cylinder a bit more to drop the vacuum. After they were balanced at idle I revved the engine again and everything was still excellent at 4k rpm.

This is how a TBS is supposed to behave. Prior to cleaning the vacuum results were not always so dramatically consistent, and would require a lot more fiddling around to balance at idle and 4k, and then the end results (vibration) wasn't as good either.

what if we just used the straw tube and sprayed cleaner into the tubes from the airbox periodically. I wonder if that would help. It would definitely be a two person job to keep the bike running and get flow.
I had tried doing that before my last valve check, and that was using the really long flexible straw that comes with the Seafoam Deep Creep (spray). I think the reason that it doesn't work well is because the rubber snorkles for each cylinder (inside the airbox) bend so much on the way to the throttle bores. To get the butterflies clean will require you pull the airbox. And by the time you've got that far, it isn't much further to yank the throttle out and do a thorough job of it.

I probably should have taken some "after" pictures to show how well they cleaned up. Short of hitting them with a soda blaster (like in Howie's link earlier in this thread) I think using a lot of carb cleaner spray and a soft bristled brush is the way to go.

One last note for anyone that decides to take this on. When you get done blasting everything with the carb cleaner you'll want to drip a little lubricant of some kind on the linkage pivots. You will have flushed out any stuff that was lubricating those pivot points previously and the throttle may feel a bit stiffer or sluggish to close afterwards if you don't lube them again. Plus those plane bushings will wear faster if left dry.

I used some Dupont Teflon lube spray as it sprays on thin (to penetrate) and then dries to a thin waxy film that will lubricate without attracting more dirt. It's the same stuff I use on my drivechains on my other bikes and they see a lot of dusty conditions and the lube never attracts any dirt accumulation there.

 
...One last note for anyone that decides to take this on. When you get done blasting everything with the carb cleaner you'll want to drip a little lubricant of some kind on the linkage pivots. You will have flushed out any stuff that was lubricating those pivot points previously and the throttle may feel a bit stiffer or sluggish to close afterwards if you don't lube them again. Plus those plane bushings will wear faster if left dry...
If your theory is correct about the crank case breather misting the plates with oil, the pivots and bearings should be self lubing ;)

 
Is there not a rule against the resurrection of long dead threads...
As long as the the necromancer is dancing with the same spirit as the zombie thread it keeps all the common information together in one place. No point in starting a new thread when there is one already developed with related information.
The only reason I asked the question is that I have witnessed others being taken to task for performing the same stunt. I was just wondering if different rules are being applied.

 
...One last note for anyone that decides to take this on. When you get done blasting everything with the carb cleaner you'll want to drip a little lubricant of some kind on the linkage pivots. You will have flushed out any stuff that was lubricating those pivot points previously and the throttle may feel a bit stiffer or sluggish to close afterwards if you don't lube them again. Plus those plane bushings will wear faster if left dry...
If your theory is correct about the crank case breather misting the plates with oil, the pivots and bearings should be self lubing
wink.png
Yabbut, unfortunately the throttle bores are under a negative pressure, so air will want to be drawn inwards from the outside. Any oil mist would have to migrate into those pivots counter to the vacuum flow. Otherwise I agree they would self lubricate in no time.
Yabbut, bless the gods of capillary action.

 
The only reason I asked the question is that I have witnessed others being taken to task for performing the same stunt. I was just wondering if different rules are being applied.
Which stunt was that, Billy?

Was it the part where I posted up some totally on-topic additional and current technical information to an old technical information thread?
unsure.png


Last edited by a moderator:
Top