Dealership Gorilla Overtightened Gas Tank Bolts

Yamaha FJR Motorcycle Forum

Help Support Yamaha FJR Motorcycle Forum:

This site may earn a commission from merchant affiliate links, including eBay, Amazon, and others.

Breathless

Active member
Joined
Sep 24, 2006
Messages
25
Reaction score
0
Location
Auburn Hills, MI
Last autumn I had my '06 in the dealership for the grounding recall. That required removal of the gas tank. When I attempted last week to remove the gas tank for install of aux wiring, one of the pretty allen drive button-head bolts at the tank front was frozen. It's supposed to be tightened to 10 neuton-meters (about 7-1/2 ft-lbs) and I believe antiseize should've been used - it was not. I applied penetrating oil and a hammer-whack three times daily for three days. Then I attempted removal again. With two people, one ensuring the drive didn't migrate up out of the allen socket and the other turning the torque wrench (I used that 'cause I was curious how tight the bolt was), we turned it. At twenty some-odd ft-lbs the drive stripped out the bolt head. ****! I'm not a big fan of HeliCoils and they don't even exist in this bolt size. What to do?

The answer turned out to be pretty simple. Maybe I'm just ignorant, but on the off chance y'all don't know about this I'll share it. A neighbor put me in touch with a welder friend. Using stainless steel welding rod, he welded a steel rod to the bolt head. Before trying to turn the steel rod and while the bolt was still hot he applied some beeswax, allowing it to melt down into the threads. Voila, out comes the bolt with no thread damage resulting.

I don't recall seeing anything in the shop manual about using antiseize where SS bolts go into aluminum (both of which oxidize which leads to galling) so maybe I am mistaken about it. Comments?

 
You are correct about the 10 Nm torque spec. But the manual doesn't show any antisieze being called for on the bolts.

That said, the M6 Allen head cap screws used there do have a great propensity for stripping out. The best thing that you could do is to go buy yourself some nice replacement stainless steel 6mm screws (bolts really) with 10 mm hex heads. Just as were always supplied on 1st gens. No more worries. ;)

 
Fred is right, the manual does not call for anti-sieze here, but, I've buggered enough threads in my life that anytime I have a bolt into aluminum, anti-sieze is used. In the case of bolt into steel or iron I always put a light coat of grease on the threads. As a warning, when doing the anti-sieze thing, stay on the low side of the recommended torques,i.e. if it call for 10 to 15 in lbs., shoot for the 10 in lb. figure. Anti-sieze does act as a lubricant, and by using it you are removing friction the the torque equation.

 
Fred is right, the manual does not call for anti-sieze here, but, I've buggered enough threads in my life that anytime I have a bolt into aluminum, anti-sieze is used. In the case of bolt into steel or iron I always put a light coat of grease on the threads. As a warning, when doing the anti-sieze thing, stay on the low side of the recommended torques,i.e. if it call for 10 to 15 in lbs., shoot for the 10 in lb. figure. Anti-sieze does act as a lubricant, and by using it you are removing friction the the torque equation.
+1 - when you start using antisieze where none has been specified, the torque spec goes out the window. You'll go from stripping the fasteners' heads to stripping out the threads in the frame.

I've had the tank off of my '05 more times than I can even count, but I can easily recall the number of times I've used a torque wrench on those tank bolts.

That would be zero. ;)

 
Last edited by a moderator:
Had the same issue/problem with the dealership doing spider recall/fix. They did a bang-up job in my case. Both bolts were 'screwed'--one was cross threaded and the other was over-torqued. After rounding out the hex trying to remove the over-torqued bolt I found a "Bolt Grip Bolt Extractor" tool set at Lowes that did a great job. The tool is made to fit over the bolt head but slightly smaller. The inside of the tool has reverse-spiraled sharp ridges made to bite into the edge of the bolt head. I used very light taps with small hammer to ensure the tool had a good bite (the tank bolt metal is pretty soft) then reversed out the bolt. They stripped the threads in the bolt hole on the other bolt so had to use Heli coil--no choice except to tap out larger hole. Didn't want 2 bolt sizes. Since I was at it I Heli-coiled both and replaced with 6mm stainless steel 6mm hex head bolts.

 
Breathless

Forget the torque wrench, that bolt has at least 3 diameters engagement - it will not fall out. Just grasp the L handle of your allen wrench by the small end when giving the final tug to tighten it. A thumb and forefinger is all the torque it needs to do the job.

wink.gif


Brodie

 
Breathless

Forget the torque wrench, that bolt has at least 3 diameters engagement - it will not fall out. Just grasp the L handle of your allen wrench by the small end when giving the final tug to tighten it. A thumb and forefinger is all the torque it needs to do the job.

wink.gif


Brodie
Brodie saved me from stripping those bolts. One of them had slightly mushroomed when I first tried to remove them until switching to a straight tipped hex. Since then, I've followed the "less is better" approach on those 2 since the tank's not going anywhere anyhow, even if one or both loosen up.

I think the suggestion of going to hex-nut heads is the way to go - I'm going to do that the next time I'm at the hardware store and actually remember this item!!

 
I don't recall seeing anything in the shop manual about using antiseize where SS bolts go into aluminum (both of which oxidize which leads to galling) so maybe I am mistaken about it. Comments?
Was the problem caused by seizing/corrosion or by being over torqued? If the latter, why start using anti-seize? It could actually make the outcome worse the next time a dealership monkey works on bike.

 
RoadRunner244 said:
I don't recall seeing anything in the shop manual about using antiseize where SS bolts go into aluminum (both of which oxidize which leads to galling) so maybe I am mistaken about it. Comments?
Was the problem caused by seizing/corrosion or by being over torqued? If the latter, why start using anti-seize? It could actually make the outcome worse the next time a dealership monkey works on bike.
OOPS! Forgot to mention--the helicoil is stainless steel so SS bolt into SS helicoil should resolve oxidizing issue. On the other hand, the SS coil DOES go into aluminum. Not sure if that could be problematic in the future. Anyway, it's done now--time will tell I reckon.

 
Don't even need bolts or screws there. Just two short dowels poking up 1/2" or so. A quick fastener not requiring a wrench would be ideal. Yamaha's lovefest with fine threaded steel bolts into aluminum is counterproductive.

I was burned when installing one of the side case lower steel brackets on my '04. Two fine threaded steel bolts into soft aluminum. I ruined the aluminum threads on one. Didn't want the case falling off. Changed to a coarse thread slightly larger D bolt.

Any smaller D bolt which is routinely removed/installed is a great candidate for a nut driver installation. Twisting on a screwdriver type grip doesn't equate to over-tightening and thread stripping.

 
Thanks Gents for the helpful suggestions and some new info.

In the end it's clear that the bolt simply was overtightened and the heat of welding freed it up as there was no sign of oxidation on threads. Some allen drive cap head bolts in black chrome now hold my tank in place - no antiseize. And I certainly agree that almost torque is needed and neither is a torque wrench. I used a 3/8" palm drive and am sure all will be well.

Thanks again. B)

 
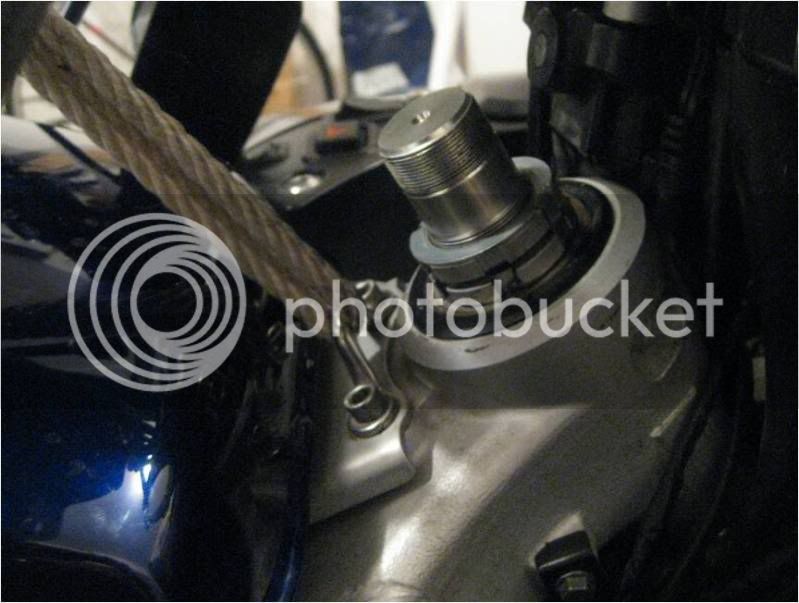
Those bolt are strong. Two are more than enough to support half the weight of your bike.

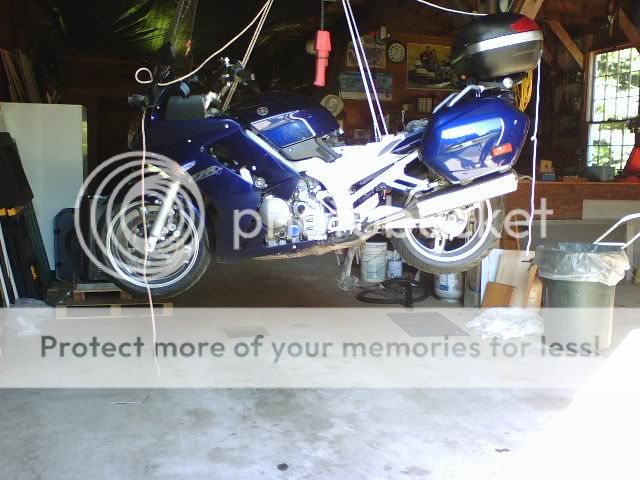
FJR-hoisted.jpg


I added a SS bracket to give me a point to lift the bike with. Attached with two SS SHCS. At leat 3 diameters thread engagement into the frame.

4254a.jpg


Yikes!! Why levitate the bike so high, Russ?

I'd hate to see what would happen if anything were to let go. Never mind being crushed by a 600 lb deadweight. :eek:

 
Fred,

You know I take pride in a clean oil pan. this makes it easier!

Actually I was testing a repair my dad did to his barn hoist. its only a 500 lb rated hoist so he wanted to be sure to over test it ;)

'Deadweight'? Gee, i never insult your bike.....

 
Last edited by a moderator:
Thank goodness that Dad passed the test! Whew! :rolleyes:

And how could I disparage your beautiful bike? :unsure:

Why, it's the spittin' image of me own B3. 'Ceptin I think you may have racked a few more miles than me, what with your cross country gallivanting, and such.

Have ya got around to testing the Harpoon Summer beer yet?

 
Last edited by a moderator:
Yikes!! Why levitate the bike so high, Russ?

I'd hate to see what would happen if anything were to let go. Never mind being crushed by a 600 lb deadweight. :eek:
ayyupp-I pick the FJR up like that and never had a problem-but just in case I set up the ropes so that the front tire and centerstand are kissing the floor..handy for fork and swingarm work.

Yikes!! Why levitate the bike so high, Russ?

I'd hate to see what would happen if anything were to let go. Never mind being crushed by a 600 lb deadweight. :eek:
 
Top