First Foray into Farkling: installing audiovox cruise control

Yamaha FJR Motorcycle Forum

Help Support Yamaha FJR Motorcycle Forum:

This site may earn a commission from merchant affiliate links, including eBay, Amazon, and others.

Leskid

Well-known member
Joined
Jun 20, 2009
Messages
339
Reaction score
2
Location
Montreal
Thanks to numerous forum member comments, I just ordered the uber-cool Scala Q2 multiset on ebay. Yay!

I also used the forums' recommended supplier (Murph clicky) to have the audiovox cruise control and left-side touchpad mounting bracket shipped up here to Canada.

please note: I haven't posted a peep on this, as all the answers ARE in the old posts. (I'm a big kid now!)

About the cruise control: I have spent at least 10-12 hours searching/bookmarking/studying the wealth of information and even the illustrated installation walkthroughs that members have been good enough to share. Thanks to all of you, I'm reasonably confident that I won't be stumped tooooo badly.

One thing though, I googled 'checklist', 'pre-installation list' and any other search values I could think of but no luck.

So I'm not stuck making numerous mid-project trips to the auto parts store or hardware store etc... is there such a thing as a pre-installation shopping list / checklist? Never mind about the vaccum reservoir, that I have figured-out. I'm talking about vacuum check valves, zip ties & those types of little odds & ends.

mine's a gen1, if that makes a difference

 
Last edited by a moderator:
Miscellaneous stuff here. This first part is excerpted from a letter to another AVCC wannabe user ;) She was looking for an installer and was curious what went into the job. This is not a how-to, just a list of parts and processes.Added text color.

I know of several people in the New England area that are looking for an AVCC installer. There was a FJR Forum member (Smitty) that used to travel around doing installs. Even after all his experience it was still a 4-6 hour job. The AVCC isn't a challenging or particularly difficult install but it takes time, and that's the problem. An average person probably can't show up with all the tools and finish a quality install in one day. If you were to travel to the installer, it most likely would require an overnight stay. I've got a pending install with a MA owner at some point, but it works because he lives close enough that I can travel back and forth to his house over a couple of days.

The control pad (if used) needs to be taken apart and waterproofed, then allowed time to cure. While the wiring is fairly simple, there are a lot of runs that take some time to make neat and reliable. There are only a few wiring connections and a bit of vacuum hose plumbing. Depending on the AVCC servo placement and the number of ports being tapped I would guess 6-8 feet of vacuum tubing would be more than enough. It would really help to have on hand a mount for the AVCC control pad, vacuum check valves, vacuum reservoir, vacuum tubing, wiring supplies like taps, spade connectors, shrink sleeving, cable ties and corrugated or asphalt looming. Again, length depends on component placement. More on this later. Parts and brackets drilled, painted and prepped as required. Relay if you want one, perhaps a switch for the relay. I used 3 vacuum tees and two 90° elbows to keep from pinching the vacuum tube at the servo connection and the #1 TB. The gas tank will have to be raised or removed and the right side body panel over the ABS pump may need to come off.

One of the important tasks to have completed in advance is a plan as to where the control pad, vacuum reservoir and servo will be located.

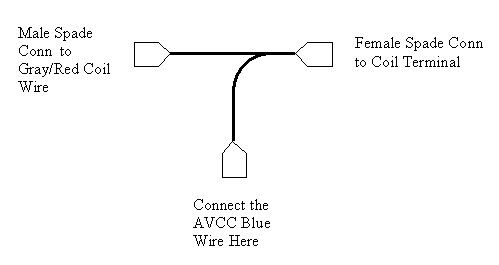
These are some of the things that help me dive into uncharted waters: First, do your homework -- as you have done. Create a battle plan, you know from your research most of the tasks and tools required. Have the documentation you are using, the tools and parts at hand. I often will lay out the parts on a folding table near the work site to organize the parts the way they will be installed. This helps visualize where everything will go and give you the basic run lengths. Prepare any little bits and pieces, such as a wire tap for the coil:

CoilTee.jpg


As previously mentioned, have the control pad sealed and cured. Set the dip switches on the servo and have the wire feed-thru end cap attached. Prep your FJR by removing or moving parts as you prefer. Strictly a personal preference -- IMO the throttle tab attachment is the most fiddly task so I start there while fresh and still with a positive attitude :) Nothing else matters if you can't get the bead attachment connected to the throttle tab. I used a piece of string to keep the bead chain from disappearing before I was ready to hook it up. I was able to drill my Gen I tab without removing the fuel rail. I used a spring loaded center punch on the idea of this one to locate the drill tip. Trust me, this is the only way to start the drill bit. Good Wife assisted with the throttle. She swears better than I do so she was designated to cuss.

00621.gif


From here it is just a matter of following your plan. I installed my servo on the rear swing arm first, then completed my wire runs from the back of the bike to the front, laying out the runs inside the wire loom. Once the wiring was in place I completed the connections and zip tied it all in place. Next I finished the vacuum plumbing around the TBs and ran it to the servo and tied it all down.

AVCCThrottleBodyConnections.jpg


Against all odds, my install worked first try.

 
Last edited by a moderator:
How's your stockpile of four letter words? Never hurts to have a couple of new ones just in case ...

 
How's your stockpile of four letter words? Never hurts to have a couple of new ones just in case ...
that's another benefit to the forum, as I've learned some doozies out here. Fucktard being my favorite, of course

thanks to radman and ionbeam (especially if I can avoid having to remove the fuel injector rail - that's a HUGE relief).

If anyone else has tips, or more checklist items, they'll be on my xmas card list!
depending on where you put the servo:

under the tank near the engine: heat proof high quality wire loom (see the thread by Useless Pickles who's the expert on that)

in the tool tray: more of the plastic auto store kind...the unit comes with some, but might now be enough for the long runs

1/8" loooonnnnnng drill bit - I found mine at Lowes

6/32 x 1/2" or 5/8" round head bolt - stainless if ya can find it

6/32 nylok (nut) - stainless if ya can find it

to seal the pad - I got gray oxygen sensor safe RTV - most just get the clear

throttle lock to hold the throttle in place where the tang is most strategic

positaps and posiloks wire connectors - check with a NAPA store who now carry it here

used to have to mail order purchase them

Autozone had the fuel filter cannister and the single hose check valves

DO NOT GET THE TWO INTO ONE CHECK VALVES - they are the wrong orientation for our purposes

if you have a harbor freight store nearby or check their website

they sell a whole box of various vac connectors, T's, etc. in all sizes for all size tubing

they also sell a whole box of various hose clamps that came in handy in my situation

my servo and canister is hose clamped to the frame being a Gen I non ABS

 
don't be afraid of removing the injectors. it makes the job a lot easier. just be cautious of the two spacers under the main screws dropping them can cause a lot of frustration. have a digital camera handy. take lots of pictures as you remove things. as simple as it looks placement can be confusing after a couple beers. i would remove all the air injection stuff while your in there. i just removed the covers flipped the reed valve springs over and put them back on then put a cap on the airbox port. i put black tape over the inlet on the caps to check for air leaking in and the tape never showed any leaks. i only took vacuum from one cylinder and have no reservoir and have had no problems in 12,000 miles. instead of running wires forward to tap the coils i would tap at the cpu if you are putting the servo under the seat. i also removed the throttle return cable. which i highly recommend.

 
If anyone else has tips, or more checklist items, they'll be on my xmas card list!
There's not any one step that is particularly difficult, but there is a lot of ground to cover. Give yourself a lot of time, if you've set aside a single evening for the install you're in for trouble. Take breaks when you start to get tired or frustrated, double check everything - especially the voltage on the purple wire.

 
A little magnet on a stick thingy is invaluable when youdrop stuff into the nether regions where no human hand was ever intended to go.

 
electrical

taps & spade connectors,

positaps and posiloks wire connectors - check with a NAPA store who now carry it here

shrink sleeving,

cable ties / zip ties

corrugated wire looming

vacuum pieces / canister

Filter Napa 33028 (Wix 3028) for vac reservoir

Check valve 214-479 Delco (single hose check valves)

DO NOT GET THE TWO INTO ONE CHECK VALVES - they are the wrong orientation for our purposes

6-8' of vacuum tubing

3 vacuum tees

two 90° elbows

HW

loctite

4mm drill bit

1/8" loooonnnnnng drill bit - I found mine at Lowes

6/32 x 1/2" or 5/8" round head bolt - stainless if ya can find it

6/32 nylok (nut) - stainless if ya can find it (qty of 3)

misc:

magnet on a stick thingy / duct tape (cute) tks peperell & spud

masking tape (scratch protection)

shop manual

camera / batteries / cable for laptop

Beer. Lots of beer

As per V65 Give yourself a lot of time.

I plan to make it part of my daughter's vacation visit to grandma & grandpa so I'm giving myself 2 full days in my dads' garage, if necessary (noooo stress). But they live in the styx so a round trip to the store is an hour. Hence my post for a preflight checklist. And holy crap, am I ever glad I did. so thanks to all

As per just roy don't be afraid of removing the injectors.

I'm afraid of that because of the one guy's illustrated post, who said you need an impact driver to get out the super-tight screws that secure the rail.... this could be a show-stopper at the onset of this project if I f**k those up

i only took vacuum from one cylinder and have no reservoir....... i also removed the throttle return cable. which i highly recommend.

yup. I can see how that much less friction would be a good thing and may also explain why you've had success with only 1 vacuum line / no reservoir. I you ever find yourself with a malfunctioning return spring, well, that's why god created the kill switch. Jury's still out on that whole subject... yours sounds like a much easier install (which is a very good thing), although some of the battling teckies were tossing some pretty compelling arguments back & forth (that only confused the hell out of me) in the many posts I read, even as to the qty / placement of lines EG: 1 line, 4 lines, MAP sensor or throttle bodies etc...

ALL those guys (and all of you) know infinitely more about it than me so wtf do I do..... The vast majority of my riding is up north in the twisties or tooling-around in town. The cruise control is a license protection measure for droning long-hauls on the slab.. so maybe the quick & dirty install would suffice?

OTOH, if I'm already going through this whole long process, doing it more thoroughly isn't going to add much time to the overall project.

My admittedly unqualified opinion is that no one is actually wrong on this subject. Just differing opinions.

I can't thank all of you enough. Cheers! (and wish me luck)

 
don't be afraid of removing the injectors...i only took vacuum from one cylinder and have no reservoir and have had no problems...instead of running wires forward to tap the coils i would tap at the cpu...i also removed the throttle return cable. which i highly recommend.
A little magnet on a stick thingy is invaluable when youdrop stuff into the nether regions where no human hand was ever intended to go.
There are a few small difference between Gen I and Gen II. If Leskid has an impact wrench removing the fuel rail is an option.

I tapped 4 ports, then later tapped one port, always with a reservoir. For me, 4 ports good, 1 port not as good. Easy check, with the cruise set and engaged try to gently turn the throttle against the AVCC. Couldn't do with 4 ports, fairly easy with 1 port. With 1 port the cruise is slower to set speed and sags on hills (for me, in New England, perhaps it would be fine in FL). The next time the tank is up I'm going to add one more port and see how it works. It's easy to change the number of ports, try the number you want and change it if you don't like the results.

I used a tee to tap at the coil to keep from damaging the insulation on an important wire. A very short wire run at the ECU has some advantages, especially on a Gen II.

Unhooking the throttle return has a very bad risk/reward ratio IMO.

Hi Pepperell! I was through your town both Sat & Sun. I have a set of little magnets that go in a socket to hold bolts or nuts in place. I use these with a long piece of #14 Romex to make long, formable fishes for dropped hardware.

 
about your diagrams, I have 3 remaining questions:

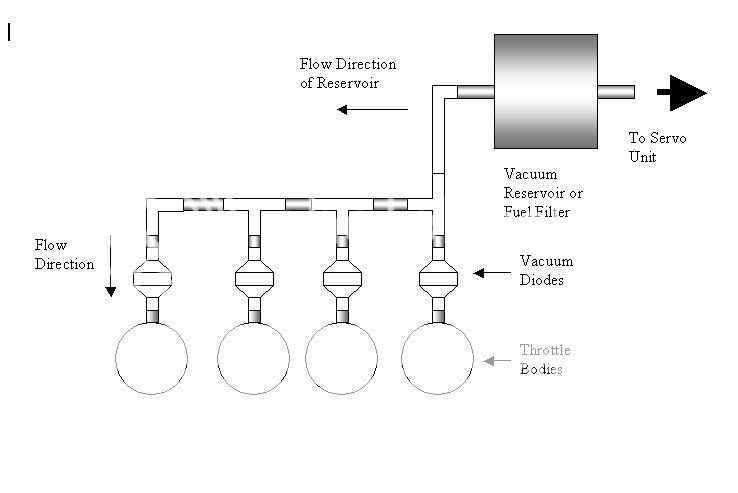
1) what are vacuum diodes? Are they already there? Way I thought I understood it, I'd plumb some lines onto the little holes on top of the TBs and from there, it's a matter of Ts and 90° elbows to run it all up to the reservoir.

2) About the reservoir, I are there any valves of any type of is it just a flow-through deal to the actuator?

3) And the biggest (scariest) question mark I have still is tapping into the coil wire, since everyone says not to touch the insulation on it. You show how to make the little connector thingy. But I've seen no pictures or any other explanation as to where & how that fits-in at either the coil or the ECU. Is there somewhere obvious that I can just slip that onto? Will I just see where it fits when I have the hood-open?

aside from taking the fairing off to go to the track, I've never even seen the FJR's innards.....

 
As per just roy don't be afraid of removing the injectors.I'm afraid of that because of the one guy's illustrated post, who said you need an impact driver to get out the super-tight screws that secure the rail.... this could be a show-stopper at the onset of this project if I f**k those up
If you have access to a impact driver/drill this becomes no sweat issue.

 
about your diagrams, I have 3 remaining questions:

1) what are vacuum diodes? Are they already there? Way I thought I understood it, I'd plumb some lines onto the little holes on top of the TBs and from there, it's a matter of Ts and 90° elbows to run it all up to the reservoir.

2) About the reservoir, I are there any valves of any type of is it just a flow-through deal to the actuator?

3) And the biggest (scariest) question mark I have still is tapping into the coil wire, since everyone says not to touch the insulation on it. You show how to make the little connector thingy. But I've seen no pictures or any other explanation as to where & how that fits-in at either the coil or the ECU. Is there somewhere obvious that I can just slip that onto? Will I just see where it fits when I have the hood-open?

aside from taking the fairing off to go to the track, I've never even seen the FJR's innards.....
well, let me take a shot

a diode is a one way valve in an electrical circuit...vac diodes are the check valves

the reservoir or canister for me is a flow throw fuel filter and nothing else

and tapping into the coil wire - I would just used a positap right into the wire; no fuss, no muss, and easily removed later

others have acutally strip the wire a bit and actually soldered to it covering the joint with heat shrink

 
As per just roy don't be afraid of removing the injectors.I'm afraid of that because of the one guy's illustrated post, who said you need an impact driver to get out the super-tight screws that secure the rail.... this could be a show-stopper at the onset of this project if I f**k those up
If you have access to a impact driver/drill this becomes no sweat issue.
with my old old Gen I '04 with 90k+ miles, I was terrified to remove that figuring things were corroded together into one mass

It was easy to centerpunch the tank and drill the tang with the brand new, unused, 1/8" long drill bit. I had the advantage of a throttlemeister throttle lock, so I turned the throttle to make the tang the most accessible and locked it down. There were three of us to assist in the operation, which was a help at times.

 
well, let me take a shota diode is a one way valve in an electrical circuit...vac diodes are the check valves

the reservoir or canister for me is a flow throw fuel filter and nothing else

and tapping into the coil wire - I would just used a positap right into the wire; no fuss, no muss, and easily removed later

others have acutally strip the wire a bit and actually soldered to it covering the joint with heat shrink
since I asked the questions, I already realized about the coil wire and feel 'a little' stupid already

but boy.... about the vacuum 'diodes'...... well if cracker red still refuses to cough-up a pic of his 5'11" blonde wife, I'll just post one of myself (even tho I'm only 5'10")

so like..... tee hee! :crazy:
don't feel bad...I can't even spell "through" and just threw out that throw thingy :blink:

and yes, these electrical types, we mechanical educated just nod when they have a plumbing problem and the water is spurting out and they refer to the pressure as water voltage and the flow as water amperage :rolleyes:

and please, google "Jennifer Anniston" and just post that instead :yahoo:

 
Top