Flashing fuel gage on coworkers bike!

Yamaha FJR Motorcycle Forum

Help Support Yamaha FJR Motorcycle Forum:

This site may earn a commission from merchant affiliate links, including eBay, Amazon, and others.

ULEWZ

Well-known member
Joined
Jun 5, 2011
Messages
465
Reaction score
47
Location
Northridge, CA
I guy at work bought a broken 2006 FJR1300. He could not wait for me to get off of vacation before looking at it. Spent too much for it also as the guy told me what he would take, and jacked up the price $300 before the guy at work went to look at it.

Oh well, back to the issue.

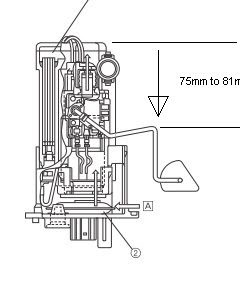
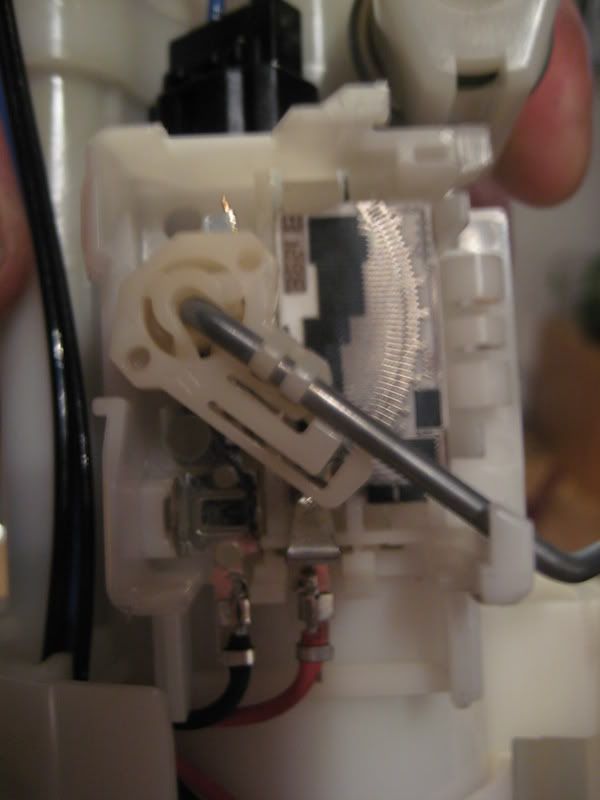
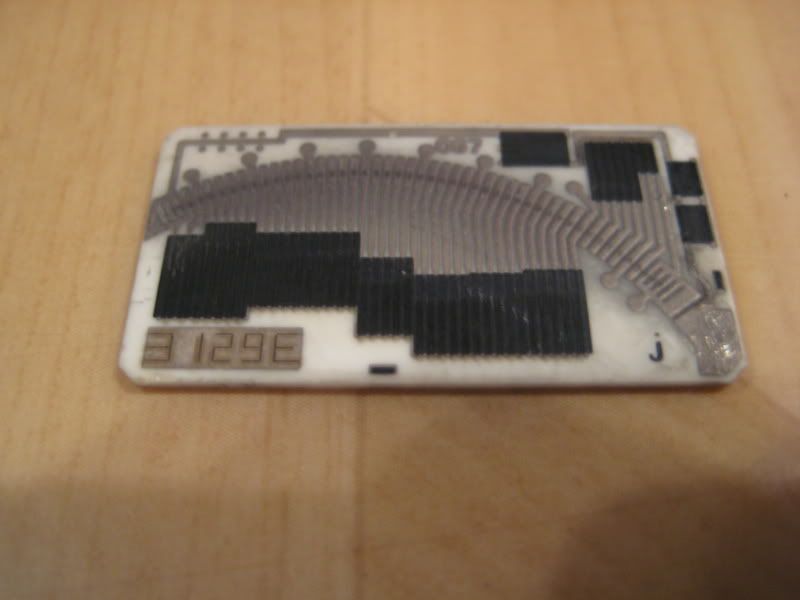
He says the previous owner syphoned some fuel and the fuel gage started to flash. Everything else starts and works. So my question is, what would syphoing fuel have to do with the now flashing fuel gage? Hit the float and bent it? It is $500 for a new sending unit! Ouch. Just asking as I feel inclined to help the poor gentlemen out.

He filled it up with fuel, and still is flashing, so it is not a low fuel problem.

Any ideas? Did a search, but nothing recent (the ignition recall and spyder recall have been done).

 
I'd say that he bent the float arm contact away from the circuit board, would be very easy to fix.

It's real easy to remove the fuel pump.

Just be careful removing it as it's a bit of a tight squeeze.

Just a good excuse to clean out the tank, it's amazing what's in there.

 
Last edited by a moderator:
I'd say that he bent the float arm contact away from the circuit board, would be very easy to fix.

It's real easy to remove the fuel pump.

Just be careful removing it as it's a bit of a tight squeeze.

Just a good excuse to clean out the tank, it's amazing what's in there.
Just bend it back, or is soldering in a fuel environment needed?

 
The circuit board and the contact of the float arm is totally exposed to the fuel.

It does take a bit of pressure to bend the float arm, I adjusted the float for a better fuel level indication.

The only way is to remove the pump and ensure the contact on the float arm sweeps the contacts on the circuit board.

I suppose you could even test it when it's removed, hook up the corresponding plug, and turn on the ignition.

Make sure it has continuity in all it's travel.

I actually bent my arm down 6mm and now have a real accurate gauge.

The circuit board is adjacent to the pivot point of the float arm.

fuel+sender.jpg


Last edited by a moderator:
When you say flashing what exactly do you mean? How many bars are showing? What does the odometer indicate? Has fuel been added to the tank? If so, how many miles have been ridden? Has he/you tried pushing the left pushbutton to see what happens?

IMHO you prolly do not need to mess with the float. You need to apply the KISS method- start by reading the instructions, the owners manual. If one didn't come with the bike, it can be read online here. You may very well find what you are seeing to be perfectly normal.

 
All bars flashing means an open or short circuit in the sender, often caused if the connector under the tank isn't connected properly. If the tank hasn't been lifted and that connector disturbed, it does sound like damage to the sender unit.

[edit] quote from the workshop manual:

gaugeflash.jpg


[/edit]

 
Last edited by a moderator:
All bars flashing means an open or short circuit in the sender, often caused if the connector under the tank isn't connected properly. If the tank hasn't been lifted and that connector disturbed, it does sound like damage to the sender unit.
[edit] quote from the workshop manual:

gaugeflash.jpg


[/edit]
Yep, but I still think the KISS method should be applied. If needed, lift the tank, check the connections. Get the meter out and check the wiring. There's lots to do IMHO before dicking with a $500 piece of electronic equipment. Including the simple question: is it one bar flashing (normal low fuel) or all bars? Also -the OP says a "broken 2006..." was purchased. Broken how?

 
All bars flashing means an open or short circuit in the sender, often caused if the connector under the tank isn't connected properly. If the tank hasn't been lifted and that connector disturbed, it does sound like damage to the sender unit.

[edit] quote from the workshop manual:

gaugeflash.jpg


[/edit]
Yep, but I still think the KISS method should be applied. If needed, lift the tank, check the connections. Get the meter out and check the wiring. There's lots to do IMHO before dicking with a $500 piece of electronic equipment. Including the simple question: is it one bar flashing (normal low fuel) or all bars? Also -the OP says a "broken 2006..." was purchased. Broken how?
I agree with you.

The OP does say it's still flashing after putting fuel in, so either it's the low fuel indication, in which case the sender's been bent and stuck, or it's all bars flashing, usually an open circuit, that if not the connector is very likely to be the sender damaged by the syphoning tube.

 
All bars flashing according to the owner. I have not seen the bike yet as it is currently at the shop getting the ECU recall done. The first thing I will check is the connections under the tank. Then an ohms check, then the removal of the sending unit. I appreciate the comments, no matter how simple.

 
All bars flashing according to the owner. I have not seen the bike yet as it is currently at the shop getting the ECU recall done. The first thing I will check is the connections under the tank. Then an ohms check, then the removal of the sending unit. I appreciate the comments, no matter how simple.
You are on the right track. Hope it is not beyond repair, they are pricey.

 
What's in the tank? Here is the fuel gauge:

The metal arm on the right side is the float arm. The semi circle with the red and black wires at the bottom is the resistor board that produces the varying voltage that the ECU converts into a fuel level.

IMG_0191.jpg


This is the sending unit (resistor board). The float arm has a wiper that must contact the little silver conductors. As the float drops with the fuel level the wiper moves down the resistor network. The red and black wires have to be attached (DOH) and the board can have ZERO damage, such as scratches. The fuel pump is an assembly, the fuel sending unit can't be purchased separately. If you can find a complete pump assembly that is bad you can salvage the fuel sending assembly and transplant it.

IMG_0196.jpg


You don't need your glasses or your eyes checked, the pictures are in fact blurry.

 
Last edited by a moderator:
So a question comes to mind:

Can the filler cap be removed to access and pop the float arm back on if that is the problem?

 
So a question comes to mind:Can the filler cap be removed to access and pop the float arm back on if that is the problem?
No. That just removes the sealing surface and you're still faced with the small hole you stick the fuel pump into. Unless you're a surgeon with arthroscopic tools and instruments to fit through the gas nozzle hole....removing the tank and fuel pump is going to be the only real option.
Thanks, I was afraid of that.
It is really not difficult to remove the fuel pump, just be careful and take your time so you don't damage anything.

 
I believe the Gen II pump assembly is a little more difficult to pull out than the Gen I, but still not too hard.

 
You don't need your glasses or your eyes checked, the pictures are in fact blurry.
Actually, I'm in need of both right now. These glasses are five years old!

Nice pics though, interesting to see how it all works in there.

 
Top