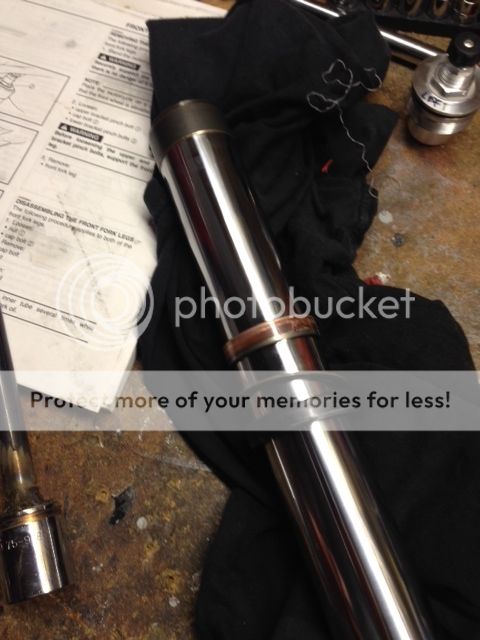
Fork Seal issues. Grrr.... Please help

Yamaha FJR Motorcycle Forum

Help Support Yamaha FJR Motorcycle Forum:

This site may earn a commission from merchant affiliate links, including eBay, Amazon, and others.

bhendron

Well-known member
Joined
Aug 22, 2013
Messages
133
Reaction score
45
Location
Arizona, USA
Hey all. I have a 2004 that had a seal give up the ghost. I've replaced the seals on several other bikes with success. Many of them gave me fits with the ****** damper bolt. The FJR is proving exceptional. The impact wrench method has failed and, of course, I don't have the tool. So, now what? I had this happen with one other bike in the past. I ended-up drilling the head off of the bolt and the replacing it afterward.

So, suggestions? Will the drill the head off method work for the FJR?

Thanks.

 
I don't think you'll have to do any drilling. There's more than one way to get this done and there's a great deal of experience available on this forum. Did you read my report here?

CLICKY

It's packed with pictures and how to's. Concerning the tools you will need, I'm curious as to just how you went about attempting to use an air wrench to release the dampener bolts... what did you do and what happened while you were doing it? Take note of Fred W's recommendation on post #2 in my thread. If that's not how you made your attempt with the air wrench, try it the way he recommended. If the spring pressure indeed prevents the rod assemblies from rotating when you hit the trigger, you'll have your forks apart in no time without using any fancy extra tools.

We'll get cha through this.

Gary

 
Last edited by a moderator:
Before you dig in too deep, have you tried a seal mate? Many have used them and been able to clean out debris from the weeping seal...

Worth a try!

Good luck.

--G

 
Sealmate: This is so true. I never tried it. But I've watched other guys use one (tech day AFTER I finished my own forks)... and listened to many tell how well this works. Funny how hind sight is 20/20. Anyway, after taking my forks off, which I had to do to change the oil, I probably could have put them back on the bike with no further leakage... IF I had used a seal mate. It's nearly impossible for the untrained eye (like mine) to determine if a seal is bad by holding it in your hand and studying it. After tearing my forks apart and looking carefully at my seals with a magnifying glass, I couldn't tell the difference with my new seals. They looked the same. Oddly enough, my bushings, which I was just SURE would need to be replaced at 38k miles, looked fine. And that's with ratty looking oil that had never been changed. I ended up replacing dust seals, oil seals AND bushings. Expensive
upset.gif


One thing I learned: changing fork oil is a piece of cake compared to putting in new seals and bushings. It's also much cheaper. Seals and bushings are pricey: well over 100 bucks. Wish I knew then what I know now. I would have tried the seal mate (or just cut one out of a plastic bottle using pictures provided on this forum). Then I would have driven the bike a bit to see if the seal was working properly once the dirt and/or contaminants were removed. Afterwards, just a simple flush and fill would have done the job and I would have been finished for the price of a quart and a half of fork oil: about 30 bucks.

Hind sight is indeed 20/20.

Gary

darksider #44

 
Put the spring, spacer, nut and cap back on the top of the fork leg and dial in the maximum spring preload when you try to remove the bottom damper bolt. The spring's downward pressure will help keep the cartridge from spinning. You should be able to do it with a regular allen socket, or continue using your impact gun.

 
I replied to the OP's first posted thread. Looks like this one has the most replies, so I'll cross post my reply here:

Put the spring, spacer, nut and cap back on the top of the fork leg and dial in the maximum spring preload when you try to remove the bottom damper bolt. The spring's downward pressure will help keep the cartridge from spinning. You should be able to do it with a regular allen socket, or continue using your impact gun.

 
Last edited by a moderator:
You guys have jinxed me. Found both seals leaking. Bought the seals and bushings for $65 from Ron Ayres. I hope my center bushing comes out easy!!! I will use the medium slide hammer technique and hope they do not get jammed.

 
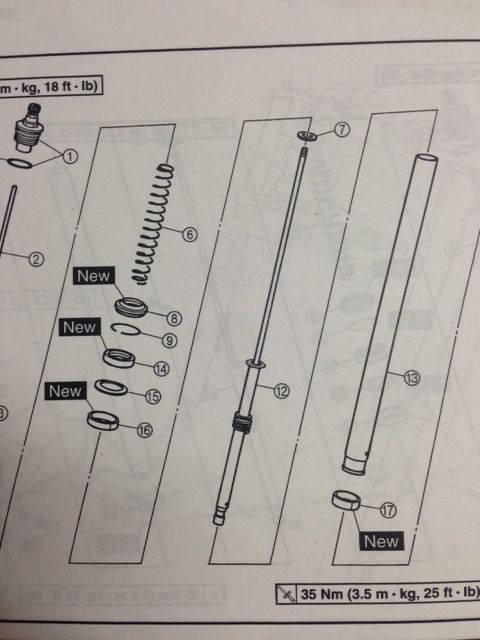
Thank you all for the replies! I'm glad I took some cool-off time to re-group. I'm totally capable of making a damper holding tool. The thing that had me befuddled was that I could not find, despite much desperate searching, a picture or any information on one until this thread. Thank you so much. The other issue was/is that washer #7 in this diagram (below) would not budge and was hiding the part of the assembly that one would actually hold with the tool! I created a hook out of an old coat hanger and after several tries this morning got the washer loose from one of them. Yes! I'll be making my own tool today and will keep you all posted of progress. The spring pressure thing is not going to be sufficient in this case, I'm afraid. I don't know what has the retaining bolts stuck, but they're STUCK!

photo6_zps2e959ec9.jpg


I'll bet the last guy to take those forks apart put locktite on these bolts. That is the only way I could see you not being able to undo it under spring tension.

When you reassemble it, make sure that you seat that washer back on the top of the cartridge before you re-insert the cartridge. You should be able to torque the bottom bolt up to spec without holding it from above with the home made tool. In the worst case just put the spring back in to hold it while tightening. Getting that washer to seat down inside the fork tube is a *****.

FWIW, when I re-built my forks, I left out those #7 washers as I was using some aftermarket springs from GP that are a near constant diameter (not tapered at the ends like the stock springs) and have added flanges / seats at the lower end to make the spring fit on the "step" on the top of the cartridge where the washer does above. This is how the 2nd gen forks come from the factory, so most aftermarket FJR springs are also made to be installed this way.

It keeps the spring centered at the bottom end, and then you just need something to do the same thing at the top of the spring. Point is, then you can just pull the spring out and use your holder tool on that hex.

 
Last edited by a moderator:
Thanks for all the help, Fred! One down...

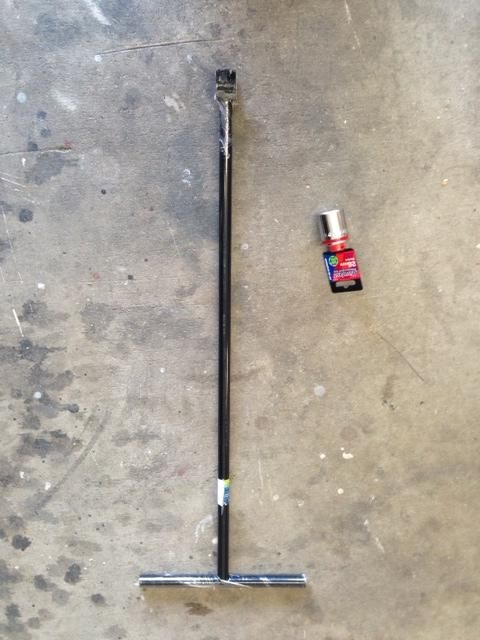
Here the beginnings of my tool:

photo15_zpse1d5b93b.jpg


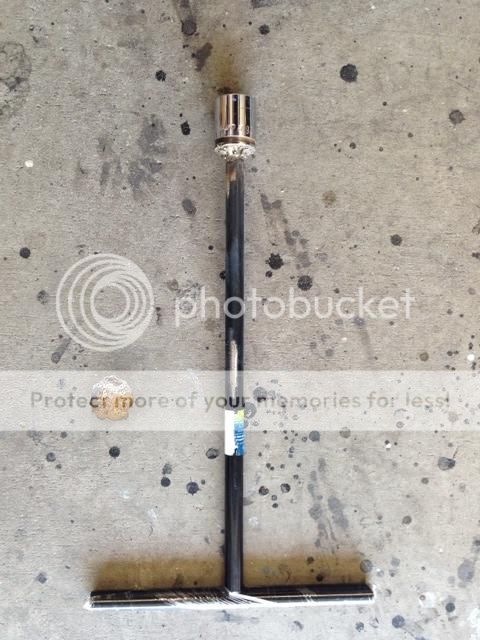
I just happened on that t-handle sprinkler tool. It's just about perfect and only a couple of dollars more than the plain steel stock. I cut the end and about a foot of length off of it and welded it to the socket.

photo33_zps569d3887.jpg


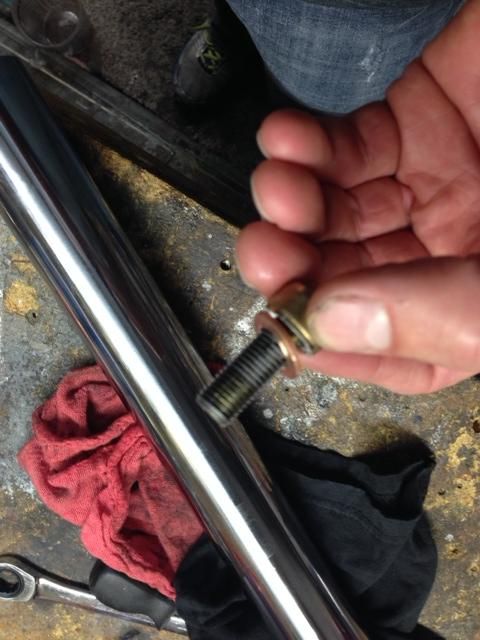
I let it cool for a while, and in seconds, that damn bolt was free:

photo42_zps70d6e537.jpg


And, as you can see, the seal out and the tubes separated. Also note the very worn bushing. I just called the Yamaha dealer and they have four in stock, so I'm heading over to get them now.

7c795ed9-b570-4fd8-8a8f-b9b298923a50_zps59f1c870.jpg


Thanks for all the help, Fred! One down...
Here the beginnings of my tool:

photo15_zpse1d5b93b.jpg


I just happened on that t-handle sprinkler tool. It's just about perfect and only a couple of dollars more than the plain steel stock. I cut the end and about a foot of length off of it and welded it to the socket.

photo33_zps569d3887.jpg


I let it cool for a while, and in seconds, that damn bolt was free:

photo42_zps70d6e537.jpg


And, as you can see, the seal out and the tubes separated. Also note the very worn bushing. I just called the Yamaha dealer and they have four in stock, so I'm heading over to get them now.

7c795ed9-b570-4fd8-8a8f-b9b298923a50_zps59f1c870.jpg
Actually, that is the non-friction side of the upper bushing (lower one in the photo) and the wider lower bushing doesn't look too bad from this photo, somewhat uniformly grey colored. The grey coating is a teflon like substance that they coat the sliding side with.

Now that you've got the forks apart I'd change them and the seals anyway, but you can closely inspect those wear surfaces just for your own future reference in accessing how often they'll need to be renewed...

Nice job with the tool. I wish I had welding skills to put stuff like that together on the spur of the moment.

 
Well crap. I got everything put back together and took the bike down off of the stand. I grabbed the front brake and compressed and released the front forks a few times and heard an unsettling noise. I kind of groaning, NOT grinding, groaning sound coming from one of the fork legs.

My first thought was that maybe the new rubber seals were kind of squeaking. I took it for a quick spin, less than two miles to see if I could hear it over bumps and dips and to see if the condition would improve. There was no real noise, except at stops (same condition as testing in the garage) but other bumps and dips, everything seemed ok and normal. Anyway, no dice. It didn't get worse but not better either.

There is no apparent binding. Even during reassembly I pumped the fork tubes many times and I did not detect any binding or uneven resistance. I should also note that while compressing and releasing the forks on the bike, I put my free hand on each fork tube and it feels like it's like the the right side. It had a slight vibration to it.

My first two suspects right now are that washer number 7 above fell off of its' perch during reassembly and the spring and washer are rubbing on the inside of the tube, or possibly trapped air in the system? My plan is to get back in there this evening, but I'd love to hear some of your thoughts.

Thanks again.
upset.gif


Last edited by a moderator:
I would check the alumimum cup at the bottom of both forks. It does not always come out and may not be setting correctly.

 
Never seen a bike with such touchy fork seals. Leaks are frequent and I don't ride in a dirty environment. I now carry a seal mate at all times and a rag to keep the fork tubes clean. Thought about putting boots on the exposed tubes but just never got around to it. Usually I can just wipe off the tubes and do several bounces on the forks while sitting on the bike and that tends to stop the leaks. Just another quirk on this fine machine. I still love my 06 even with issues we've had. Stay alive. PM.

 
My first two suspects right now are that washer number 7 above fell off of its' perch during reassembly and the spring and washer are rubbing on the inside of the tube, or possibly trapped air in the system? My plan is to get back in there this evening, but I'd love to hear some of your thoughts.
I would agree. It is probably a spring concentricity issue, which is not all that uncommon with 1st gens. Are you still using the stock fork springs? Or do you have some aftermarket ones in there? As I mentioned earlier the stock 1st gen ones have the spring coils tapered at each end which helps keep the spring centered on the damper rod so it doesn't rub on the inside of the inner (upper) tube.

But the washer not remaining (or getting fully) seated is a real possibility (see my prior post about deleting it). Easy enough to check, though. Just pull the cap off and the spring and then feel down there with your coat hanger to see if the washer is just sitting loose or properly seated. If it's seated there isn't much risk of knocking it loose unless you are really trying to do that.

Never seen a bike with such touchy fork seals. Leaks are frequent and I don't ride in a dirty environment. I now carry a seal mate at all times and a rag to keep the fork tubes clean. Thought about putting boots on the exposed tubes but just never got around to it. Usually I can just wipe off the tubes and do several bounces on the forks while sitting on the bike and that tends to stop the leaks. Just another quirk on this fine machine. I still love my 06 even with issues we've had. Stay alive. PM.
Good to see you posting PM. I've been using the NOJ neoprene fork protectors for the past few years and I think they dop a better job than the stock deflectors at keeping crap away from your legs and seals. But you are right, these things do seem to get dirty awfully fast.

 
Last edited by a moderator:
Top