GEN3 battery access made easier !

Yamaha FJR Motorcycle Forum

Help Support Yamaha FJR Motorcycle Forum:

This site may earn a commission from merchant affiliate links, including eBay, Amazon, and others.
Well, as much as I hate to admit it, I observed Her Majesty's loyal subject get to the battery in less than 5 minutes.
All I can add? His poor wife!
Did he completely remove the center panel or just pull out the right side far enough to get access to the screw behind it........or was the screw behind the center panel already removed?

Completely removed the center panel. And the screw behind right side of center panel was still there. He's done it so many times he is good at it. We video'd the procedure. Perhaps the tosser will post it up.
Pretty impressive but I bet he could do it in one third the time with the new part.

 
Ok, is see the first two differences, should not be too hard to do manually, number three not so clear yet, but I am sure I can manage... thanks!
When you will manage manual mods (if you will) please post some pictures. By the way, good info here - I did not know about new part Nr's.
Some pictures of the manual modification. Works fine...

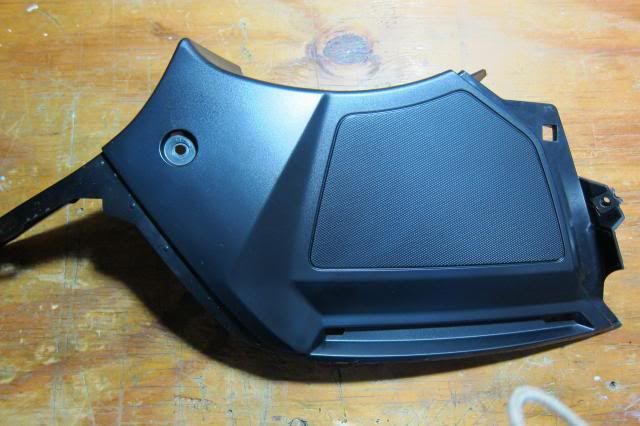
For reference the picture of the official part posted before..

IMG_2365.jpg


This tab needs to be removed:

Foto-PCV7LXPU-D.jpg


And the tab with the square hole on the upper side of the picture below

Foto-HIJN8JV6-D.jpg


The tab on the left front side needs to be cut

Foto-SYXLEAHT-D.jpg


To this...

Foto-MNYD36C7-D.jpg


That does the trick...

 
Last edited by a moderator:
For those with the 2014, is the battery panel modified now so as to eliminate all this alteration?
Yamaha recently issued a bulletin and revised part number, so I think that's a safe assumption.

--G
No assumptions, yes it has been revised. All you need to do is revive two screws and 2 pop rivets and the right panel slides off. I did this the second day I had my '14ES to install my heated gear/battery tender cord. This was the first time I ever installed one and did so easily without needing instructions on how to access the battery.

 
If you want you can eliminate the screws altogether, using 4 "rivets" only: Remove the spring nuts for the 2 screws in question and just use a couple more of the same type of rivets in place of those screws.

 
I made the modification to my cover today. Simple operation. I made sure the cover was warm and used snips to cut the tabs. My bike was buildt in May 2013. I installed the Eastern Beaver wiring harness and PC8 under the seat.

 
If you want you can eliminate the screws altogether, using 4 "rivets" only: Remove the spring nuts for the 2 screws in question and just use a couple more of the same type of rivets in place of those screws.
I prefer using the two screws because they attach the panel a little more securely than slide in rivets are able to.

 
OK, mine is 0038, and after trying to jump it in a dark parking lot (yes, I left the parking lights on right after buying it), I broke one of the tabs on the center cover trying to jump it. At $89, Yamaha should cover the cost of a design defect they corrected later in the year. Oh well.

Since we will be having two weeks of sub-freezing temperatures, it looks like a good project for the weekend.

Thanks @rjen for the pictures.

 
I beg to differ. I don't really think it's a design defect but rather a poorly designed access panel to the battery. They've made enhancements to the design now which btw gives us a couple of options. I choose to update my design with a dremmel tool.

 
I beg to differ. I don't really think it's a design defect but rather a poorly designed access panel to the battery. They've made enhancements to the design now which btw gives us a couple of options. I choose to update my design with a dremmel tool.
Ron, I've also done the Dremel modification and I agree it's not a huge deal, but I have to take issue with your distinction between "design defect" and "poorly designed access." I think any difference is probably purely semantic in this case. I don't think anyone is saying there should be a recall or anything but the point is that Yammy could have designed the battery access much better in the first place. They've recognized their error by correcting it in later production and I agree with others that as a matter of customer service and goodwill they could have offered a replacement part for free (or at least at less than the usual retail mark-ups; I read about somebody paying $150+ for the new panel) or pay a few bucks for the shop guys to do it for you when in for the routine service.

And not to pick a fight with you, but if we're going to play semantic games I have to say that the modification is neither an "update" nor an "enhancement;" it's a "fix."

 
If you want you can eliminate the screws altogether, using 4 "rivets" only: Remove the spring nuts for the 2 screws in question and just use a couple more of the same type of rivets in place of those screws.
I prefer using the two screws because they attach the panel a little more securely than slide in rivets are able to.
Tried getting the battery cover off my 2014 today. Took off the two screws, and the two plastic pop rivets. Then tried prying, sliding the cover off, Thought the panel should slide forward first to clear the two front tabs, but no luck. I must be missing something....

 
Ok, just got it off. I did not just slide off, but after having it off once, you can see how to get it back on. Had to do some serious tugging towards the rear of the panel, and it finally popped of a hidden tab, but almost sounded like it snapped off! This ABS is some tough stuff.

 
i guess i will be modding mine when i get home later this week......after i ride it of course, assuming it will start after sitting for 2 months....but then i will need access to the battery if it won't start so i might as well do the mod then.......ummm take a breath....

R

 
I've found that even with this mod, removal/replacement of the OEM battery requires removal of the front panel, as the inside front corner of the battery won't clear it. Maybe there's enough flex in the panel that only partial removal (right side) would be enough, but still...

 
I've found that even with this mod, removal/replacement of the OEM battery requires removal of the front panel, as the inside front corner of the battery won't clear it. Maybe there's enough flex in the panel that only partial removal (right side) would be enough, but still...
Having recently replaced my 2013 OEM battery (don't ask...) and having done the panel mod, I agree absolutely - no chance of getting the battery in/out with the front dash panel on. I did the mod so that if and when I have the need to get at the battery terminals (for jumping, adding/changing pigtails, etc.) it's easier.

 
I just bought a new 14 ES. I removed the panel in 2 minutes. Two bolts and two plastic pins. My VIN is 73. Hope that helps. Mine has the updated part.

Flash

 
Top