Great White North Wrenching Report

Yamaha FJR Motorcycle Forum

Help Support Yamaha FJR Motorcycle Forum:

This site may earn a commission from merchant affiliate links, including eBay, Amazon, and others.
I seem to remember telling you not to bring any of this crap....

beer%20run-L.jpg


I wasn't too sure how much to bring for the 3 of us.
Having imbibed with this crowd I can assure everyone this was not nearly enough.. Nobody got smacked upside the head with a bookcase!

 
Bill

Any perceptible running difference with the valve clearance adjustment? I see that none of yours was below the minimum tolerance. I checked mine this spring and four intakes were right at the minimum specification. I elected to call it "good enough" for this year with the expectation that I will have some shims to change next winter when the next check will be (almost) due. I figured that minimum is still OK and there is likely to be some additional tolerance before any damage could occur.

 
IIRC Ross, Bill had a couple that were close to minimum last time we checked and didn't do anything.. They went a year without an issue but Maybe I'm mistaken.

 
With as many intakes right at minimum and since I had everything apart I went ahead and did the shim change. I also had the Owosso Shim Kit in hand so everything was handy to do the work now. I think the only way you are going to see any difference in motor performance would to have done a before & after dyno run and look at the numbers. If anything I have theoretically lost some performance since the valves are not opening as far as before now that I have increased the valve shim clearance.

I cannot detect any difference before or after by "feel".

Bust was correct that the intake valves were close to minimum 40,000 km before this check. Last time we used inch feeler gauges but this time I used metric feeler gauges which give a little better resolution but it still takes some skill and experience to get an absolutely true reading. Being able to fit a 0.15mm feeler gauge with very little resistance was my cue to change the shims. Once I had one that required changing it only made sense to bring all the clearances back to the "ideal" 0.20mm clearance.

Personally if I had four valves right at the minimum value I would have done the little extra work and changed them just for the peace of mind. I'm cheap and the idea of a whole bunch of real expensive motor work because I was too lazy to change out $10 of shims when I had the opportunity would drive me crazy.

Sorry but there is no way I am going to say it is OK to run another season on valves that are already at minimum. It is entirely your call and good luck to you.

 
Last edited by a moderator:
Bust was correct that the intake valves were close to minimum 40,000 km before this check. Last time we used inch feeler gauges but this time I used metric feeler gauges which give a little better resolution but it still takes some skill and experience to get an absolutely true reading. Being able to fit a 0.15mm feeler gauge with very little resistance was my cue to change the shims. Once I had one that required changing it only made sense to bring all the clearances back to the "ideal" 0.20mm clearance.
Oh hell Yes!!! I did something right here!!

Gawdamnit! I deserve a box of Cookies! Or at least some Tim Bits.

 
Personally if I had four valves right at the minimum value I would have done the little extra work and changed them just for the peace of mind. I'm cheap and the idea of a whole bunch of real expensive motor work because I was too lazy to change out $10 of shims when I had the opportunity would drive me crazy.
Sorry but there is no way I am going to say it is OK to run another season on valves that are already at minimum. It is entirely your call and good luck to you.
You are probably right, I should have changed them while I was in there. Very little difference from where they were a year ago (3 at 0.15mm then, 4 now) I am encouraged by my observation that things are not progressing rapidly. My reluctance to change them was more a matter of a lack of experience and a fear of messing up the timing putting it all back. I would be more comfortable if I had at least seen the operation being performed before flying solo.

 
You are probably right, I should have changed them while I was in there. Very little difference from where they were a year ago (3 at 0.15mm then, 4 now) I am encouraged by my observation that things are not progressing rapidly. My reluctance to change them was more a matter of a lack of experience and a fear of messing up the timing putting it all back. I would be more comfortable if I had at least seen the operation being performed before flying solo.
If you are coming to NERDS check with FJRed (not Fred) and see if there is going to be another Tech Day and if there they have a shim kit. Ideally you will want to drop the bike off at Ed's the night before so that everything is cooled off beforehand.

You might even get treated to Fred (not Ed) sanding the shims for you.

Oh hell Yes!!! I did something right here!!

Gawdamnit! I deserve a box of Cookies! Or at least some Tim Bits.
I placed the order through Timmy's Head Office and a box of Tim Bits will be waiting for you at the Drive Thru window. Just tell them the Great White North Liberation Army sent you.

timbits2.jpg


Last edited by a moderator:
Bill

I am not too uncomfortable with doing the work myself (once I have observed it being done) and not too worried about waiting until the next scheduled valve check. It did meet spec (just barely) and I don't tend to beat the snot out of it too often. I think (perhaps wrongly) that I would be a little more concerned if it was an exhaust valve.

I am planning to be at NERDS this year and if anyone wants to do a valve check demo (that's demonstration, not demolition) as an education tool for other participants, I would be willing to sacrifice offer my '07 as a platform for the further enlightenment of other NERDS.

Wrench first, beer later and no pinched O2 sensor wires!! (I think that one was my fault but everyone had their hands in there at one point or another)

Cheers

 
Last edited by a moderator:
I'm calling bullshit. This isn't your bike. No way. That engine is cleaner than your windshield.
I've turned a new leaf in life Steve... I clean the bike with a tooth brush. AFTER every ride...
The only thing that hasn't changed is Molson Canadian in his repertoire. Bill and I didn't even have to wash up with hand cleaner after the job was done. And Rob gave me strict instructions to clean that little spec of crud off his coolant passage and shop vac it while he went on the beer run. Spotless when he got back........ not that I was askeered of being thrown under the bus or anything...........

 
Bill
I am not too uncomfortable with doing the work myself (once I have observed it being done) and not too worried about waiting until the next scheduled valve check. It did meet spec (just barely) and I don't tend to beat the snot out of it too often. I think (perhaps wrongly) that I would be a little more concerned if it was an exhaust valve.

I am planning to be at NERDS this year and if anyone wants to do a valve check demo (that's demonstration, not demolition) as an education tool for other participants, I would be willing to sacrifice offer my '07 as a platform for the further enlightenment of other NERDS.

Wrench first, beer later and no pinched O2 sensor wires!! (I think that one was my fault but everyone had their hands in there at one point or another)

Cheers
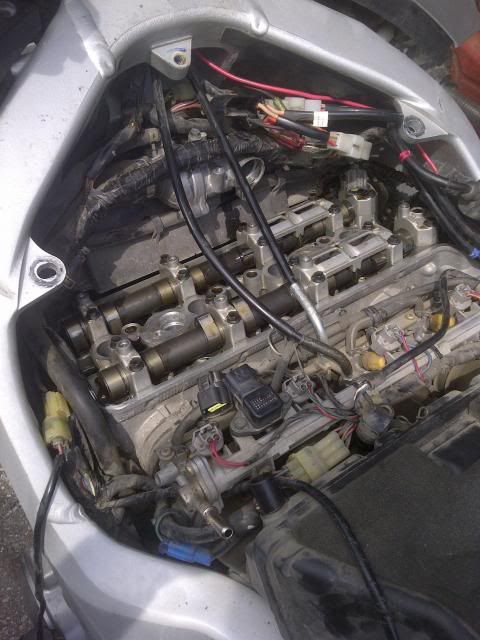
Ross, after having done a bunch of these, it's a piece of cake. Worst is getting that upper left rad hose/coolant tube clamp off there the first time (Yamaha pointed it the wrong way) and getting the valve cover off and back on (right end out first, in last), so when you take it off, you might want to prep it by making sure the gasket is adequately stuck on (use a bit of adhesive/RTV in a few spots and press it on). But, best way after you've checked clearances, spin the crank so the crankshaft and cam sprockets are lined up per the FSM, you'll see the little arrows, dots and perhaps paint daubs lined up level with the top edge of the cylinder head. #1 is at TDC and cams pointing away from each other. Using the other method with arrows and drilled dots on the cam caps is more unreliable, especially if you did get a tooth off, you have a lesser accurate reference point to fix it. If you're only doing intakes, marks are easily visible. Tie wrap crank sprocket, exhaust cam sprocket (if you're going to remove it, as close to TDC as holes allow which is first or second tooth fully engaged), remove intake cam caps in increments, release tensioner, roll out intake cam and lay it there. Real easy. Put it all back when you're done, engage tensioner, take the wee bit of slack out of the chain, recheck the marks, cut tie wraps, rotate crank 360 or 720, check marks, you're done. Recheck clearances. If you do exhausts, keep the tie wrap on cam sprocket, intake cam in place, roll exhaust cam out, shim change, roll it back in, check timing mark, etc. Pretty easy really, take your time, FSM timing mark method is really the best. 1-2 hrs. once the valve cover is off, includes calculating your new shims. Less if you've done it before and don't have too many beer breaks or two guys throwing you under the bus.

 
Last edited by a moderator:
Thanks Ray

I am pretty comfortable with the coolant pipe removal as well as the valve cover (done x2). Used some Permatex RTV to "glue" the gasket in place. If nobody wants to do a check at NERDS (for educational purposes), I think I would be OK on my own with the comments you posted. Fred did a good write-up when he did his last check as well. I will still likely wait until the off season.

 
What the hell does anybody from Texas know about beer other than how to open it by crushing the can on their forehead. Up here we call people like that Newfies......


Texans make their beer from water out of the Rio Grande that has been pissed in by a bunch of Mexicans.

 
Top