Harbor Freight Motorcycle tire adapter changes.

Yamaha FJR Motorcycle Forum

Help Support Yamaha FJR Motorcycle Forum:

This site may earn a commission from merchant affiliate links, including eBay, Amazon, and others.
Ok.. I finally used it. Rear BT 21 off, BT23 GT on. 4428 miles.

Some notes to those who are new to this or havent formed opinions of their own yet...

When the wear bars just show on your bt021... get rid of it... there is like no meat left... at all.. thin tire... I'm glad i went on the cautious side(only a couple were just flush)

The rear tire on this bike is the most challenging motorcycle tire i have ever changed. The lack of a significant valley, or step down from the beads, in the middle of the rim is the cause of my complaint, there is no give.. you have to be attentive to keep the tire squished and in the cent of the rim.

Off was not bad at all, on was a slight challenge.

That being said, this machine works well and it was a great purchase.. very happy with it.

For those who havent changed a rear tire yet... be sure you get the light spot dot where you want it, once you get the second bead on the rim, you can all but forget about spinning the tire on the rim.

The White blocks i made... gone.... they threw off where the tire centered on the machine and i had fear of them cracking.

I took a bicycle tube, stretched it over the HF rests, did three layers on the upright part... works fine, no damage. held well.

The rain gutter molded to the HF tire lever.. .worked AWESOME.

The balance dot was 3inches off from the valve stem. I tried to move it.. and gave up.

I used 2) 0.25oz_7g (0.50 total) stick on weights(i will find and buy a proper clip on when i can)

They went where the old one (0.75oz_20gram) was, right next to the valve stem.

I use the HF tire balancer.. it works well too...no mods.

I checked the drive system lube condition while i was in there.

On my 2012, the was no lack of grease at all on the drive hub splines, the drive shaft splines, or the output shaft splines... in fact, they used soo much it, that it was a nasty mess in there... way too much.

 
On the subject of the HF tire machine bead breaker...

My HF tire machine is bolted to the floor.

I threw an old towel folded in half on the floor, doubled it up(so 4 layers) on the "nub" that sticks up on the bottom leg, I then pressed the tire down enough (no tape..nothing) with the breaker to slip my motion pro rim guard on, then put the breaker againt that... no fear of damage and it worked great.

 
It helps a lot if you warm the tires up before you try to mount them. For me a cold tire takes an hour and a lot of swearing to get on the rim. A warm tire goes on in a few minutes.

 
On the subject of the HF tire machine bead breaker...My HF tire machine is bolted to the floor.

I threw an old towel folded in half on the floor, doubled it up(so 4 layers) on the "nub" that sticks up on the bottom leg, I then pressed the tire down enough (no tape..nothing) with the breaker to slip my motion pro rim guard on, then put the breaker againt that... no fear of damage and it worked great.
I cut a strip of rubber off an old tire and tie wrapped it over the nub, works good too.

 
The tire was about 45 degrees... DUH... I could have at least brought it in the house for a while..

Kind of an obvious thing... I never thought about it.

Maybe next time... Thanks for the tip :)

The rubber strip is a great idea to assure no damage... i was careful.. but i prefer foolproof... will do :)

I like the towel 'cause it kept the rotor and drive splines off the floor.

I'll combine those :)

 
One of my mods was to bolt a piece of plastic cutting board to the curved bead breaker...... makes it deeper and wider, if it matters. Be sure to put any bolts such that they don't scratch up the rim.

 
The balance dot was 3inches off from the valve stem. I tried to move it.. and gave up.
You probably already know that the yellow balance dot is an indication of the light spot of the tire. Conventional wisdom is to align that dot with the valve stem, the idea that the stem would be the heavy spot of the wheel, so that those to imbalances would tend to cancel each other. But on FJR wheels the stem is not always (or even usually) the heavy spot. Since you have a balancing rig you can put the bare wheel on the fixture and find out where the heavies spot really is, then mount your balance marked tire accordingly.

I used 2) 0.25oz_7g (0.50 total) stick on weights(i will find and buy a proper clip on when i can)They went where the old one (0.75oz_20gram) was, right next to the valve stem.
Well, that is certainly not an excess amount of weight, so you seem to have made out OK this time even without knowing where the heavy spot of the rim was (maybe yours is near the stem).

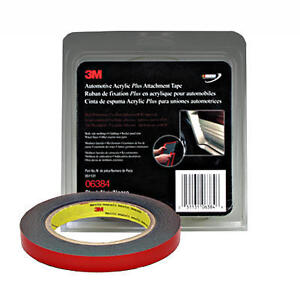
As for the stick on weights, I use them all the time. Just peel off the double-sided sticky tape they come with and use 3M Acrylic Foam Tape instead. You know, the gray foam stuff with the red release paper that you see all over the place. You can get it at any auto parts store.

%24(KGrHqR,!lgE5uuTHB48BOpdt7MOC!~~60_35.JPG


The 1/2" wide size is perfect for stick-on wheel weights. If you clean / degrease both sides to be adhered it will hold the weights well and they'll never fly off. Then when it is time to remove comes off easily and cleanly with no residue.

 
The rubber strip is a great idea to assure no damage... i was careful.. but i prefer foolproof... will do :)

I like the towel 'cause it kept the rotor and drive splines off the floor.

I'll combine those :)
Oh yea, forgot to mention that. I use a piece of 2x4 to prop up the other side of the tire to keep the rotor off the floor. It's not an ideal solution, but it works. I'm still saving my pennies to buy one of these: https://www.nomartirechanger.com/Classic_Model_Motorcycle_Tire_changer_No_Mar_p/tc-classic.htm
 
Last edited by a moderator:
The rubber strip is a great idea to assure no damage... i was careful.. but i prefer foolproof... will do
smile.png


I like the towel 'cause it kept the rotor and drive splines off the floor.

I'll combine those
smile.png
Oh yea, forgot to mention that. I use a piece of 2x4 to prop up the other side of the tire to keep the rotor off the floor. It's not an ideal solution, but it works. I'm still saving my pennies to buy one of these: https://www.nomartirechanger.com/Classic_Model_Motorcycle_Tire_changer_No_Mar_p/tc-classic.htm
Looks like now might be the time Phil...$495 is a great price. I need someone local to split one with.

 
Last edited by a moderator:
bwv, I like all your inexpensive mods. I've always just used 3 Motion Pro tire irons on work bench but for the minimal investment you've figured out I might give the HF changer a whirl for the heck of it. The one issue I have with the tire irons is getting the last secton of bead down on very stiff walled tires. It's tricky, to say the least, wedging the iron in there without scratching the rim.

 
The rubber strip is a great idea to assure no damage... i was careful.. but i prefer foolproof... will do
smile.png


I like the towel 'cause it kept the rotor and drive splines off the floor.

I'll combine those
smile.png
Oh yea, forgot to mention that. I use a piece of 2x4 to prop up the other side of the tire to keep the rotor off the floor. It's not an ideal solution, but it works. I'm still saving my pennies to buy one of these: https://www.nomartirechanger.com/Classic_Model_Motorcycle_Tire_changer_No_Mar_p/tc-classic.htm
Looks like now might be the time Phil...$495 is a great price. I need someone local to split one with.
Have a lookie at the Cycle Hill... on sale right now.
Wow, $295! Anyone have experience with this or do you need to upgrade to Classic or Jr Pro?

 
Last edited by a moderator:
Yeah.. same fears here PhilJet... I just acidentally said "NO WAY" (with my outside voice) while reading this...fortunatly my wife didnt hear it, and my daughter who is sitting right next to me is cool and didnt talk... :)

 
bwv, I like all your inexpensive mods. I've always just used 3 Motion Pro tire irons on work bench but for the minimal investment you've figured out I might give the HF changer a whirl for the heck of it. The one issue I have with the tire irons is getting the last secton of bead down on very stiff walled tires. It's tricky, to say the least, wedging the iron in there without scratching the rim.
This ^^^

3 tire irons, lotsa lube, a clean work bench, removing the rotors, and using the plastic rim guards has served me well for years. I probably changed my first bike tire, 28 years ago...so there's been quite a few. (mostly knobbies..lots easier)

In comparison to that method, I am very happy with the HF device, even if only as a clamp.

I did not use the top arm that came with it... no need...

I own a mig, some steel, and some CAD software... after this experience, I think I'm making up some new rim clamps, or maybe I'll just flip these over and build on the bottom of them...

The problem was with the rim being allowed to slip upwards out of the clamps.

 
Top