VTFJR13
Well-known member
Well cool I'm glad there are alot of idea's coming from this. Thanks for all the positive comments from everyone. I thought this might be a useful mod to share with everyone.
Eric
Eric


") (If I want to later, I can just put some kind of a little hook up at the top to kind of close off the whole opening with the net, but I don't think it will be needed.) Thanks, VTFJR!
(If I want to later, I can just put some kind of a little hook up at the top to kind of close off the whole opening with the net, but I don't think it will be needed.) Thanks, VTFJR!
Erm, that would be just about any overnight trip taken with "the pillion", eh Bob?I just got back from a trip where I had to very carefully stack the stuff up inisde the trunk to get it to close.


Great tip! Just did mine last night in prep for a 5 day trip to Americade. This will be the first multi day trip with my wife, so any way to optimize storage capacity is welcomed. Thanks! :clapping:Well cool I'm glad there are alot of idea's coming from this. Thanks for all the positive comments from everyone. I thought this might be a useful mod to share with everyone.
Eric
I found a battery powered LED light with magnetic switch at the Local Harbor Freight for $3 (including batteries). I'm using it on the glove compartment up front so it turns on when I open it up and off when it's closed.Has anyone done surgery on the lid inner plastic to create even more space in the "attic" without losing too much strength? Perhaps someone has a trashed tail box they wouldn't mind experimenting on. I know someone carved out some space for a light in the empty pointy area of the top, was in here someplace...
is there a link to purchase the exact net you haveAfter seeing the trunk lid idea, I completed my own this past weekend. I really wanted to use open-sided clips so I could easily remove it, but went with close-loop like the OP's instead. I'm not sure if I will ever remove it, and if I have to, it's a quick job. The bungee net I found looks to be about the same size, shape, and bungee gauge (a new standard?), but the grid spacing was smaller, so I was able to use 4 little plastic cable clamps along 3 sides, leaving the top loose. The net in its unstretched state was smaller than the trunk lid, so it stretches slightly when installed. This makes for a very nice fit, and the open side doesn't hang there limply (never a good thing). So far, it works beautifully. Sorry, no photos yet.
Thanks to the OP for giving me a simple, effective, easy-to-use solution for the only real problem with the Yamaha top box. Bravo!
sounds perfect for this purpose
the one I had laying around is more open loop than I desire
TIA
let's ride safe and be careful out there,
Mike in Nawlins'
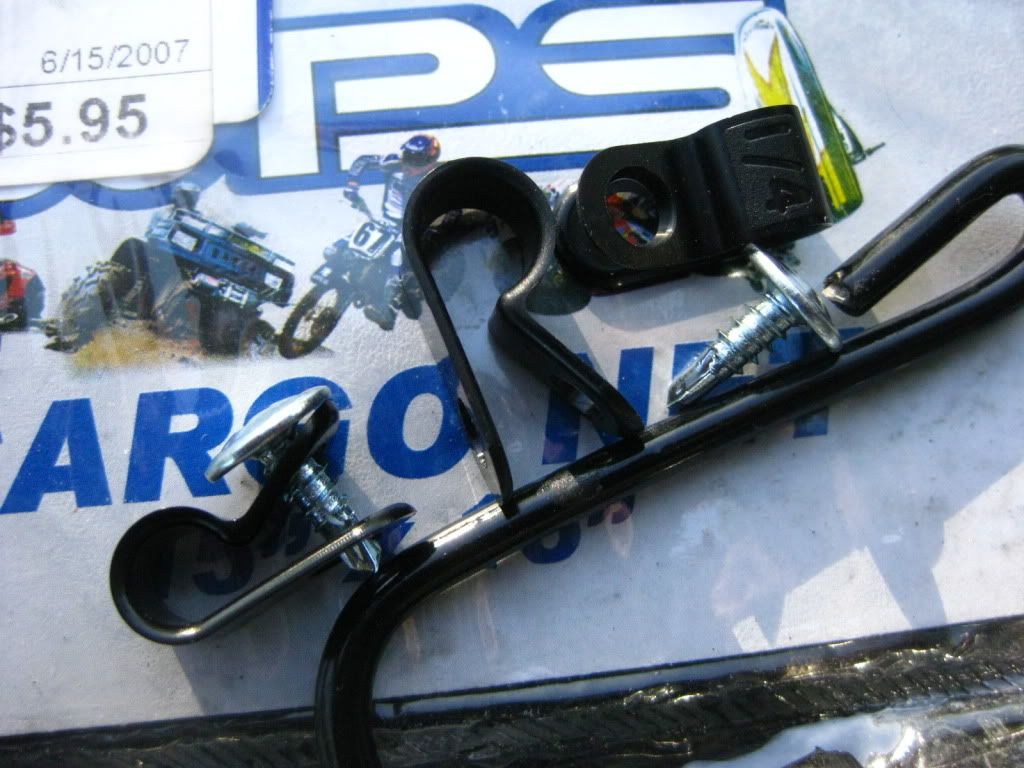
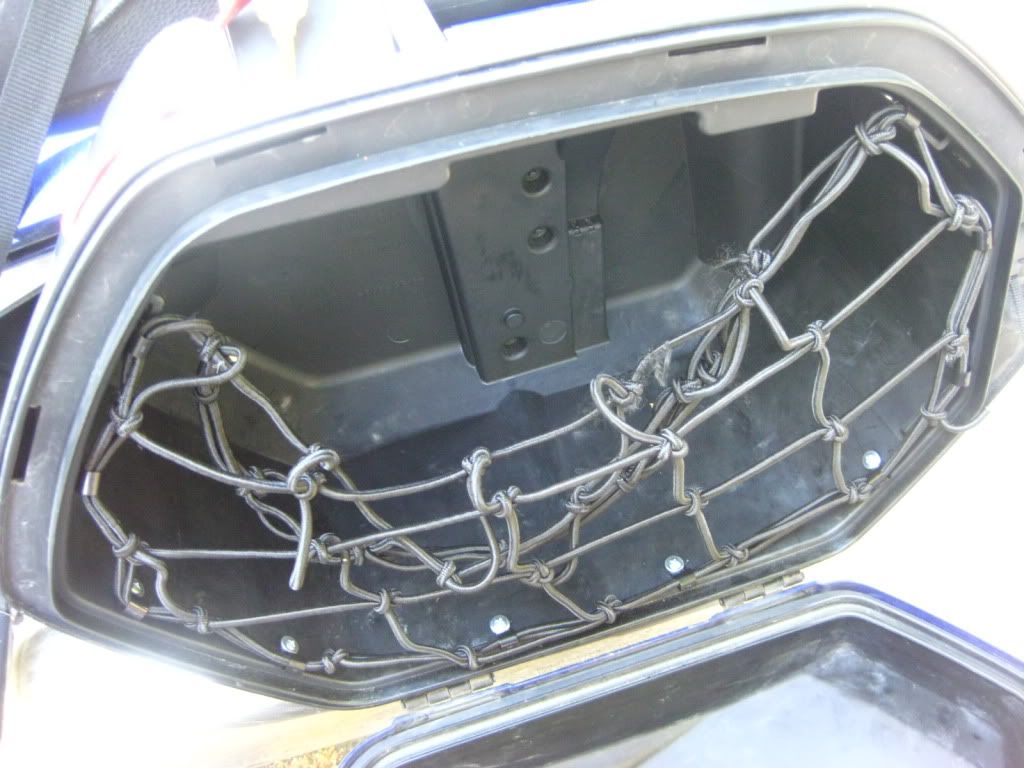
well that sure does make the side cases more useful. I'm glad there are so many finding this simple idea so useful. Great jobI went ahead and did this on one of my side cases. Just used some little plastic clips from the hardware store, about 14 cents each I think, and half-inch self-tapping screws. I used a standard little cargo net, guess like the OP did. The metal hooks were easy to pull off the bungee material; no bending or cutting needed. I didn't want to cut it down any so it wouldn't unravel, so I just let the extra material hang over on the inside. Not much to the job, once VTFJR13 came up with the idea. I think it will be a big improvement for keeping things from falling out when loading or unloading. Easily removed, if it doesn't work out. I'll do the other bag later, and the new top box I just ordered too.
Here's the hardware:
Installed, empty:
With a jacket liner inside. Not falling out.
is there a link to purchase the exact net you haveAfter seeing the trunk lid idea, I completed my own this past weekend. I really wanted to use open-sided clips so I could easily remove it, but went with close-loop like the OP's instead. I'm not sure if I will ever remove it, and if I have to, it's a quick job. The bungee net I found looks to be about the same size, shape, and bungee gauge (a new standard?), but the grid spacing was smaller, so I was able to use 4 little plastic cable clamps along 3 sides, leaving the top loose. The net in its unstretched state was smaller than the trunk lid, so it stretches slightly when installed. This makes for a very nice fit, and the open side doesn't hang there limply (never a good thing). So far, it works beautifully. Sorry, no photos yet.
Thanks to the OP for giving me a simple, effective, easy-to-use solution for the only real problem with the Yamaha top box. Bravo!
sounds perfect for this purpose
the one I had laying around is more open loop than I desire
TIA
let's ride safe and be careful out there,
Mike in Nawlins'
I just bought 6 motorcycle cargo nets from Harbor Freight (No- I don't work there, but do spend a lot of time there) for $3 each (on sale, normally $4) for the top and bottom of the top case and both sides of the saddlebags (lids and bases). Also bought more of the LED lights with magnetic switches (only $2.50 each!!).
Hopefully I'll be installing rivet nuts in the interior plastic shell of the topcase and saddlebags along with the cable clips for the bungee cargo nets. That way I can use machine screws to hold everything in place and only have to worry about attaching something to the plastic liner once. From then on it's all metal-on-metal, just the way I like it.
I looked around at Wally World, Target, Menard's, and other places, but found it at a local Suzuki/Polaris dealer. He only had one there, for something like $10.95. Sorry, I tossed the packaging away, and I don't remember the manufacturer's name. I guess keep looking, and hopefully you get lucky like I did. I used #8 X 1/2" sheet metal screws with a lock washer under each head.


![Decrum Motorcycle Jacket Men - Mens Leather Jacket | [1100065] Austin Brown, XL](https://m.media-amazon.com/images/I/41HqZSRj6LL._SL500_.jpg)