Installation of Gen 1 Handguards

Yamaha FJR Motorcycle Forum

Help Support Yamaha FJR Motorcycle Forum:

This site may earn a commission from merchant affiliate links, including eBay, Amazon, and others.

luvtoride

My Indian name is "Pants On Fire"
Joined
Jun 21, 2005
Messages
4,944
Reaction score
136
Location
VA
Well, after a good solid month to month & 1/2 I finally received the hardware that I ordered to do this. After looking in the little plastic baggies & seeing which screw fits what bolt & thinking... "man, I could've bought 3/4 of this shit in the hardware store"... I'm a little confused about which piece of hardware goes where. Well, in reality, some of it is pretty obvious but there almost looks like there'd be extra nuts. Now, I know them pups go somewhere!

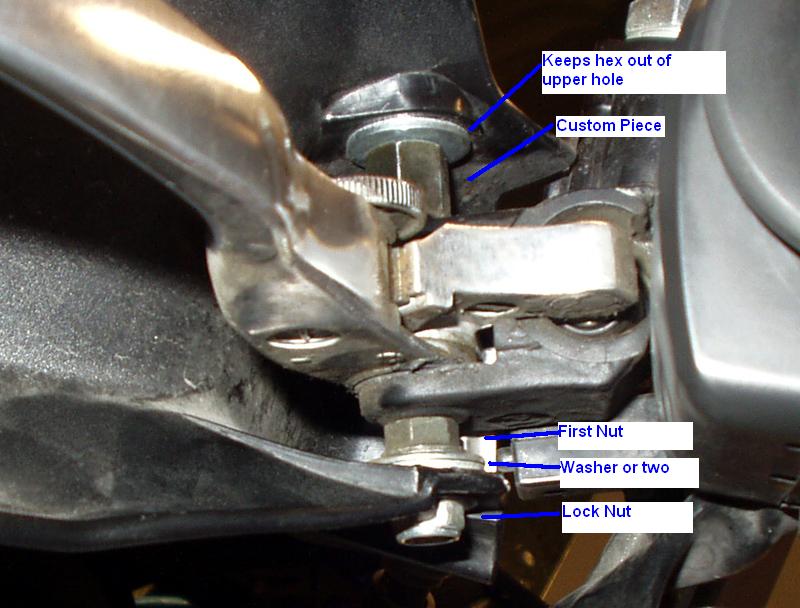
I went to the FJR Tech page that talks about installing these but no info on the order of nuts and bolts & no really descrptive pics of the nut/bolt install. I decided to come on over here and ask if anyone can give me the exact order of their assembly.

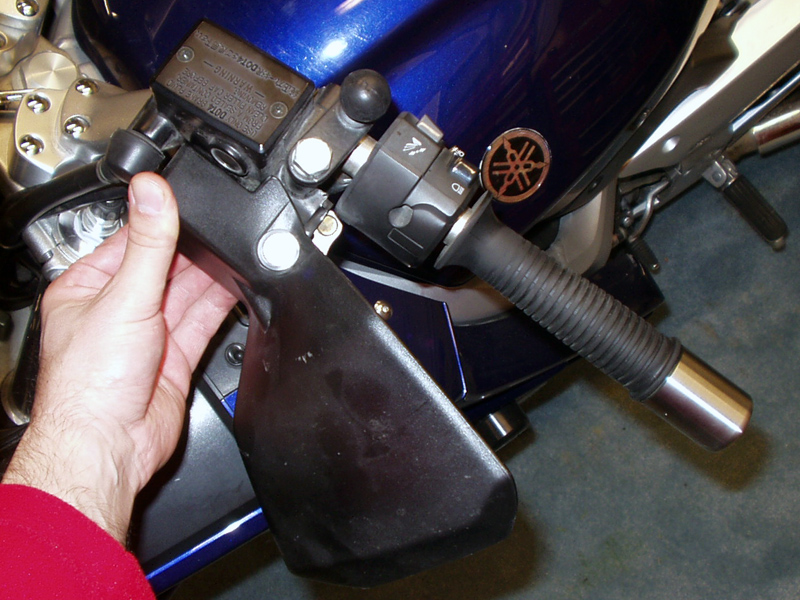
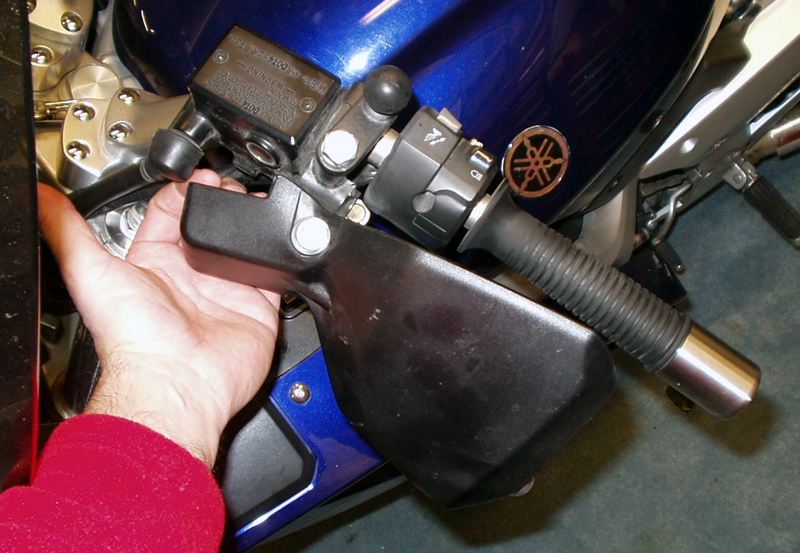
Pics or a verbal decription would be so helpful.

Thanks in advance fellow pilots, Heidi

 
Truly custom piece goes in from the top and replaces the current shaft and nut. I'd try the clutch side first. Add one nut to bottom and tighten similarly as the removed nut.

20051212068.jpg


Put on handguard. Bottom hole first. Stretch top hole plastic to fit over the top hex custom piece. Scratch head for one hour on whether hex should be pushed through round hole or round hole is supposed to stay just on top of hex my magical force...... Add the phillips threaded screw and washer to top hole and see how that doesn't help make more sense of things, but does make it look somehow more finished.

Meanwhile put second lock nut on bottom so that bottom plastic is sandwiched between regular nut and lock nut. This part seems to make sense.

Go back to the top piece and figure out that the phillips screw isn't the best idea and go to your bolt box (this part helps having Warchild standing there offering suggestions). Find a galvanized hex bolt that fits the top thread and two washers and one lock washer.

Feed under one washer so the top hole stays just above the hex custom piece. With four hands feed hex bolt with lock washer and washer through. It's important to struggle here or you're not doing things right and should question your mechanical skills. Also make sure and get the wrong amount of thread and try at least two other length hex bolts before find the best one.

20051212073.jpg


Once you get it all together realize that the galvanized should be stainless and go to the store for a replacement or suffer the mocking and ridicule of Warchild for several days following.

Meanwhile, figure out some way to stop the clutch side from moving for me, would you? My latest scheme involves 18 zip ties, JB Weld, and a slave Keebler Elf.

Good

20051212076.jpg


Irritating

20051212077.jpg


Last edited by a moderator:
Good lord that was a fast response!

Ignacio, I'd highly appreciate any info that you can gather on this. Not planning on an immediate install so's info at your leisure is great. Thanks you,

Heidi

 
Ignacio, thank you greatly. Very good pics... I'm sure my install will be easy now.

Thank you, thank you, thank you!!!

Heidi

 
The guy in the little brown truck just dropped off my Gen 2 handguards and hardware. Got the kit packaged up by Guru Glenn at fjrgoodies as a belated birthday present from my brother. After reading this and other threads about how the installation may not be straight forward I think I'll hold off until after the holidays to install so I will have a little time to look things over before digging in. Too much ice and snow in the driveway to get a bike out and ride anyway.

 
I cut with a Dremel the plastic that interfered with the fit on the clutch side. Has not moved in 8000 miles. Also used the original top Phillips screw, has not pushed through or anything else.

 
I may have realized something looking at my own picture. The first nut may work better reversed. There appears to be a bit of a shoulder on that nut, may fit better against the bottom of the clutch hole, and make the whole mess less prone to rotating when the clutch is actuated.

 
One other thing. Do you have 1 nut holding the hex pivot/bolt secure on the bottom, then a second to hold the guard in place? Thats how Franks is.

Edit-never mind, checked the pic higher up. It has to be the interference when the lever is pulled pushing against the guard.

 
Last edited by a moderator:
This could be very painful for me but when I fitted mine (the BMW ones ) they are the other way up ie the large bit is under the hand

Have I done it wrong ? :(

Picture111_edited.jpg


Last edited by a moderator:
This could be very painful for me but when I fitted mine (the BMW ones ) they are the other way up ie the large bit is under the hand
Have I done it wrong ?
Totally different hand guard and attachment points than the V-Strom Gen 1 we're talking about in this thread, so I don't know. Never seen yours before and pretty hard to tell from the angle of the pic. I would suggest putting it in a different thread with a BMW hand guard title and asking the community there.

 
Last edited by a moderator:
I may have realized something looking at my own picture. The first nut may work better reversed. There appears to be a bit of a shoulder on that nut, may fit better against the bottom of the clutch hole, and make the whole mess less prone to rotating when the clutch is actuated.
I did reverse what I labeled in the pic as "first nut" and it made a HUGE improvement on the clutch side. The hand guard doesn't rotate now at all when I engage the clutch. The shoulder on the nut now has enough friction to hold the shaft in place.

 
Hmmm, looking at your installation pics it appears that I don't have enough washers... so, off to the hardware store I go... 'cause my a$$ is definitely not ordering anything else from Suzuki. It might be another month b4 I get 'em!

I'm going to do my install this weekend. I should have the shield that I'm buying from Tim Becker Tuesday. Then I'll be ready for a little bit colder weather than I've been riding in.

Ignacio, thanks greatly for the pics. I'm going to print them out in color & take 'em home with me tonight.

 
This could be very painful for me but when I fitted mine (the BMW ones ) they are the other way up ie the large bit is under the hand
Have I done it wrong ? :(
Installed my V-Strom gen 2 guards yesterday. I was trying to decide wheter to install them right side up or swap sides and install them upside down. Kind of depends on where the wind is coming from. Intuitively I thought the cold air would be coming up from under the edge of the fairing but I don't know that for sure. Ultimately, I decided to be a sheep and install them the same way others on the forum have because I expect better protection from rain at low speeds that way.

So, if you can install them either way up then I guess it doesn't matter which is the 'right' way. Rather, it depends which way does the job best for you. Have you ridden in the cold and rain with them as they are now? Work well?

 
I installed my gen 2's right way up.

Works very well, hands almost dry and never cold after a 6hr downpour on I-90

 
Top