Wee Willy
It's bad, you know
Well, I finally got around to installing a new set of PIAA horns (Clicky). These horns are significantly louder than the OEM items. On the advice of many members here, I also procured a horn wiring harness from FJRandy. This is a well-made item (thanks Randy for all the info & pix). Here are the details.
It took me about 3 hours over two evenings to do the install. This amount of time is about 2x what it would take a typical good-with-their-hands grease monkey, but I had never opened the FJR panels before so I took my time and spent some minutes after each panel was off to marvel at the engineering details on display (yup...I'm an engineer's engineer). I was pleasantly surprised at how easy the panel removal is on this bike...few screws and some pop fasteners and it's off. Nice.
First, the old horns (old...they're really only about 3 months off the showroom floor) were just completely inadequate. I have almost been run out of a lane by a big 1/2 ton Ford who didn't see me and sure as hell didn't hear my wimpy horn squeeking in protest. I decided then and there to get this fixed & soon. The old horns are shown here after I removed them:
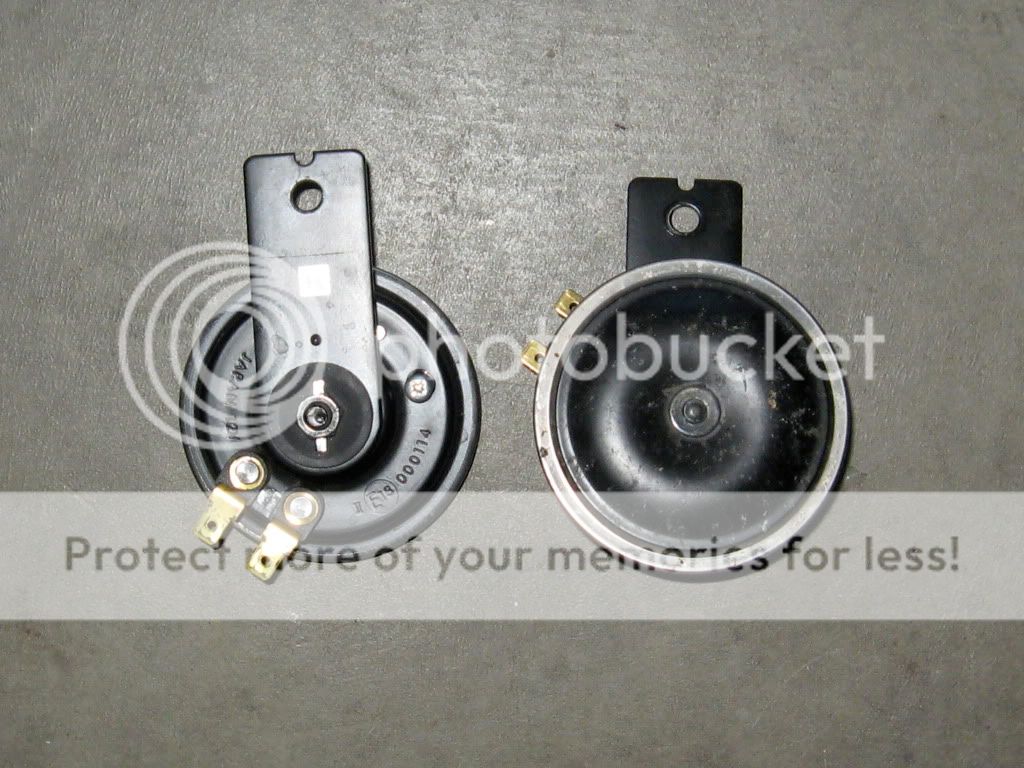
These horns are mounted using a single 4mm allen head screw through the hole in the top of the bracket. The OEM's are mounted to the bracket using a rubber bushing and washers for good isolation. I could not use the bushing for the new horns however...they would not fit. So I took the rear washer from the OEM (the black one...the other is basic steel) for use in the new install.
The PIAA's came with alot of funky stickers all over them...looked kinda cheesy to me so I took them all off and was left with only the bare plastic. Here's the box with some of the removed stickers for display.

These horns have a "weather cover" that fits over the mouth of the horn to keep bugs, water, etc. out of the device. The instructions for the horn warn users to install the horns where water is unlikely to get into the throat. For the FJR install, I do not think they will do anything significant to keep stuff out of the horn so I did not install them. They clip onto the new horn bracket easily however & I can put them on without any panel work if I choose to change my mind later.
I bought the PIAA's because I was pretty well convinced that NO cutting of the radiator bay side panels would be required for their install. I don't know about you, but I didn't relish the idea of taking a Dremel to my plastic...even if it's mostly out of sight. So, the first part of this install was to pull these two side panels down in the radiator bay. These panels are held using three screws and two pop fasteners each. They pull out quite easily with a bit of panel manipulation to clear all the bits. With these off, both horns are easily accessed. I removed the OEM horns, installed the new PIAA horns using the original 4mm screws and Locktited them in with Blue. I then hooked up the original wires. The left horn install required a bit of gentle tugging on the left horn wires and their harness to get the extra 1/3 inch needed to make the connection. With the horns installed, I did a very brief test and all worked well. A quick note on this...the new horns draw more electric power than the OEM's. Under extended use with the OEM harness, they can cause serious heating problems because the OEM wire gauge is not heavy enough for the electrical load. This is where FJRandy's wiring harness comes in.
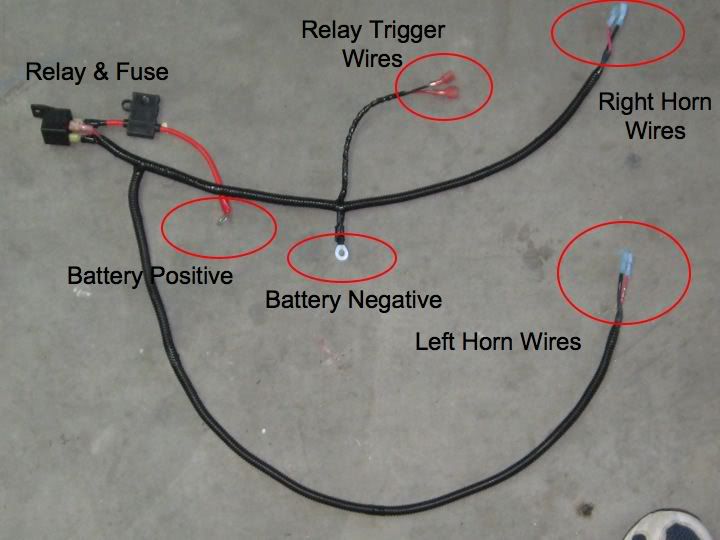
FJRandy manufactures this well-made harness and sells if for around $45. It is made of heavier gauge wire than the OEM and will power the new horns without issue. It works in a very simple fashion. FJRandy uses the OEM horn wires from the right horn to activate the relay which completes the circuit to send power from the battery to both the horns. To accomplish this, you plug the male Relay Trigger Wires into the existing right-hand horn wires so that when you push the horn button, you use the OEM system to power the relay and activate the new horns. Proper polarity is important only at the battery (red to + and black to - per standard) and at the horns. The wires at the horns just need to be installed the same on both sides. Red right on both or red left on both...don't mix them. Rather elegant Randy...nice job.
Now, the next job was to survey the route where the harness was going to go. 4 panels behind the windscreen must be removed to accomplish this job. They come out pretty easily. A 4mm allen wrench is required to get the right side panels off. You'll also need a large headed Phillips to get the left off as there is a screw in the glove box area that must come out. With the panels off, do a good survey of where you want to route the cable and place the relay. I laid out the cable and thought the problem thru for a few minutes before I started threading. I ended up using 4 tie wraps to hold the cable in and routed it twice before I was happy. Here's a pic of the layup before I started stuffing cable.
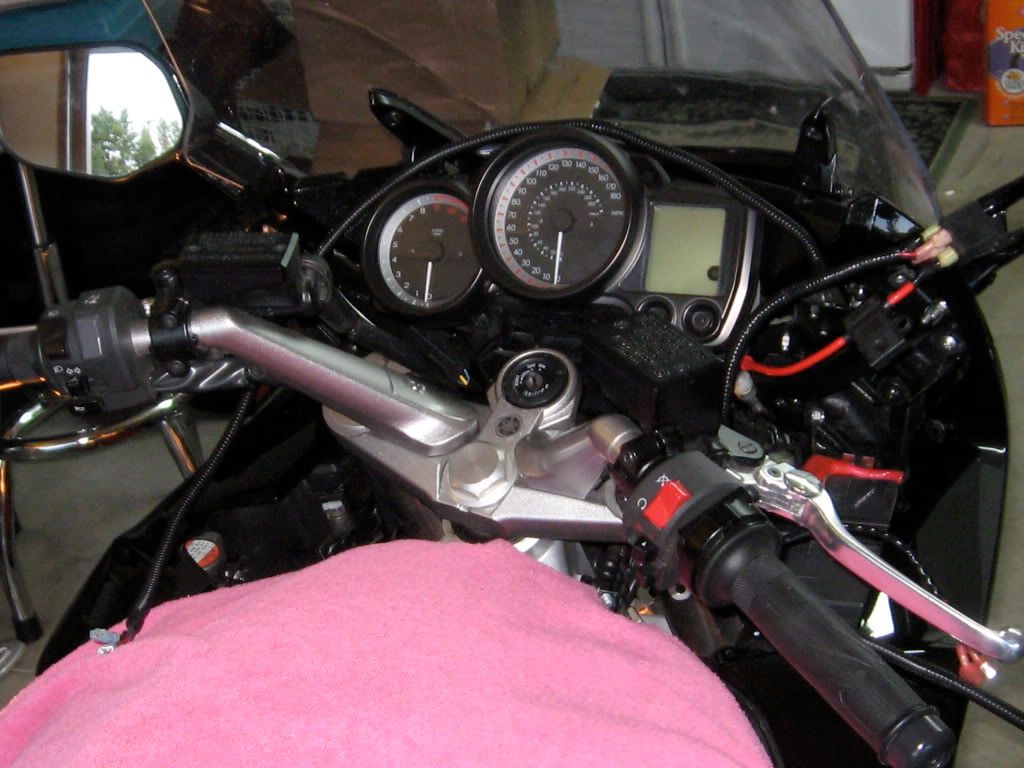
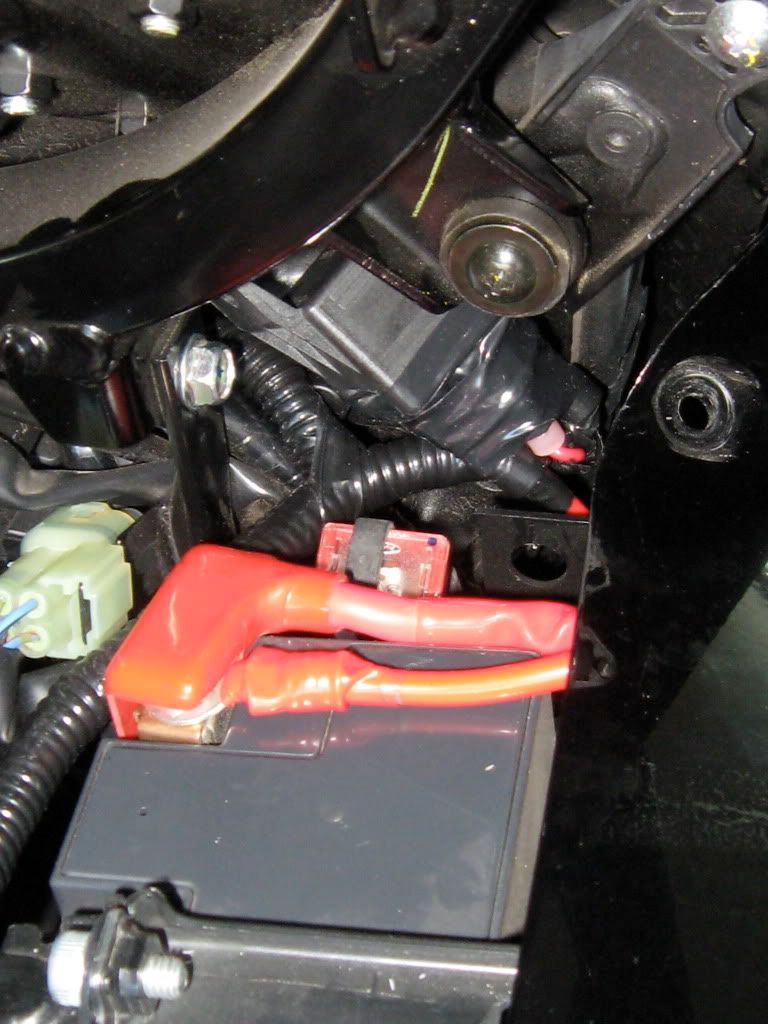
The hardest part of this whole business revolved around what to do with the relay. It has a mounting hole in it and I wanted to secure it to structure so I would not have to worry about a wire working loose as it moved around. After about 1/2 hour careful search, however, I was convinced there was no good place to really tie it down. So in the end, I used a few turns of electrical tape around the base of the relay and the wires to keep everything attached and snugged it into the recess above the right headlight. The stiff wire harness keeps it in place and I'm satisfied it won't work itself loose. Here's the final resting place of the relay...it's that little plastic box thingy just above the battery:
Now,with the harness installed, it was time to get it all back together. That took all of 15 minutes...6 panels, about 16 screws and 8 pop fasteners. Sweet.
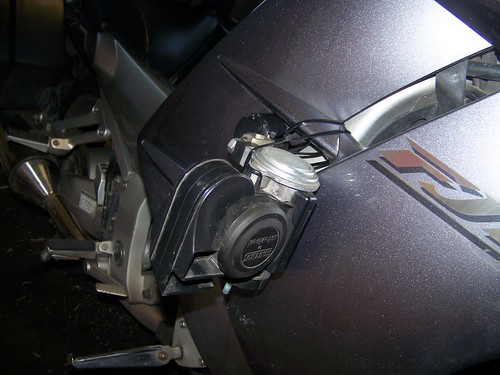
The final horn arrangement is shown below. First the right horn.
And the left horn BEFORE the panel reinstall.

Now, the noise I make will get me noticed. These horns work well and are a significant improvement over the OEM crap. Thanks to all the folks here who helped me get the info together to pull this off easily. This is a great forum.

It took me about 3 hours over two evenings to do the install. This amount of time is about 2x what it would take a typical good-with-their-hands grease monkey, but I had never opened the FJR panels before so I took my time and spent some minutes after each panel was off to marvel at the engineering details on display (yup...I'm an engineer's engineer). I was pleasantly surprised at how easy the panel removal is on this bike...few screws and some pop fasteners and it's off. Nice.
First, the old horns (old...they're really only about 3 months off the showroom floor) were just completely inadequate. I have almost been run out of a lane by a big 1/2 ton Ford who didn't see me and sure as hell didn't hear my wimpy horn squeeking in protest. I decided then and there to get this fixed & soon. The old horns are shown here after I removed them:
These horns are mounted using a single 4mm allen head screw through the hole in the top of the bracket. The OEM's are mounted to the bracket using a rubber bushing and washers for good isolation. I could not use the bushing for the new horns however...they would not fit. So I took the rear washer from the OEM (the black one...the other is basic steel) for use in the new install.
The PIAA's came with alot of funky stickers all over them...looked kinda cheesy to me so I took them all off and was left with only the bare plastic. Here's the box with some of the removed stickers for display.
These horns have a "weather cover" that fits over the mouth of the horn to keep bugs, water, etc. out of the device. The instructions for the horn warn users to install the horns where water is unlikely to get into the throat. For the FJR install, I do not think they will do anything significant to keep stuff out of the horn so I did not install them. They clip onto the new horn bracket easily however & I can put them on without any panel work if I choose to change my mind later.
I bought the PIAA's because I was pretty well convinced that NO cutting of the radiator bay side panels would be required for their install. I don't know about you, but I didn't relish the idea of taking a Dremel to my plastic...even if it's mostly out of sight. So, the first part of this install was to pull these two side panels down in the radiator bay. These panels are held using three screws and two pop fasteners each. They pull out quite easily with a bit of panel manipulation to clear all the bits. With these off, both horns are easily accessed. I removed the OEM horns, installed the new PIAA horns using the original 4mm screws and Locktited them in with Blue. I then hooked up the original wires. The left horn install required a bit of gentle tugging on the left horn wires and their harness to get the extra 1/3 inch needed to make the connection. With the horns installed, I did a very brief test and all worked well. A quick note on this...the new horns draw more electric power than the OEM's. Under extended use with the OEM harness, they can cause serious heating problems because the OEM wire gauge is not heavy enough for the electrical load. This is where FJRandy's wiring harness comes in.
FJRandy manufactures this well-made harness and sells if for around $45. It is made of heavier gauge wire than the OEM and will power the new horns without issue. It works in a very simple fashion. FJRandy uses the OEM horn wires from the right horn to activate the relay which completes the circuit to send power from the battery to both the horns. To accomplish this, you plug the male Relay Trigger Wires into the existing right-hand horn wires so that when you push the horn button, you use the OEM system to power the relay and activate the new horns. Proper polarity is important only at the battery (red to + and black to - per standard) and at the horns. The wires at the horns just need to be installed the same on both sides. Red right on both or red left on both...don't mix them. Rather elegant Randy...nice job.
Now, the next job was to survey the route where the harness was going to go. 4 panels behind the windscreen must be removed to accomplish this job. They come out pretty easily. A 4mm allen wrench is required to get the right side panels off. You'll also need a large headed Phillips to get the left off as there is a screw in the glove box area that must come out. With the panels off, do a good survey of where you want to route the cable and place the relay. I laid out the cable and thought the problem thru for a few minutes before I started threading. I ended up using 4 tie wraps to hold the cable in and routed it twice before I was happy. Here's a pic of the layup before I started stuffing cable.
The hardest part of this whole business revolved around what to do with the relay. It has a mounting hole in it and I wanted to secure it to structure so I would not have to worry about a wire working loose as it moved around. After about 1/2 hour careful search, however, I was convinced there was no good place to really tie it down. So in the end, I used a few turns of electrical tape around the base of the relay and the wires to keep everything attached and snugged it into the recess above the right headlight. The stiff wire harness keeps it in place and I'm satisfied it won't work itself loose. Here's the final resting place of the relay...it's that little plastic box thingy just above the battery:
Now,with the harness installed, it was time to get it all back together. That took all of 15 minutes...6 panels, about 16 screws and 8 pop fasteners. Sweet.
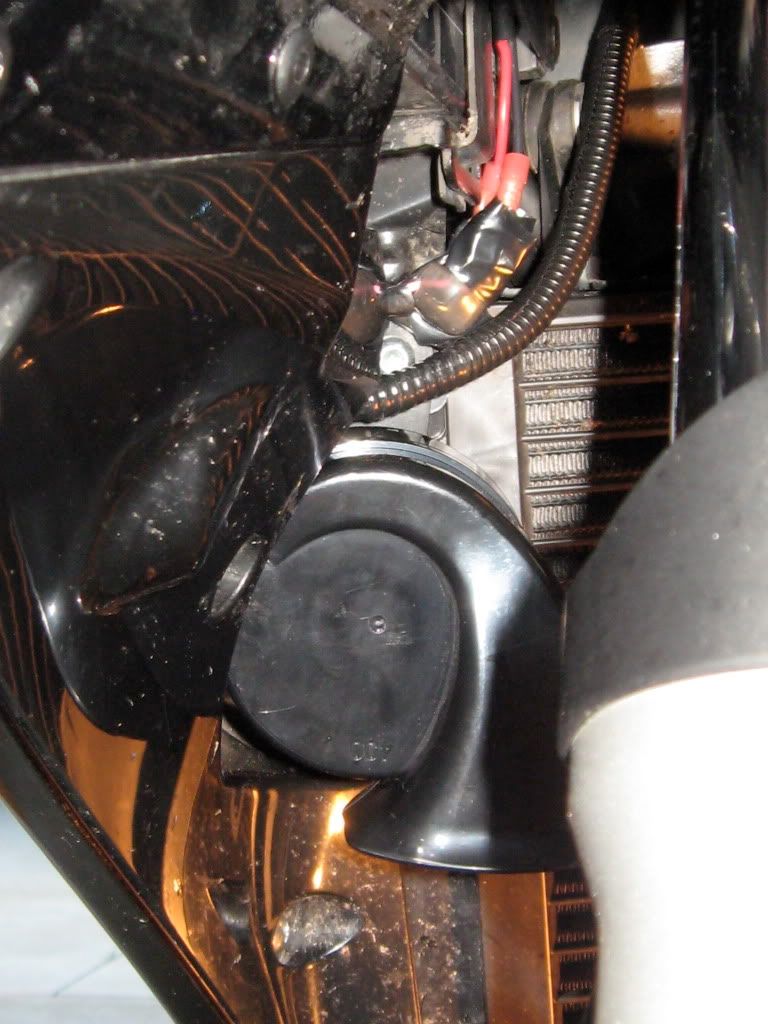
The final horn arrangement is shown below. First the right horn.
And the left horn BEFORE the panel reinstall.
Now, the noise I make will get me noticed. These horns work well and are a significant improvement over the OEM crap. Thanks to all the folks here who helped me get the info together to pull this off easily. This is a great forum.
Last edited by a moderator: