No-Mar Tire Install

Yamaha FJR Motorcycle Forum

Help Support Yamaha FJR Motorcycle Forum:

This site may earn a commission from merchant affiliate links, including eBay, Amazon, and others.
I was fortunate to have procured my changer, balancer and motorcycle lift for the cost of picking it up in CT. I purchased the Mojolever and blocks, so I am way ahead. At $40 per set at the local shop it will not take long to be ahead, Also ditto everything Bokerfork said (except for the weird sexual perversion).
no.gif


Trying not to get too far off topic. Especially since the OP's question has essentially been answered.
In response to the time and money spent on a tire changer vs. going sown to Cycle Gear, here is my two cents.

I can now change the tire at my convenience.

I can now save the old tire and if necessary remount it. ( This is handy when planning a 3,000 mile trip when you only have 2,900 miles left on your present tire.

I can rest in the knowledge that it is done right.

I can buy tires when they are on sale and from whom they are on sale.

And most importantly, pulling in to the garage and seeing my tire changer sitting there gives me a wierd sort of testosterone surge.

JSNS
All good reasons... plus you can switch between knobbies and Dual Sport tires depending on what kind of ride you are making.

 
I have maybe $250 in my HF changer (w/Mojo blocks and lever) and Handy balancer. Space is too tight in my garage (5 bikes in a single bay garage) to mount it to the floor, so I put it on a half sheet of 3/4" plywood with 3/8" carriage bolts so I could quickly disassemble and store it. The spot in front of the bead breaker has 2 pieces of 2X4 screwed to the plywood so the brake disc doesn't bear any weight when the bead breaker is in use. I found the wheel can still turn in the Mojo blocks, so I use a ratchet strap around the wheel spoke and the arm of the HF to limit that. For the number of tires I change yearly, the HF is sufficient and a lot more convenient than taking wheels to a dealer for changes.

 
If you're thinking of buying a No-Mar, they are on sale now but act quick.

Biggest benefit for me is having a waist level surface to work on and securing the wheel.

https://www.nomartirechanger.com/dealoftheday.asp

I found mine on Craiglist and swapped a Rossi revolver for it.

Since I don't have a lot of room in the garage I don't have it bolted down, instead I bolt it down in my trailer when I'm ready to use it.

 
Like most, I do not have much excess garage space to leave a tire changer setup. So, I drilled and inserted some expanding anchors into the garage floor for the Cycle Hill (by NoMar) changer to be bolted down (relatively quickly) after pulling m'lady's car out. If you take one of the two bolts out of the two side arms the changer folds up to a pretty small package size for storage.

Question about the Harbor Freight Clamp set up:

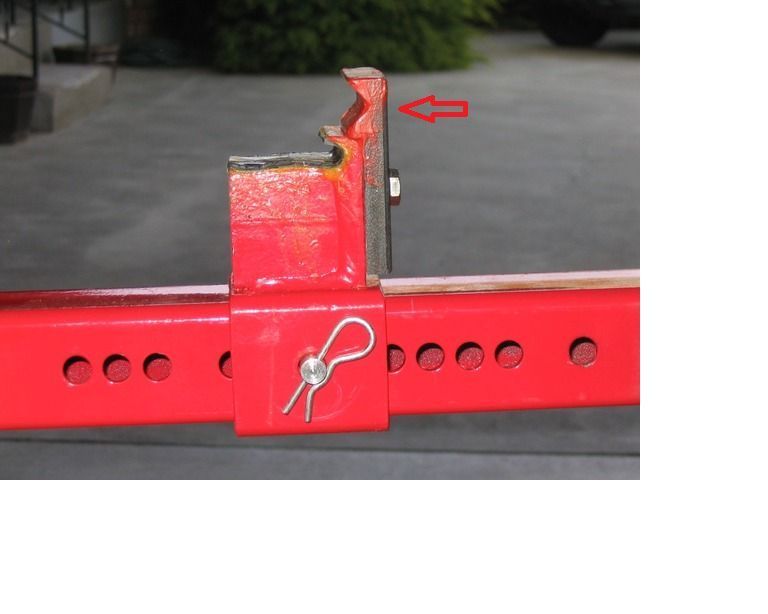
What is this part of the clamp used for? It seems like they would jab into the bottom of the tire and make it more difficult to get the rim hooked into the clamps. Maybe you could trim them off flush with the working part of the clamp? :unsure:

Harbor%20Freight%20Changer%20clamp.jpg


My guess Fred it is there for a wider rim that would not fit in the lower groove. If you don't need it just unbolt it and take it off I would imagine.

Dave

 
Fred,

The main reason, I believe for that riser is to do exactly what you're afraid it's going to do. It helps push the lower bead into the drop center.

 
My guess Fred it is there for a wider rim that would not fit in the lower groove. If you don't need it just unbolt it and take it off I would imagine.
Dave
We have a winner! I read that some rims, especially BMWs, will not fit in the lower HF mounts so I asked my son-in-law to make the upper brackets in case I ever needed them and I covered them in plastic dip to avoid scratching. I've never used them and pretty much forgot about them until I saw those pictures.

 
I have maybe $250 in my HF changer (w/Mojo blocks and lever) and Handy balancer. Space is too tight in my garage (5 bikes in a single bay garage) to mount it to the floor, so I put it on a half sheet of 3/4" plywood with 3/8" carriage bolts so I could quickly disassemble and store it. The spot in front of the bead breaker has 2 pieces of 2X4 screwed to the plywood so the brake disc doesn't bear any weight when the bead breaker is in use. I found the wheel can still turn in the Mojo blocks, so I use a ratchet strap around the wheel spoke and the arm of the HF to limit that. For the number of tires I change yearly, the HF is sufficient and a lot more convenient than taking wheels to a dealer for changes.
+1 I got the ratchet strap idea from a video.

 
My guess Fred it is there for a wider rim that would not fit in the lower groove. If you don't need it just unbolt it and take it off I would imagine.
Dave
We have a winner! I read that some rims, especially BMWs, will not fit in the lower HF mounts so I asked my son-in-law to make the upper brackets in case I ever needed them and I covered them in plastic dip to avoid scratching. I've never used them and pretty much forgot about them until I saw those pictures.
Fred,The main reason, I believe for that riser is to do exactly what you're afraid it's going to do. It helps push the lower bead into the drop center.
The problem I see with that is that it is never the lower bead that I ever have a problem with, either mounting or dismounting. In both cases it is trivially easy to get the opposing section of the bead in the drop valley of the rim since the upper bead is off the rim and not fighting back. When mounting I usually only have to lube the half of the bead circumference (away from my body) and just shove the tire at the rim with both hands and it pops right on.

It's always the upper bead that is more difficult since you are having to compress the tire cross section to get the opposing bead into the valley, and I can only see that block pushing up on the bottom sidewall from below making that situation worse. I would think it would work better to remove that block when you aren't using the hooks for a bigger / fatter rim
unsure.png
.

 
Last edited by a moderator:
I just wanted to update the thread by saying that the Michelin I received took about 2 minutes to install. Warmed it up in the sun for about 2 hours, lubed it up good and it went on without incident. I think I'll stay away from Bridgestones... Thanks for all the insight from all the forum members that posted.

 
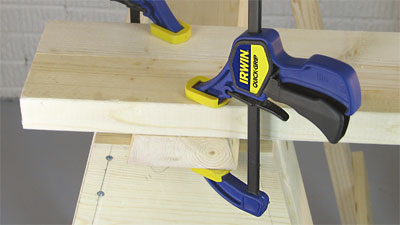
Getting a little off track. I use a couple of these (in addition to the handy clamps) to keep the opposite side in the center of the rim. Works like a charm, I've tried the zip tie as well, but these just seemed to be easier.
clamps-1.jpg
Those are exactly what I use to keep the beads pushed together and in the center of the rim. I clamp the wide part of the tire in 2 spots maybe 30-45 degrees apart and this pushes the beads together. My knee keeps the tire beads in the center of the wheel.
 
I think I might win the race to the bottom in low cost tire changing equipment.
smile.png

My tire changer is made almost entirely of scrounged parts that I either already had on hand or found on the side of the road (the car wheel). I make it a point to tell the wife everytime I use some of the junk laying around to fix or create something to lessen the bitching about me "never throwing anything away." ;) I only had to buy some threaded rod and a few nuts, which kept costs below $10.
tire_changer.jpg


The wheel is bolted to the 2 inch square tubing by the threaded rod and this allows it to be inserted in the hitch on my truck for use and then easily stored in the shed when not in use. An old hose is glued to the wheel to protect the bike's rims and the bead breaker contact point is a piece of oak from an old cutting board. I replaced the wing nut in the picture with a standard nut that I had the welder at work weld a couple wings on so I can quickly spin it on to hold the rim (I also removed unneeded threads on the rod so that the nut drops down quickly before engaging threads for final tightening).

I also made the balancing stand with scrap lumber and some modified brackets to hold bearings that used to be in a aircraft flight recorder. I use the bike's axle to hold the wheel on my bearings to allow for effortless tire spinning.

balance_stand.jpg


I did end up splurging on a mojo type lever from www.no-scufftiretool.com to make the job a little easier than the tire irons I've used my whole life. I think the $89 was well worth it!

 
Top