Remove and Install Wheels

Yamaha FJR Motorcycle Forum

Help Support Yamaha FJR Motorcycle Forum:

This site may earn a commission from merchant affiliate links, including eBay, Amazon, and others.

RossKean

Well-known member
Joined
Feb 15, 2010
Messages
7,140
Reaction score
3,640
Location
Fredericton, NB
I was wondering if the procedures described in the FJR Tech pages (for a 2004 ABS) are essentially the same for the 2007? Taking the wheels in tomorrow for new rubber and thought I would save some coin by doing the remove/install by myself. Just wanted to make sure the procedure is right.

Thanks

Ross

 
Yes essentially the same. That's what I used when I first pulled the wheels on my 2006.

Griff
Thanks Griff

I was looking at the service manual and its not always crystal clear in terms of what is really necessary to remove/disassemble. Yamaha would have you take it down to the frame, I think. Anyway, I'll have a go at it tonight. The diagrams in the FJRTech section are pretty much the same as the service manual. Assuming my idea for blocking up the front works (after rear wheel removal), it shouldn't take much more than an hour or so. I'm a little nervous about leaving the bike a half day without support other than the center stand and a jack under the header pipes. The garage is off-limits to everyone until its buttoned up again.

Ross

 
GenII front wheel has an axle nut, GenI axle just screws into the left fork. ABS was optional on GenI so some of those bikes don't have the sensors and stuff associated with ABS.

Otherwise the same. Get the brakes out of the way, get the axle out, drop the wheels. Generally while supporting the bike somehow. :)

 
Last edited by a moderator:
There's also 4 pinch bolts for the axle as opposed to the one mentioned on the site.

It's actually rather straightforward once you get the calipers out of the way (watch out for your fender's paint job if you leave it on).

 
Harbor Freight sells a scissor jack for $15. You can weld or bolt a rectangular piece of sheet metal to the jack head to make a very nice jack for the FJR. Or use a scrap of wood temporarily. Nice thing about scissor jacks is you don't have to worry about them leaking down overnight.

I highly recommend removing the front fender for a Gen-II tire change. It makes the job much easier and there's significantly less risk of paint damage.

One final recommendation... Hang something like a red flag on the front brake handle, each and every time you begin a tire change. That will remind you of that final, most important step to pump the caliper pistons back into position before riding the bike. I use one of the "REMOVE BEFORE FLIGHT" flags.

 
All done - easier than I thought. The FJRTech articles were great - easier to follow than the service manual. Bike is wheel-less and resting securely on the centerstand and a jack under the header pipes. Blocks under the forks for a little added security.

New skins going on it tomorrow. As far as I am concerned, the Shop Monkeys at the dealership won't touch this bike again. (I am even getting a tire machine to handle future rubber replacement.) From the last service:

1) Rear axle nut must have been torqued to 200 ft-lb or more!! Took a 3 foot bar and a lot of grunt to even move it and I ain't a 90 lb weakling.

2) The heads on two of the three screws holding the dust cover on the rear wheel were stripped and the cover rattles. Will have to find replacement screws and see if it is even possible to get the old ones out. (no idea why any shop would have this off - possibly f***ed up from the factory?)

3) The front axle bolt was LOOSE. Good thing there are four pinch bolts.

I WONDER WHAT ELSE HAS BEEN SCREWED UP? I bought the bike used this spring with 12,600 miles on the clock. Another 20,000 so far and hope a lot more over the next several years. This one is a keeper.

Thanks for the help!

Ross

 
Harbor Freight sells a scissor jack for $15. You can weld or bolt a rectangular piece of sheet metal to the jack head to make a very nice jack for the FJR. Or use a scrap of wood temporarily. Nice thing about scissor jacks is you don't have to worry about them leaking down overnight.
I highly recommend removing the front fender for a Gen-II tire change. It makes the job much easier and there's significantly less risk of paint damage.

One final recommendation... Hang something like a red flag on the front brake handle, each and every time you begin a tire change. That will remind you of that final, most important step to pump the caliper pistons back into position before riding the bike. I use one of the "REMOVE BEFORE FLIGHT" flags.
I already had a MC jack and just put a 2 x 4 on one of the arms to raise the front. (not too much pressure on the headers). The MC jack has a mechanical lock so can't leak down. Didn't remove the front fender but I can see where it might have been easier. May remove it to re-install the front. Good idea on the red flag. Both to remind me to pump the brakes before starting out but also to NOT pull the lever while the wheels are off - PITA to push back the pistons to re-install.Thanks

Ross

 
Last edited by a moderator:
...I WONDER WHAT ELSE HAS BEEN SCREWED UP? I bought the bike used this spring with 12,600 miles on the clock. Another 20,000 so far and hope a lot more over the next several years. This one is a keeper.
I recently bought a used 2006 with only 1,800 miles on it. It still had the original tires installed by the selling Yami dealer. The front wheel was installed with the ABS sensor disc installed OUT of the notch. ABS wire pulled banjo tight and front axle nut finger loose. The crap you find from "dealers" can be worse than anything from an individual.

My advice..., take your time and go through the bike. Apply anti-seize to the threads of steel bolts that screw into aluminum and torque them all to spec. You may correct something that your life depends upon.

 
...another reminder for GEN II's, although it's been inferred but not said on this thread. Pump the rear brakes in addition to the front lever. Can't forget about that single front piston... ;)

--G

 
Just did the front wheel on my 08. It was the abs stuff that made me hesitant. The manual I have says to torque the front axle to 66 ft lb. But the tech stuff here says like 52 (iirc). Is 66 right? it seems pretty stout.

My dumb mistake was 1st buttoning it up with the spacer backwards! sheeesh. Remember, the flange goes to the outside...

would add, sure didn't seem like the torques were right from the dealer when taking it apart, pinch bolts especially where quite diff.

 
Last edited by a moderator:
Just did the front wheel on my 08. It was the abs stuff that made me hesitant. The manual I have says to torque the front axle to 66 ft lb. But the tech stuff here says like 52 (iirc). Is 66 right? it seems pretty stout.
Yes, it's correct.

Axle torques of 65-lbs. front, 90-lbs. rear. Fairly common for Yamaha bikes.

 
If I have to leave my bike with both wheels off for any length of time I put a bar through the front axle holes and gently lower the bar down onto a jack stand with a U shaped top support. This lets me take the weight off of the header pipes and it adds stability to the suspended bike.

 
Because the front rotors are bigger on GenII, there is just barely enough room to get the calipers back on. Can be done, but a tight squeeze. Spray down the brakes with brake cleaner to wash out dust and crud that might compromise the piston dust seals when you push them back in (a little bit).

 
Because the front rotors are bigger on GenII, there is just barely enough room to get the calipers back on. Can be done, but a tight squeeze.
Gen 1 for 04-05 have the larger rotors as well.. only the 03's have the smaller ones.

 
To raise the front, I use handle bar straps hooked to a come-a-long hooked to a tie-down that's around an overhead rafter. Clickety clickety and it's up as high as I like. I do put blocks under the headers though just to ease my paranoia.

 
I know I'm late to the party here but just wanted to share a few musings about my experience removing and replacing my front wheel (after putting on front PR2).

First, I highly recommend removing that front fender -- it's easy and makes getting the brake calipers off much easier.

Second, there are 4 bolts off that front fender -- two of them look like regular fairing bolts and two of them are longer bolts. These bolts look identical to the bolt that holds the ABS sensor on -- with the exception that the two fender bolts are longer. It took me about 15 minutes of noting that the long bolt didn't go in all the way to figure out that I was using the wrong bolt :glare:

Most of all, a big thanks for the links already there: https://fjr1300.info/howto/frontwheel.html (and it's pointer to wheel removal for ABS models).

I've removed front wheels off of 3 other sport bikes (and all were pretty straightforward), but for the FJR, I was hesitant to do this mostly because I didn't want to mess with the ABS. Eventually I found that dealing with the ABS was a minimal inconvenience -- if at all.

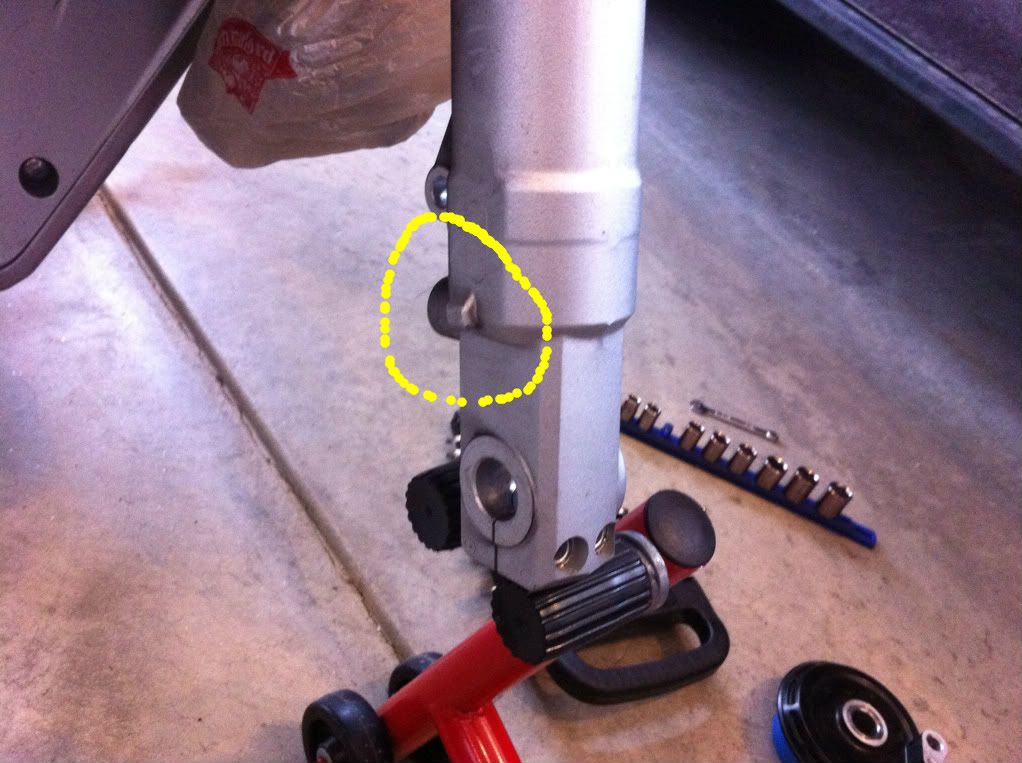
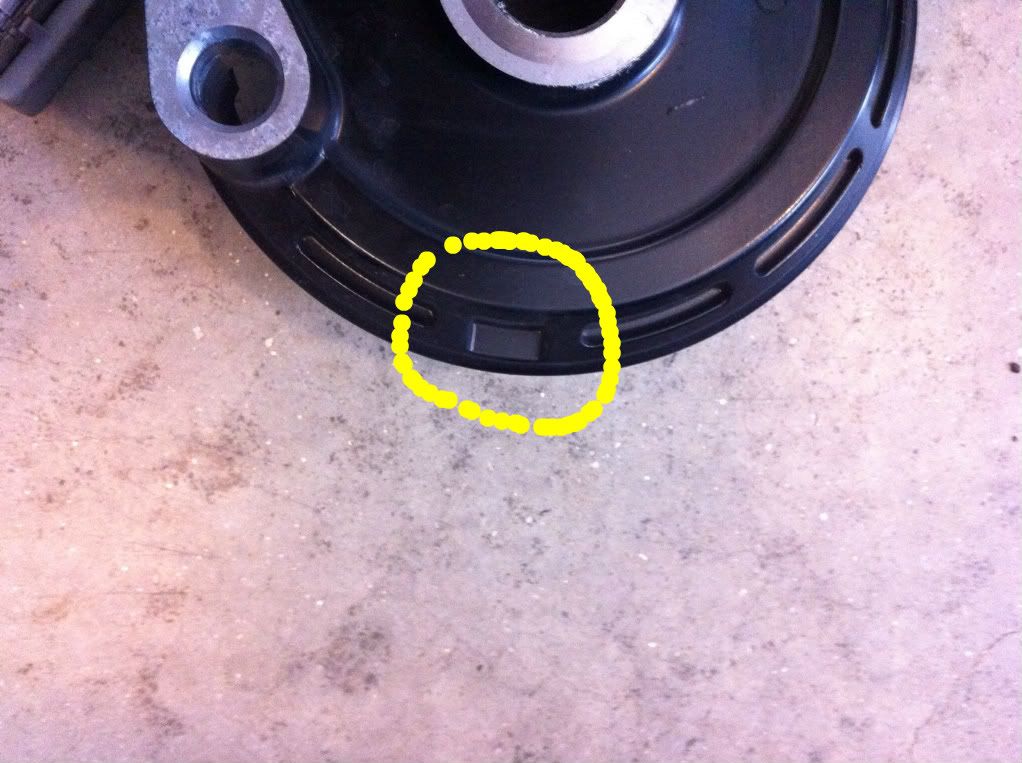
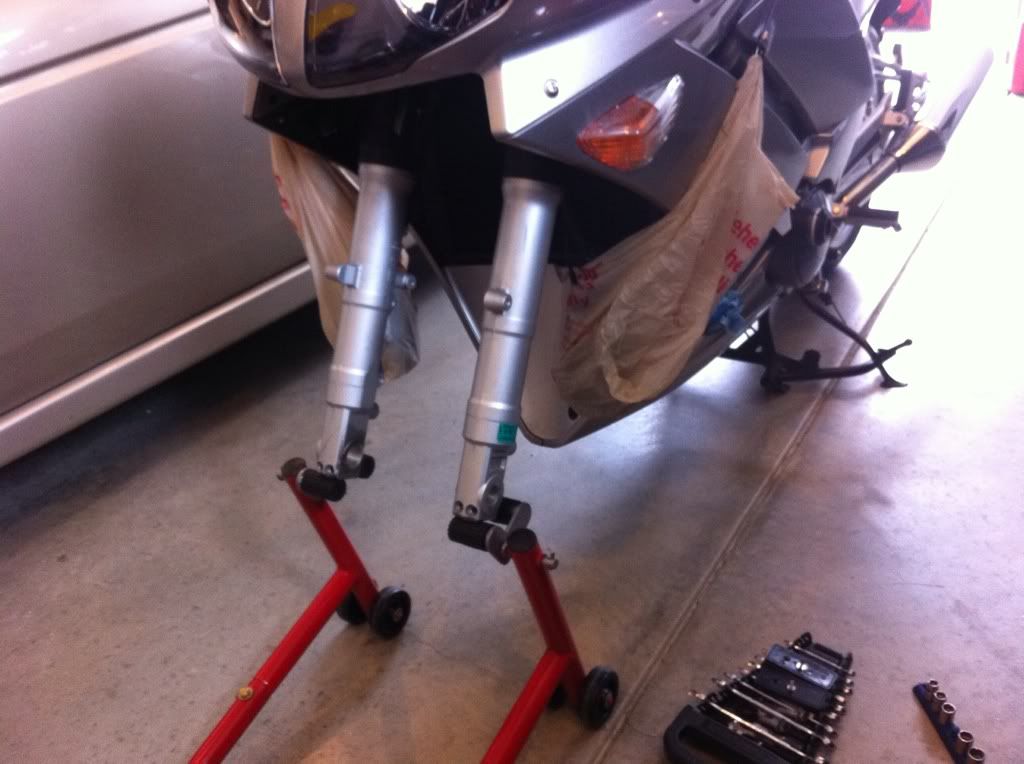
Here're a few pics to show more.

Here's the protrusion that holds the ABS hub in place:

f9583cbe.jpg


Here's the slot in the ABS hub where it goes:

221fd847.jpg


Here's my way of holding the calipers out of the way while I work -- basically, use two grocery bags to hold them and hang them from a mirror using a bungie chord or whatever is handy:

0702db23.jpg


Dennis

 
Remove the front fender? Whatever floats your boat but I find it much easier to park the rear wheel on a 2x4 and add a 3/4" piece of plywood under the centerstand. This gives more than enough clearance to remove/install the front wheel with ease. Plus, rather than a front end stand as you show, I just use a floor jack with a piece of 1x2 under the exhaust pipes. Then nothing is in my way out front and I'm not worried about knocking it off.

 
That 90 ft.lbs. on the rear axle nut has been a pain for me. I always end up marring the nut. First tried a 12 point socket and mar ed the shit out it. Next went to a 6 point impact with similar results. Impact sockets chew things up. Finding a non-impact 27 mm in 6 point is hard to find. Found one a Auto Zone. I go with 80 ft.lbs.. One other point - 22 ft.lbs on the rear wheel sensor bolt (abs sensor) is b.s.. I don't know where Yamaha comes up with some of this shit.

 
Top