SOS from Alaska

Yamaha FJR Motorcycle Forum

Help Support Yamaha FJR Motorcycle Forum:

This site may earn a commission from merchant affiliate links, including eBay, Amazon, and others.

iCruze

Well-known member
Joined
Jan 17, 2009
Messages
138
Reaction score
0
Location
Alamogordo, New Mexico
Ok I have seen the numerous threads on how-to install the AVCC-100 and at times felt very confident and at times like right no so much. I am putting out an SOS first to Alaska FJR owners (or anyone in AK who has installed an AVCC or has the knowledge and know how) than to anyone who is coming up to the Fairbanks area that is willing to help me out. I have the unit and vacuum from Murphs but am a little weary about the whole process. The FJR is my first real bike and the AVCC will be the first real farkle I am a bit nervous about tearing into it what I consider full bore for me at least. Please note I was careful not to post on Friday so all the fair weather owners could concentrate on weekend ride planning.

 
I just completed my install. Ist really not that hard, if you apply some common sense. I am going to do a write up on it. Pretty basic. I had a few issues but only becaue I have an ABS generatoin 1 bike. best shortcut is take the grey wire coming from the control pad and soldier it to the red wire, They both need 12 volts to work. No reason to run another wire. I also ran my red wire from my servo to my power block under my seat, No reason to tap into another wire. Used 3/8 hose wrapped around inside my tail fairing as my serervior to save room. All is good so far.

 
Here's the site that I used for the install on my 04 ABS:

https://www.fjr1300.info/howto/audiovox.html

Here's an alternative site for the servo placement:

https://www.fjrforum.com/forum//index.php?showtopic=14483

Seems like I saw another site that had an alternate idea for holding the cable end in front of the throttle tang using parts that were in the Audiovox box but I couldn"t find it.

Just start the install and take your time. I used a friend's heated garage using the first site in this message (it'd be a lot easier now that I could have a laptop in the shop). It took me about 20 hours, I was devastated when I tried it with the bike on the center stand and it didn't work-bike has to be running on the road. Good luck! Ian, Iowa

BTW I used a long drill bit to drill the hole in the throttle tang and it kept slipping off. A friend gave me the tip about putting a piece of masking tape on the tang to give the bit purchase.

 
I installed an Audiovox cc on my 04 ABS using this FJROwners site:

https://www.fjr1300.info/howto/audiovox.html

I put the servo in the tool tray-it took a little work with the dremel

I later saw this site about an alternative place for the servo-looks good if the engine heat doesn't affect it:

https://www.fjrforum.com/forum//index.php?showtopic=14483

There was another posting offering a better method of mounting the cable end in front of the throttle tang using parts icluded in the Audiovoxbut I can't find it.

I used a friend's heated garage and took my time-about 20 hours. Didn't have any problems. Ian, Iowa

Oh BTW, I used an extra long drill bit to drill the throttle tang but the bit kept slipping off the tang. My friend suggested putting a piece of masking tape on the tang-worked great.

Must be having a problem on the forum-I've posted twice and it's disappeared into the ether.

My bad, somehow I got switched to outline :dribble: .

 
Last edited by a moderator:
The few things the guide fails to mention is that you need to bend the tang slightly, adn teh grey adn black wires that are not used are on the servo. The grey and blck from the control pad are both used. To ops check the servo. Remove the plate at the rear, When you arm the CC teh light will come one, When you set it the light will again turn on. If your bike is like mine it has different color wores at the coil. Use the forward wire to attach your blue wire to.

 
Here's some more details about the "alternate" installation of the servo behind the coolant pipe on the engine: https://www.fjrforum.com/forum//index.php?showtopic=114094

No one has reported any issues with engine heat.

While removing my air box for modification, I discovered that working with the throttle pulley tang would have been SOOOO much easier if I had removed the air box. You can probably get right at it with a drill without having someone hold the throttle open for you. And if you drop any of the tiny pieces as you're working on it, you'd have a much easier time retrieving it.

If I get any requests, I can post a step-by-step photo walk-through of removing the fuel rail and air box.

I was quite afraid of tackling the cruise install myself also and was actually planning on paying smitty to do it for me. But then I got bored one day and wanted to work on the bike (because it was winter and I can't ride; farkling is the next best thing). If you read through the various guides and make decisions ahead of time where you are going to place things and where you are going to tap into wiring, then you can gather necessary supplies ahead of time. After that, just work slowly, checking the guides on the forum as you progress, and double-checking each step along the way (especially the electrical stuff). Plan on your bike being out of commission for several days at least (prevents you from rushing anything) and just walk away from the bike and take a break any time you get frustrated or are unsure of what to do next. Solutions often come to you when you take your mind off the task for a while then re-visit.

Also, don't forget that if you are unsure of any particular step when you get there, you can ask us on the forum. Response time may not be as quick as you'd like, but that's why I say to assume the bike will be out of commission for at least several days. Try to "rehearse" the entire project in your mind (or write out detailed steps) to discover the missing pieces before you start.

 
The few things the guide fails to mention is that you need to bend the tang slightly
If you use Rad's button head screw you shouldn't have to, break that tang and you will NOT be happy.
I used the botton head screws, Just needed another hair for clearance. I just tweaked it a hair, then removed adny excess with my dremel from the screw.

 
Ok I have seen the numerous threads on how-to install the AVCC-100 and at times felt very confident and at times like right no so much. I am putting out an SOS first to Alaska FJR owners (or anyone in AK who has installed an AVCC or has the knowledge and know how) than to anyone who is coming up to the Fairbanks area that is willing to help me out. I have the unit and vacuum from Murphs but am a little weary about the whole process. The FJR is my first real bike and the AVCC will be the first real farkle I am a bit nervous about tearing into it what I consider full bore for me at least. Please note I was careful not to post on Friday so all the fair weather owners could concentrate on weekend ride planning.
Man, am I glad you created this post! :yahoo: Going through the threads, I've learned so many answers to the exact questions I had about installing the AVCC on my '06 AE. Now if I can just learn how to get or make a mount that looks factory for the control pad of this thing! :unsure: I'd be set and ready to tackle the install myself.

I think I'll do one of those picture "how-to" posts for the AE AVCC install since I haven't been able to find a complete one here for us AE owners.

 
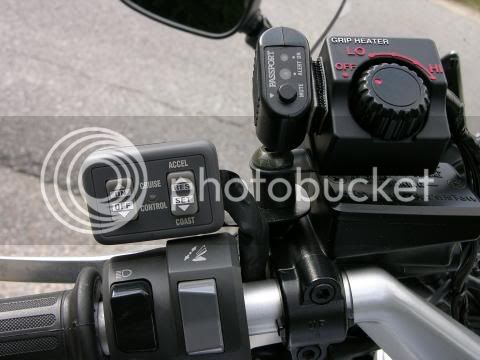
In my best "outside the box" thinking, I mounted the pad on the upper fairing, just outside the inner panel. I have to reach down to set it, but so what? I know where it is, I don't have to look down to use it, and I didn't have to fabricate anything, either.

Yes, it required putting a hole in the fairing. So what? I covered the hole with a useful piece.

controlpanel.jpg


Finished.jpg


Last edited by a moderator:
In my best "outside the box" thinking, I mounted the pad on the upper fairing, just outside the inner panel. I have to reach down to set it, but so what? I know where it is, I don't have to look down to use it, and I didn't have to fabricate anything, either.
Yes, it required putting a hole in the fairing. So what? I covered the hole with a useful piece.

controlpanel.jpg


Finished.jpg
Now that's a thought! I guess I was "hell-bent" on having the thing near my thumbs somewhere but, as you've shown, it's not absolutely necessary.

 
In my best "outside the box" thinking, I mounted the pad on the upper fairing, just outside the inner panel. I have to reach down to set it, but so what? I know where it is, I don't have to look down to use it, and I didn't have to fabricate anything, either.
Yes, it required putting a hole in the fairing. So what? I covered the hole with a useful piece.

controlpanel.jpg


Finished.jpg
That is pretty cool, I just cant believe the things that guys come up with on the forum. I hope with time that I will gain the ingenuity and gumption to peform these one of a kind farkles. I am still working on figuring out the most common ones. I took my FJR apart Sunday and between school work and visiting relatives I havent achieved much, luckily I live up here in the winter wonderland and have time to get get'er done.

 
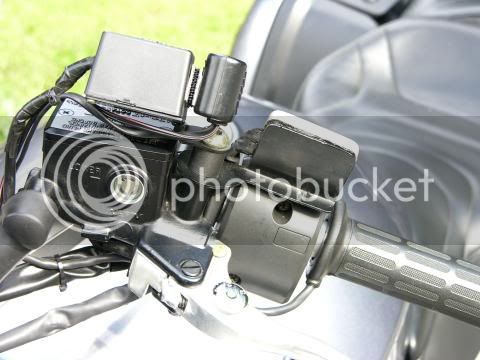
The best control pad is this one from Dan Bergmen/Murph's Kits for 29 bucks. It bolts right up alongside your clutch master to an already existing bolt and you can control it with your thumb while underway and without having to remove your hand from the left handlebar.

dansb.gif


You can get it here.

 
My home made bracket puts the control pad right at my thumb so my hand never has to leave the handlebar. The bracket started out life as a joist hanger from which I subtracted all the bits I didn't need ;) I did leave some of the folds in the bracket to give it some extra strength.

pad3.jpg


pad_back.jpg


The best control pad is this one from Dan Bergmen/Murph's Kits for 29 bucks. It bolts right up alongside your clutch master to an already existing bolt and you can control it with your thumb while underway and without having to remove your hand from the left handlebar.
dansb.gif


You can get it here.
Umm, it appears that I will still have a couple of issues with this one. First, I have a 2006 1300FJR AE and there's no mirror mount hole to put the bolt into on either side. Second, the left side mounting would have to clear the "finger paddle" gearshift. To try and mount the control pad on my bike near the thumbs is going to take some figuring out considering what I have to work with. I probably will have to think "outside the box" on this one.

 
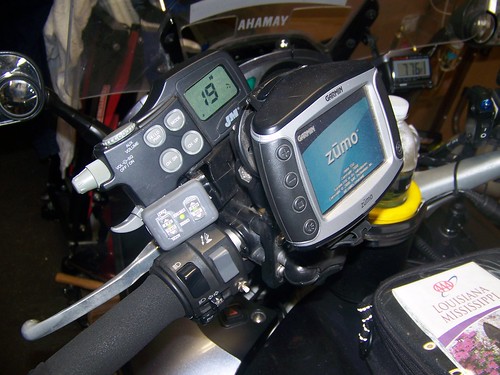
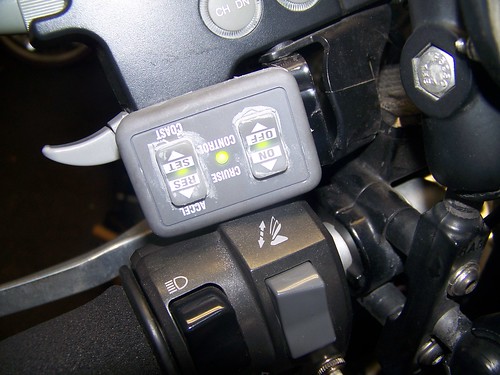
Mine's a homemade bracket using the installed J&M mount which does use the mirror hole mount

My install uses a 12" 1/8" diam drill, with a spring loaded center punch to dimple the tang and keep the drill from walking

Then used a Stainless 6-32 x 3/8" long round head bolt (with slot) and nylok nut on the tang (nothing else)

I wanted the set/resume button closest to my thumb so it's mounted upside down

3229123863_719485fcc3.jpg


3229123869_a3ecca71fe.jpg


3229124651_d95899e6e2.jpg


The best control pad is this one from Dan Bergmen/Murph's Kits for 29 bucks.
I'm fond of Brundog's solution myself.
[SIZE=18pt]Now see, this is WHAT I'M TALKING ABOUT!!!! I LIKE THIS!!! This is why I looovve this forum.[/SIZE] :yahoo: I would only make two changes. My preference would be to only have the CC on when I turn it on and I would also like an LED maybe to let me know it is on and operational. I know it can be done, I would just need instruction on getting the LED part done. :unsure:

 
I would only make two changes. My preference would be to only have the CC on when I turn it on and I would also like an LED maybe to let me know it is on and operational. I know it can be done, I would just need instruction on getting the LED part done. :unsure:
I've not done the install and was going to start this past weekend but then got off on seeing if I could get the Audiovxo mounted on my wife's VStar 1300 (gotta figure out how to attach to the throttle bell crank - the FJR model doesn't work).

I'm seriously leaning to BrunDog's method of mounting the control pad. As I recall his diagram, from the switch side of the On/Off side he takes the 12V to the Set/Resume switch. I don't recall if there is a ground wire up there. You would need to to what I was thinking of doing. I was going to drill two tiny holes just large enough and spaced so the leads of an LED (most likely green) with go though the case. I was thinking of surface mounting the LED on the top of the case where clearance allowed and hopefully in a clear line of sight.

to install the LED I was going to insert the leads it the holes (depending on the lead length) 1/2" plus (hopefully) into the case and then put silicone glue on the bottom of the LED and into the holes and the firmly push the LED onto the case. Want to keep the silicone off the lead where you solder or make a mechanical connection.

The ground wire would then attach to the negative ("pointy end of the arrow of the LED" and then attach a resister between the switch 12v and the other side of the LED. I've not investigated with LED I would use the resister size would be 12V / LED_nomimal_mA = X-Kohms. The LED needs to attach to ground and you need the resister to limit the current and maintain 12V at the switched 12V terminal of the On/Off switch.

I'd email BrunDog about his switch installation late last week and asked about the LED. He said he'd thought of it but was concerned about too many holes in the case.

Roy


Latest posts

Top