Spiegler - Missing Banjo Bolts?

Yamaha FJR Motorcycle Forum

Help Support Yamaha FJR Motorcycle Forum:

This site may earn a commission from merchant affiliate links, including eBay, Amazon, and others.
My package (ABS) of lines, pads, bleeders and rotors was short the banjo bolts for the manifold in front of the forks. Gary overnighted them right away and all worked out well. Of course, on the first long ride with the new brakes the shmuck on the HD hit me but that's another story.

 
jim v, did you make a new bracket for where the hard lines connect to the new lines in the front?The instructions call for a new homemade bracket there.Did the speed bleeders work as advertised?I've still got to tackle this project soon.
No, the bracket is on my to do list. For the moment, I just put the stock bracket back on and zip tied the lines to it. I'm sure it’s functional but it’s not something you'd call your friends over to show off to them.

I'm ambivalent over the speedbleeders right now. After doing the front brakes and the clutch, I thought they were the greatest thing ever. However, last night, as I was doing a second bleed on the rear brake, I kept getting bubbles in the tube. I probably pumped a pint of fluid through the damned thing and I can't completely get rid of them. If you pump the brake pedal hard it makes it worse, almost like champagne. The thing is, there are no leaks anywhere and the brake feel with the Spieglers is great. You hardly have to press the lever now. I just wonder if it isn't aspirating air through the threads on the speedbleeder. I've decided that, as long as the front brakes aren’t in question, I'm just going to leave the rear brake alone until I can drive test the bike. Although I'm now paranoid enough that I'm going to do the ABS tests recommended in the service manual before riding the bike. And then rebleed the rear.

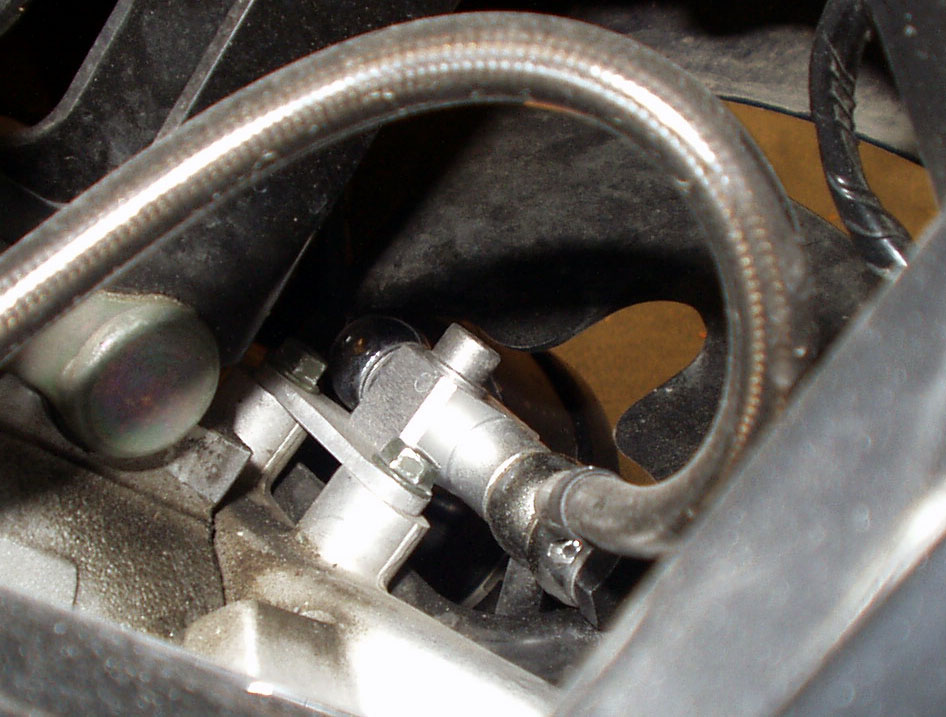
I also wonder if I put the two way manifold on correctly for the front brakes because it conflicts with the steering cover (the little black plastic fender thing that the lines pass though coming from the calipers). Basically, the hole in the steering cover is too small for the manifold to fit through it properly when everything is put back together. I couldn't find any pictures of how anyone else did it but mine is mounted under and in front of the bracket they provide and bolted to the stock holes. The bracket is basically pointing downward. I just used a file to widen the hole in the steering cover enough that it doesn't conflict.

My one piece of advice on the Spieglers is to not be a ******* like me and get a couple of flare nut wrenches (aka line or split-box wrenches) for the connections to the hardlines as recommended by Warchild. You'll need a 10mm and a 14mm to disconnect the hardlines. I came PERILOULSY close to ruining one of the fittings with a 10mm open end wrench. The instructions should be amended to recommend this tool for amateur mechanics like me who don't know what they are. DO NOT use an open end (two sided) wrench on those fittings because they're tight and strip like butter, especially the crucial 10mm fitting on the hardline.

Cheers,

Jim

 
OK, time to resurrect this thread instead of starting a new one...

I just rec'd my Spieglers (ABS kit) from Gary. BTW, he was awesome to deal with, and the stuff came in record time, exactly (I think) as I asked.

Here are a few questions for those who installed this kit. While the instructions on FJR1300.info help, they are far from complete and seriously lack photos.

1. I asked for all banjo bolts and rec'd a total of six. One is a double M10 for the 2-way manifold, one is a single M10 for the 2-way manifold. That leaves the four standard thread single banjo bolts. Where do these go? Assuming I re-use the bolts at the ABS pump, there would be two master cylinders and three calipers, for a total of five, so I am one short. Obviously, I will use all three calipers, so which master cylinder gets to keep its original bolt? The rear or front?

2. How the frig is the two-way manifold configured and mounted? A picture with the line positions would have been nice. I assume the feed from the hard line and the right caliper go on one side, the left caliper is on the other, but still, do they expect us to be psychic? The mount bracket looks like something Helen Keller whipped up in her spare time, too. I cannot in good conscience put this POS on my ride.

3. I count 12 banjos, so with a crush washer on each side, I should have 24. For some reason, the line position sheet indicates 23. WTF? Which banjo gets screwed? Is it the interface between the double banjo? Luckily, they actually put in 26, so when I wreck one I'll be backed up...

4. If anyone has more detailed instructions, or even better yet, some photos, I would gladly repay you somehow.

Thanks in advance!

-BD

 
1. I asked for all banjo bolts and rec'd a total of six. One is a double M10 for the 2-way manifold, one is a single M10 for the 2-way manifold. That leaves the four standard thread single banjo bolts. Where do these go? Assuming I re-use the bolts at the ABS pump, there would be two master cylinders and three calipers, for a total of five, so I am one short. Obviously, I will use all three calipers, so which master cylinder gets to keep its original bolt? The rear or front?
Yes, reuse the existing bolts for the pieces that don't show. The front should get the snazzy bolt.

2. How the frig is the two-way manifold configured and mounted? A picture with the line positions would have been nice.
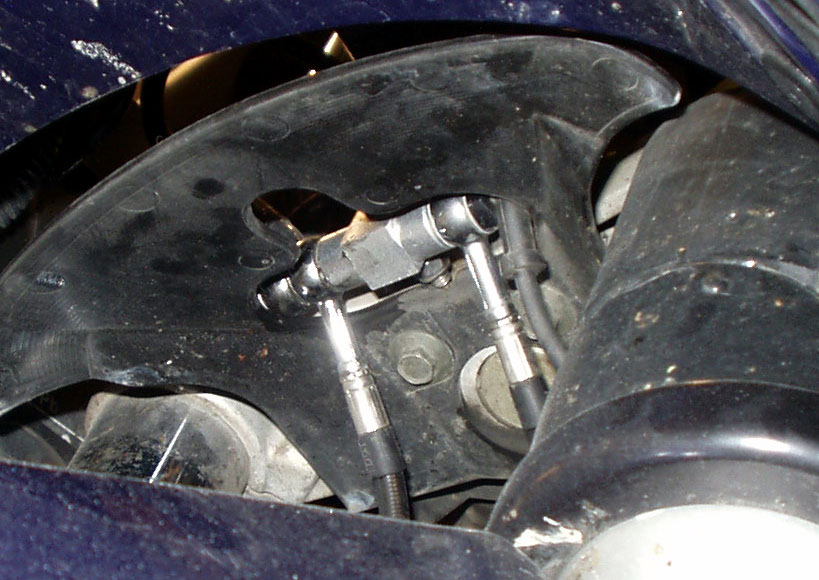
Try these pictures on for size. The two down lines are at roughly a 35 or 40 degrees compared to the two bolts holding the manifold. I made that angle as little as possible to account for shock travel.

Spend your time here. Visualize, dry fit (finger tight things), and repeat until you feel comfortable. It's a half hour well spent.

spiegler01.jpg


And you can just make out the line on the left that goes up to the master cylinder.

spiegler02.jpg


3.  Which banjo gets screwed? Is it the interface between the double banjo?
Yeah, you use one less because you have two banjos right next to each other. You can see it in the picture above.

4. If anyone has more detailed instructions, or even better yet, some photos, I would gladly repay you somehow.
Pictures provided. I think I feel my kharma swelling already.

 
Last edited by a moderator:
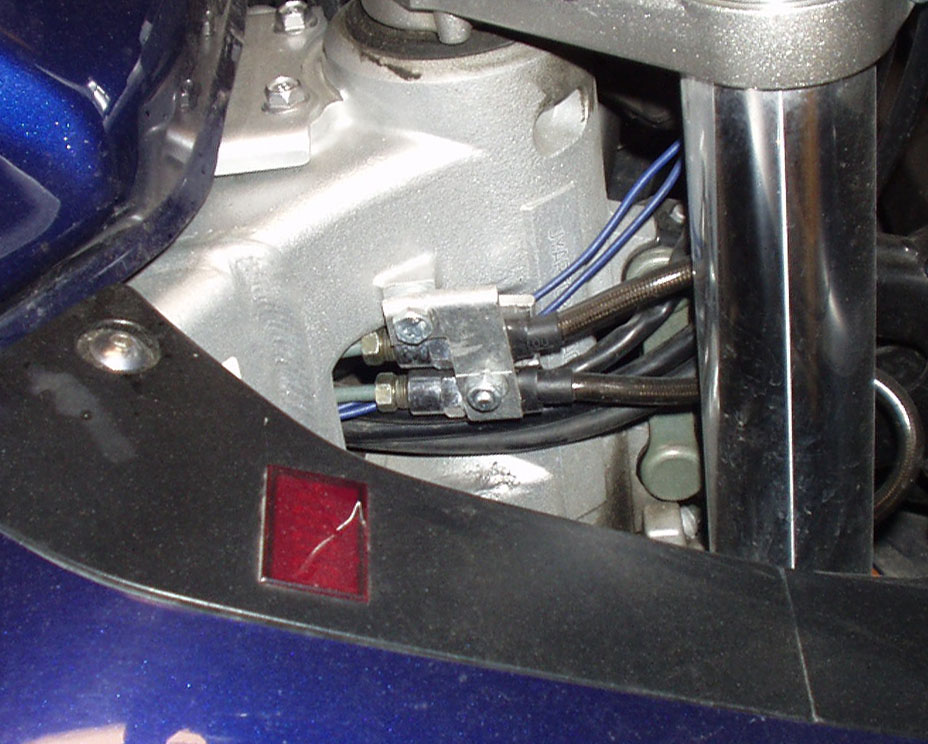
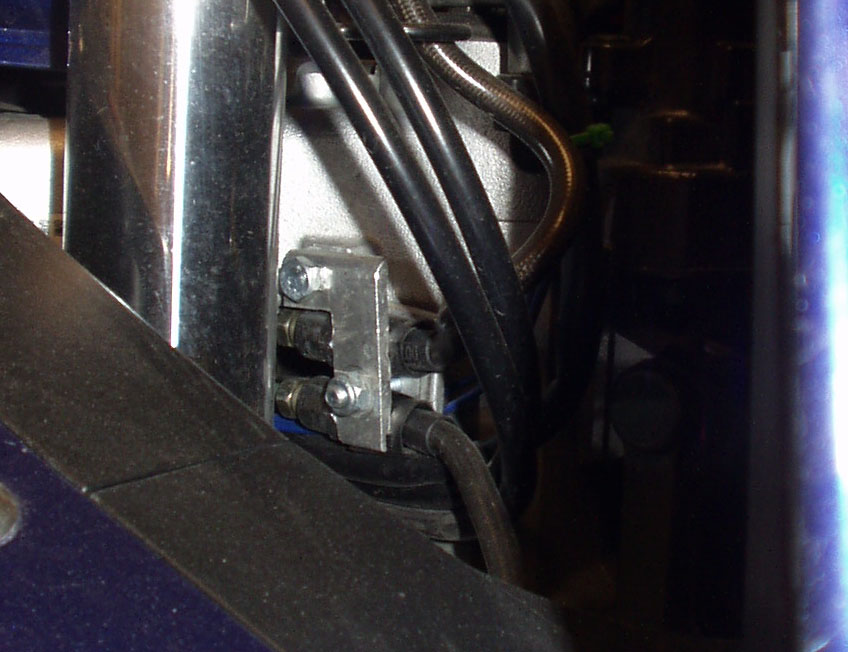
And you didn't ask for it, but maybe you'll be figuring out that you want to make a bracket to hold the fittings down where they go into the hardlines of the frame.

Handlebars at full left lock:

spiegler04.jpg


And at full right lock. I wrapped the lines in some spare gas line I had and ground out the aluminum plates a bit to give the lines an guide to let the clamp hold onto. Not pretty, but effective.

spiegler03.jpg


Here are a few questions for those who installed this kit. While the instructions on FJR1300.info help, they are far from complete and seriously lack photos.
As complete as one could do after a HD crash!

A picture with the line positions would have been nice.
I did not add a photo of my manifold set-up, since my prototype 3-way manifold set-up was changed for a 2-way manifold for production. The photo would have only caused more confusion.

There should be xtra washers in case you damage one. You want to alien everything finger tight before final tightening, to eliminate washer damage. Watch for weeping at the washers when finished and final checking of the system.

 
As complete as one could do after a HD crash!
Rick, sorry. Reading my line makes me sound ungracious. I certainly was not trying to call out any attempt by you at intentional non-disclosure. You definitely paved the way!

I did not add a photo of my manifold set-up, since my prototype 3-way manifold set-up was changed for a 2-way manifold for production. The photo would have only caused more confusion.
I can see in your photo it looked different, and that's why I asked.

Pictures provided. I think I feel my kharma swelling already
Matt! You rock, dude! I will totally buy you the golden frosty beverages of your choosing as soon as an opportunity presents itself! Great pictures, I don't believe these haven't been posted before (unless my search efforts sucked)!!

And you didn't ask for it, but maybe you'll be figuring out that you want to make a bracket to hold the fittings down where they go into the hardlines of the frame.
Yeah, I have been thinking about this one. Without seeing the underside of the current bracket, I haven't yet devised a solution. I want it to be slam-dunk solid and clean to match the original. I may machine a W bracket, but that bridge can be crossed at a later date. Thanks for your photos on this!

-BD

 
Matt! You rock, dude! I will totally buy you the golden frosty beverages of your choosing as soon as an opportunity presents itself! Great pictures, I don't believe these haven't been posted before (unless my search efforts sucked)!!
Naw. Those pictures were fresh. Your post spoke to me. I was later than the masses on installing my lines and couldn't find or remember posts when I went through it. As I had a new grinder and bought some aluminum stock from the salvage yard I spent many hours on those two projects. So, a trip out to the garage this afternoon yielded some pictures I wanted anyway.

Glad they help and look forward to possibly a frosty. I signed up for Spank Rally in August and knowing that the Rallybitch, George, has a prediliction for lots of miles and 5 days to spank us all--who knows? Maybe I'll end up in Florida on part of it.

 
I just got around this weekend to finally installing my Speigler lines. First a big thanks to Warchild for last year's group buy and another big thanks to Fabone for his excellent write-up.

Some pictures would have been helpful but once you jump into the project Fabone's write-up gives you what you need. However, there is one item where I would suggest a different approach than Fabone. On the clutch line, once it is disconnected and drained, cut it out in pieces. I spent an hour trying to get that POS out in one piece without any luck. I finally decided that if I was serious about replacing the line I could live without the old line. Ten-minutes after I cut the old line out I was completely finished with the clutch line (yes, the new line was in and bled). Fishing the new line through the engine bay up to the triple tree took about a minute.

And Fabone isn't kidding about the reservoirs draining quickly when you are bleeding the lines. Don't ask how I know this.

 
Rick, sorry. Reading my line makes me sound ungracious. I certainly was not trying to call out any attempt by you at intentional non-disclosure. You definitely paved the way!
No problem. ;) I was miffed at all the material that was lost and it all didn't turn out like expected. We do the best we can, with what we have to work with at that time. A lot was re-created from memory of the install and some photos I couldn't reproduce. Oh well. :rolleyes:

Anyway....the bracket at where the lines connect and secure at the frame, was a L type sandwich bracket similar to Matts picture, just 1/8" flat stock. Spiegler figured that one is up to you if you wanted one there. The bracket they send for the manifold is a little lacking to say the least. Some have needed to elongate the bolt hole to make final adjustments for clearance issues. They didn't want to spent time and money on the brackets, figuring most guys would make their own anyway. I plan on making something out of Carbon sometime for myself, since I'm not a machinist. Good Luck! :cigar:

 
OK, so I started taking off the lines tonight. Took off the plastics, front brackets, manifold, and front caliper and master cylinder banjos. Easy stuff and went quicker than I expected.

Then I went to break the hardline connections at the frame neck. I bought a flare nut professional set from Sears. For some reason, the 10mm wrench seems loose on the nut. Is this normal? This is why I stopped - to see if any of you had a similar experience. It would explain why an open ended wrench would have issues possibly stripping the nut. I tried the 9mm, but it no-go.

So, before I hammer forth, your comments are appreciated!

-BD

 
Alright, I'll perpetuate this thread longer.

Finished the install. By miracle of God there are no leaks (yet). Opted for the black lines with chrome banjos and bolts. Looks slammin IMHO.

I had a hell of a time bleeding the fronts. I kept running the master dry and sucking new air into the lines. Burned up damn near an entire 32 oz. jug of brake fluid. I think I got all of the bubbles out, but will probably ride bleed again in a few days.

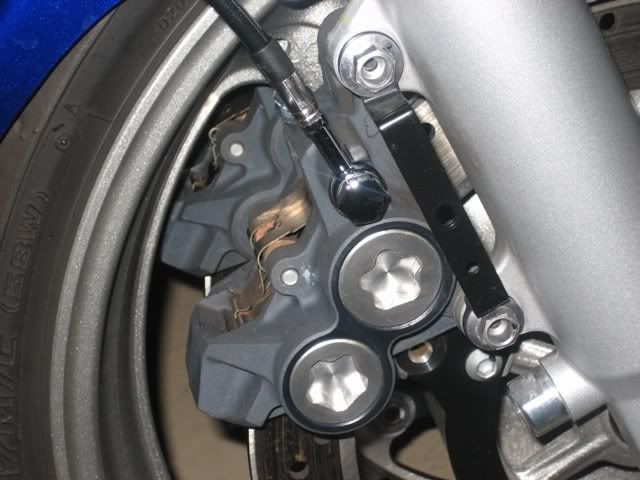
I am still bent out of shape on the front and completely missing hardline interface brackets. I have to make the hardline one myself, but here is a piccy of the front wheel:

IMG_0535.jpg


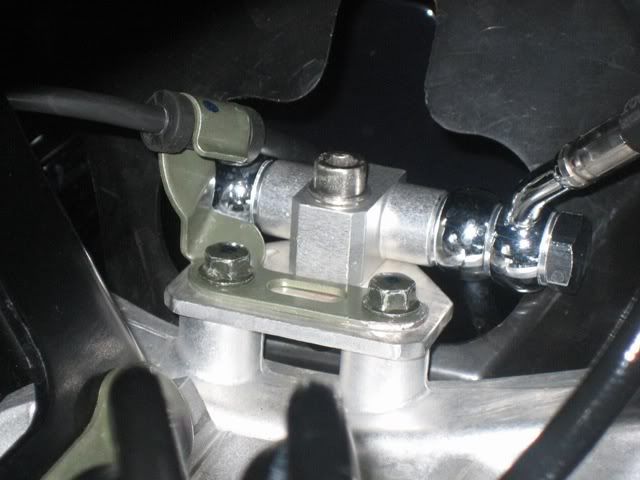
and the front manifold. I made a new bracket and used the original factory ABS sensor wire holding bracket, ground down on one end:

IMG_0538.jpg


-BD

 
Last edited by a moderator:
OK OK OK! You begged me so I will post more. Insatiable people!

Since the Spiegler POS kit does not include any parts, here are another two I made.

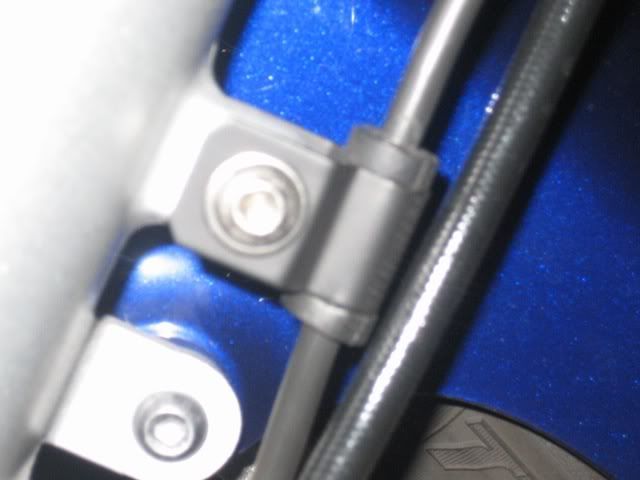
The ABS sensor wire is normally contained down by the line straightener for the rubber lines. Since the Spieglers are stiffer, the bracket can be gone (saved a few ounces, too)!! So, instead of letting the wire float, I took a little aluminum sheet, cut it, and folded it into shape with hand tools, then rattle-can blacked it:

IMG_0604.jpg


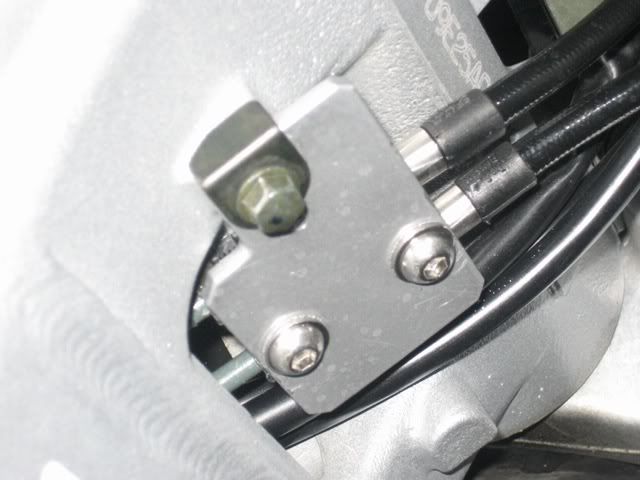
And here is the sandwich bracket, rattle-canned aluminum color:

IMG_0603.jpg


Anyway, that's all. I don't care how much you beg, I'm not posting again in this thread.

-BD

 
Last edited by a moderator:
Top