What is wrong with my left mirror?

Yamaha FJR Motorcycle Forum

Help Support Yamaha FJR Motorcycle Forum:

This site may earn a commission from merchant affiliate links, including eBay, Amazon, and others.
I've had to "adjust" mine, too, and it's not hard, but the adjust was for the mirror being tilted upward after a lowside, not because it sits 1/8 inch too far rearward. That said, a very slight tweak of the plate making the mirror tilt toward the front of the bike (i.e. raising the rear mount hole) would have the effect of moving that base forward slightly. Maybe enough.

The front stay is steel. Magnets adhere to it. Still very easy to bend.

The point above about the windshield being perhaps not exactly symmetrical is a good one, too, and one I didn't consider.

 
Wow....some great ideas/discussion. Thanks so much. Would never had sorted through all those thoughts on my own. Really appreciate it.

Took the time to remove the mirror tonight based on the pictures from mcatrophy (great pictures.......very helpful) and suggestions to look at angles etc, I am convinced that there must have been some kind of tip over that jammed the mirror upwards and in. My plan is to leave the mirror as is for now until I remove the front fairing this winter to install HID headlights. I will confirm at that time that the bracket is bent and use a bar for leverage to bend it back.

I have considered removing some material from the windshield and that will be Plan B. I like the Cal Sci screen in the cold weather but will put the stock screen on again next summer...

 
Last edited by a moderator:
If you replace it, it's 1 piece, listed as "Stay 1" (p/n 3P6-28356-00-00) on the "Cowling 1" parts fiche (line item 36). Cycle Parts Nation has it for US$ 308.43. As it's steel and not aluminum, I'd think that a good auto body or precision metal shop should be able to straighten the original piece if it's removed from the bike.
vs SGD$280. This kindof thing makes me wanna stay in Singapore. :p
That's what's called "market pricing". Good to know given I have an office in Singapore. Perhaps I'll order my parts from a local dealer to be delivered that office, and then hand-carry them back to the US when I'm there. Now there's a thought..! :)

 
That's what's called "market pricing". Good to know given I have an office in Singapore. Perhaps I'll order my parts from a local dealer to be delivered that office, and then hand-carry them back to the US when I'm there. Now there's a thought..! :)
Except you said it out load on the internet, sending you a list of parts I need ...

 
Look at the lines where the mirrors pivot on their respective bases and your right is clearly bent upward. I just fixed the exact same bend on mine this weekend from a tipover that happened a couple months back. It took all of about 20 minutes from start to finish.

Take off the right two black plastic panels, the 2 mirror base nuts, use the mirror base to drill matching holes in a piece of scrap angle iron and bolt it where the mirror mounts (I left the rubber base piece to pad the fairing.), then gently bend the flange the mirror mounts to. You want to pull the angle iron out & down from above the mounting point. The flange is what bent, not the heavy-duty square section fairing frame stay. With the bike on the centerstand, I'd bend a bit, check the upper outboard corner of each mirror for height to the floor, and then bend a little more. When done, they were perfect to the floor, front axle, and sliders.

 
Look at the lines where the mirrors pivot on their respective bases and your right is clearly bent upward. I just fixed the exact same bend on mine this weekend from a tipover that happened a couple months back. It took all of about 20 minutes from start to finish.
Take off the right two black plastic panels, the 2 mirror base nuts, use the mirror base to drill matching holes in a piece of scrap angle iron and bolt it where the mirror mounts (I left the rubber base piece to pad the fairing.), then gently bend the flange the mirror mounts to. You want to pull the angle iron out & down from above the mounting point. The flange is what bent, not the heavy-duty square section fairing frame stay. With the bike on the centerstand, I'd bend a bit, check the upper outboard corner of each mirror for height to the floor, and then bend a little more. When done, they were perfect to the floor, front axle, and sliders.

Sounds like a plan...simple, fast.... what is not to like! Couple of questions. Having a hard time picturing your setup..... How did you prevent the angle iron tool from contacting or cracking the fairing plastic? I have a picture of the angle iron bolted to the mirror mounts and the long end of the iron pointing upwards.... Then you pull out and down as indicated. You must have used washers etc to ensure that the angle iron did not contact the plastic. Any pics on angle iron orientation, size of angle iron etc..... Yep probably being a bit dense here.

 
Last edited by a moderator:
Look at the lines where the mirrors pivot on their respective bases and your right is clearly bent upward. I just fixed the exact same bend on mine this weekend from a tipover that happened a couple months back. It took all of about 20 minutes from start to finish.
Take off the right two black plastic panels, the 2 mirror base nuts, use the mirror base to drill matching holes in a piece of scrap angle iron and bolt it where the mirror mounts (I left the rubber base piece to pad the fairing.), then gently bend the flange the mirror mounts to. You want to pull the angle iron out & down from above the mounting point. The flange is what bent, not the heavy-duty square section fairing frame stay. With the bike on the centerstand, I'd bend a bit, check the upper outboard corner of each mirror for height to the floor, and then bend a little more. When done, they were perfect to the floor, front axle, and sliders.

Sounds like a plan...simple, fast.... what is not to like! Couple of questions. Having a hard time picturing your setup..... How did you prevent the angle iron tool from contacting or cracking the fairing plastic? I have a picture of the angle iron bolted to the mirror mounts and the long end of the iron pointing upwards.... Then you pull out and down as indicated. You must have used washers etc to ensure that the angle iron did not contact the plastic. Any pics on angle iron orientation, size of angle iron etc..... Yep probably being a bit dense here.
The angle itron was just a nasty foot long cut-off of 1 1/2" that I had lying around with all sorts of holes & notches from using it for all sorts of errands. As you thought, I just drilled a couple of holes at one end so it was a handle sticking upward. It didn't take much force to bend the tab.

As for protecting the plastic, when you take the mirror off, there is a rubber grommet remaining. I did throw a fender (large area) washer on each bolt, between the angle iron and the rubber. The biggest thing was not to torque the angle iron to the fairing plastic, I just ran the nuts snug, so the load was on the bolts, not the plastic.

The more important thing was to make sure the bike was level (left-right) when on the center stand, then bend the tab a little at a time. Put the mirror back on and re-check the height to compare with the good one, take it off, and then bend a bit more.

 
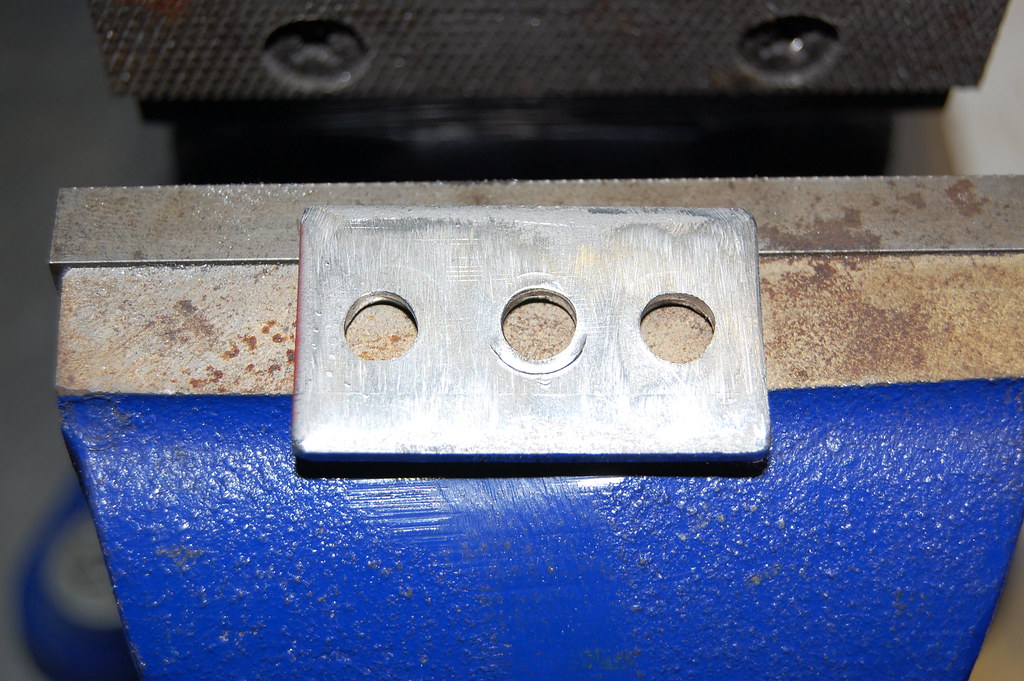
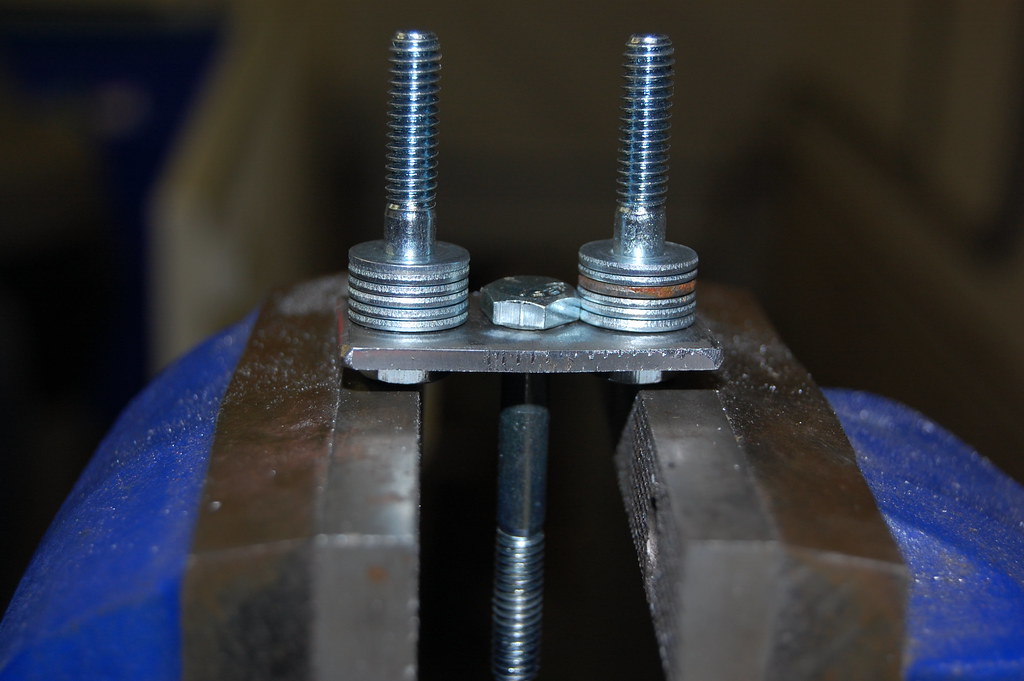
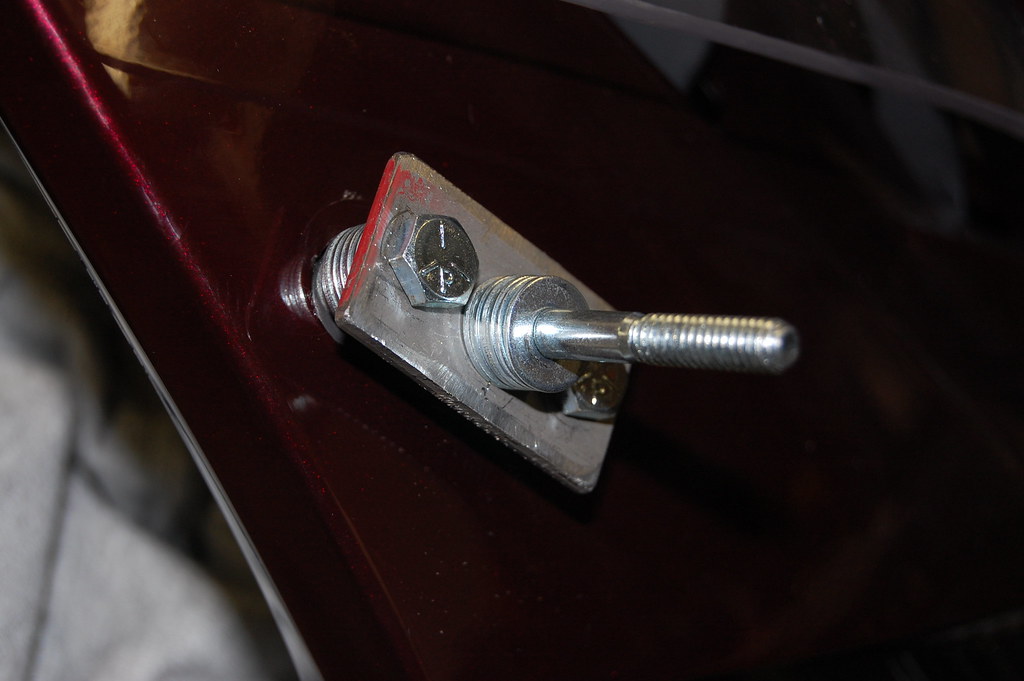
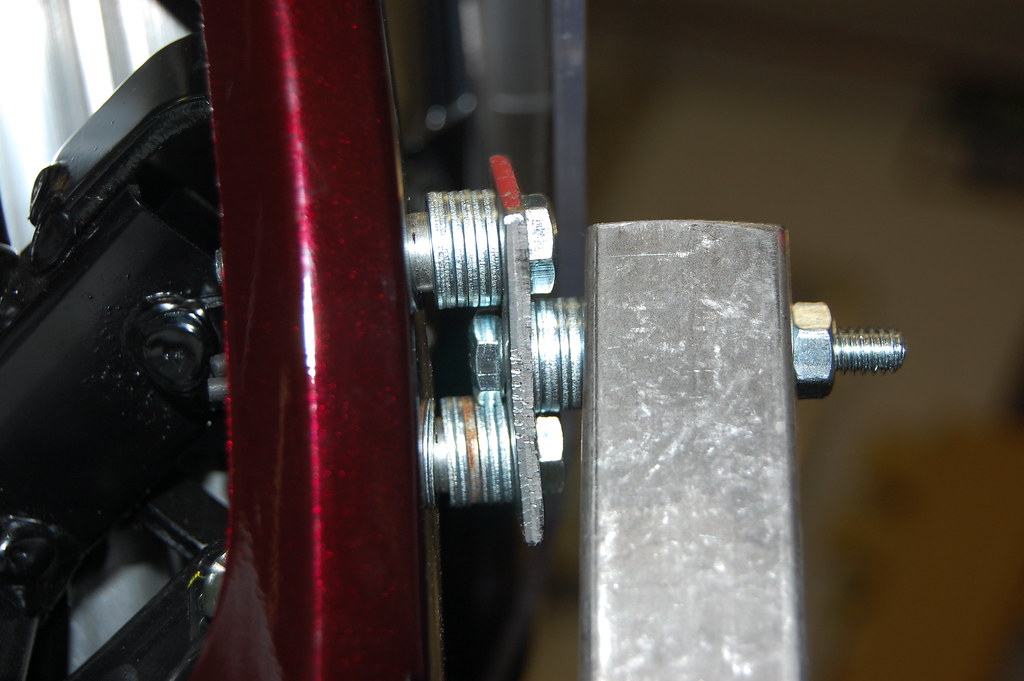
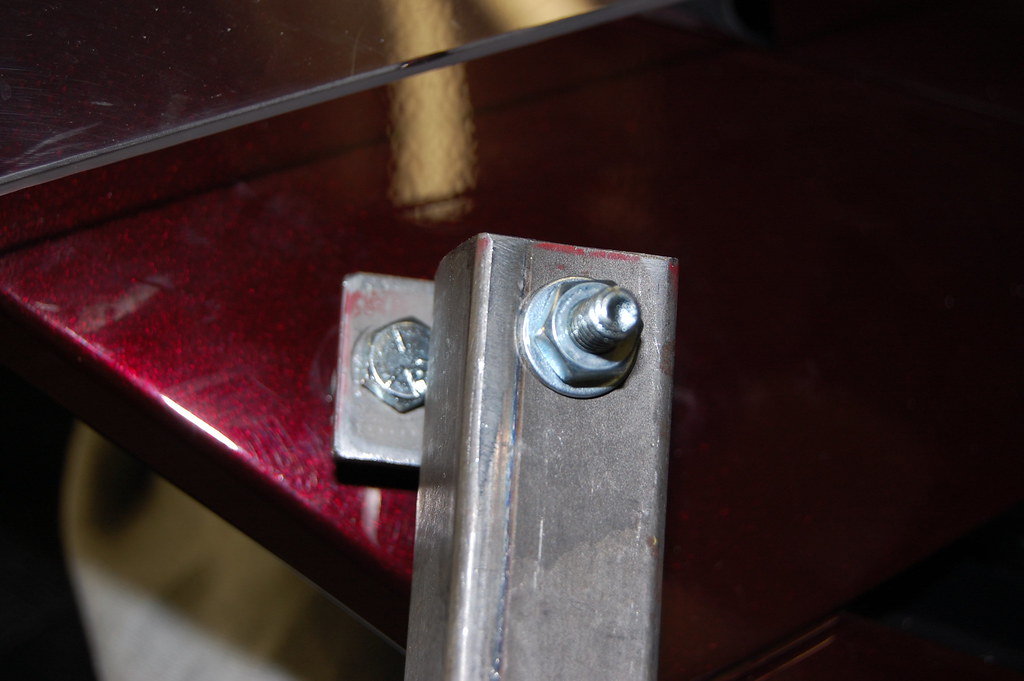
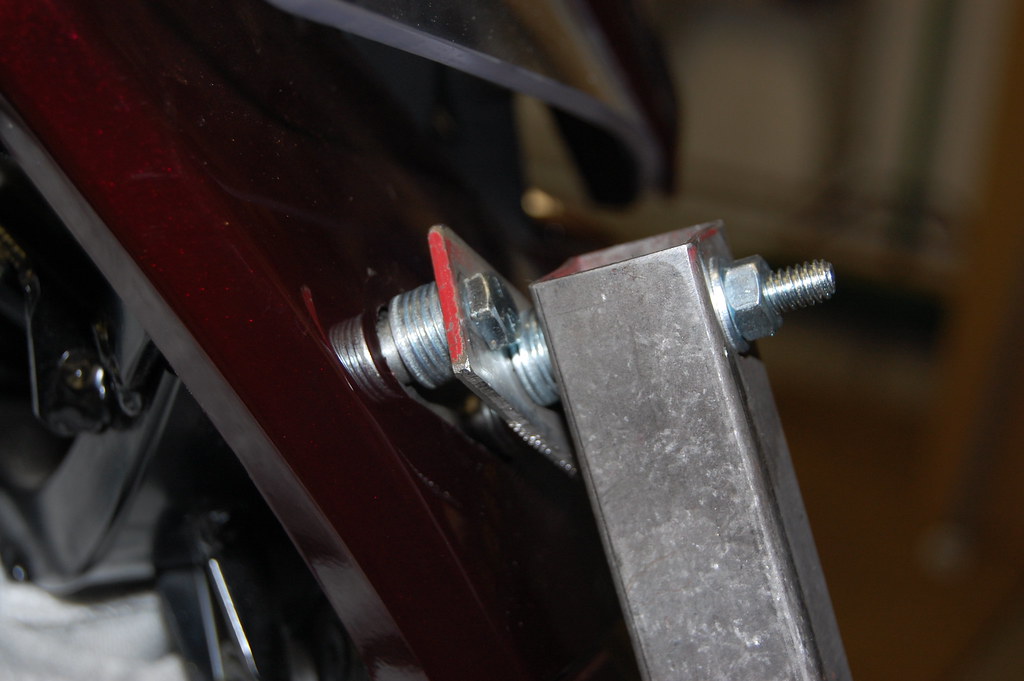
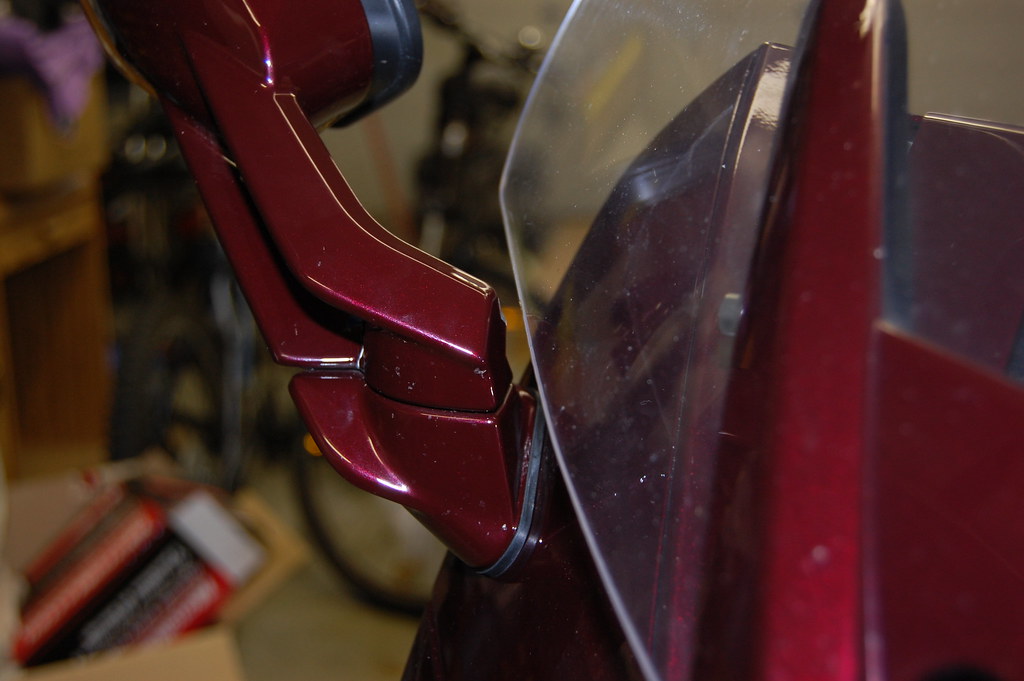
Thank you to everyone for your help and suggestions. I used your feedback to fix my mirror today. I made a tool to bend the mirror base back into alignment. Below are some pics showing the setup. This arrangement allowed me to bend the the mirror base in any direction required. Really quite simple and minimal time required. Material required: 1/8" x 1" flat stock, 1" square tube x 3ft, 1/4" bolt x 1.5" long (qty 2), 1/4" bolt x 2" long (qty 1), washers/nuts.

4040759055_33a6301e46_b.jpg


4041503526_60a9e39700_b.jpg


4040755997_37856f9bc8_b.jpg


4041501270_c5a3c9f930_b.jpg


4040753963_613b2249f8_b.jpg


4040752467_b3a12a3820_b.jpg


And the final result....mirror back into original position!

4040758239_5fb324a3c0_b.jpg


Last edited by a moderator:
Thanks for the great write up,the pictures, and materials list. I knew I couldn't be the only one to have done this. I watched my 2009 tilt slowly to the right and put the mirror and throttle through a 1/2" drywall garage wall. Think I will stick to using the side stand. Only damage is a slight scuff mark on the upper right portion on the windshield where it is contoured (already buffed out mostly with Plastx and lots of elbow grease) and the mirror which is bet upwards enough to drive me crazy in traffic. One weekend project coming up. Good weekend for it as the rain is due back in Seattle again.

Maybe this procedure can be added to one of the maintenance/fix-it lists that seem to cover everything else but this. Only took me 6 hours of searching to find it.

Thanks again, Dennis

 
Now that is creativity at work.

Since I've had a slow tip while stopped and on sandy pavement when my pillion leaned around to talk to me, I have a minor bend in the mirror base that needs some TLC.

Would you be interested in renting your creative tool?

 
Just adding my experience.

I noticed a clearance problem with the LH mirror when I installed the Cal-Sci screen - not rubbing but too close for me. I bought the bike new and it hadn't been dropped when I went through all this (of course who knows what the dealer did).

At first I was thinking it was a Cal-Sci defect and tried to reposition the screen a bit on its mount screws without much luck. Upon further investigation, I noticed the top edges of the mirrors (painted housing not mirror insert) were NOT sitting at an equal angle to the ground. To check it, I put the stock screen back on and sure enough - different spacing to the mirrors. I just didn't notice it on the stock screen because of the large gap. So I did what many have done here and bent the LH steel mirror mounting bracket a bit until they appeared to match angles. Now the measured gap on all three screens (Cal-Sci, 2 stock) measure equally from side-to-side.

I suspect others come that way direct from the factory. A small variance in that welded mount bracket amounts to quite a bit of movement on the mirror. It probably goes unnoticed because there is plenty of clearance to the stock screen.

Just my opinion, of course.

 
Last edited by a moderator:
Glad you got your mirror back in alignment! Your tool fabrication skills are excellent... good on ya!

A question for those of you who have tweaked your errant mirror: The stock mirror arm appears to be of pretty stout design/construction, so might it not be possible to just use the existing mirror arm and a little muscle power to move the bracket the little bit required?

From the description you've given, it doesn't seem to take all that much force to move the bracket back into alignment... just askin'! :p

Don
Remember the mirror arm is hinged, so you can't get the leverage without putting severe strain on the join.

And I'm not sure the arm is strong enough, it's only some light alloy inside a plastic skin.

(Click on image for larger view)


That sounds reasonable enough, but I've never seen, nor heard of the mirror arm itself being bent or broken in the inevitable drops so many of our bike have experienced. The arm itself seems able to take the initial strain of the drop without a problem! :unsure:

 
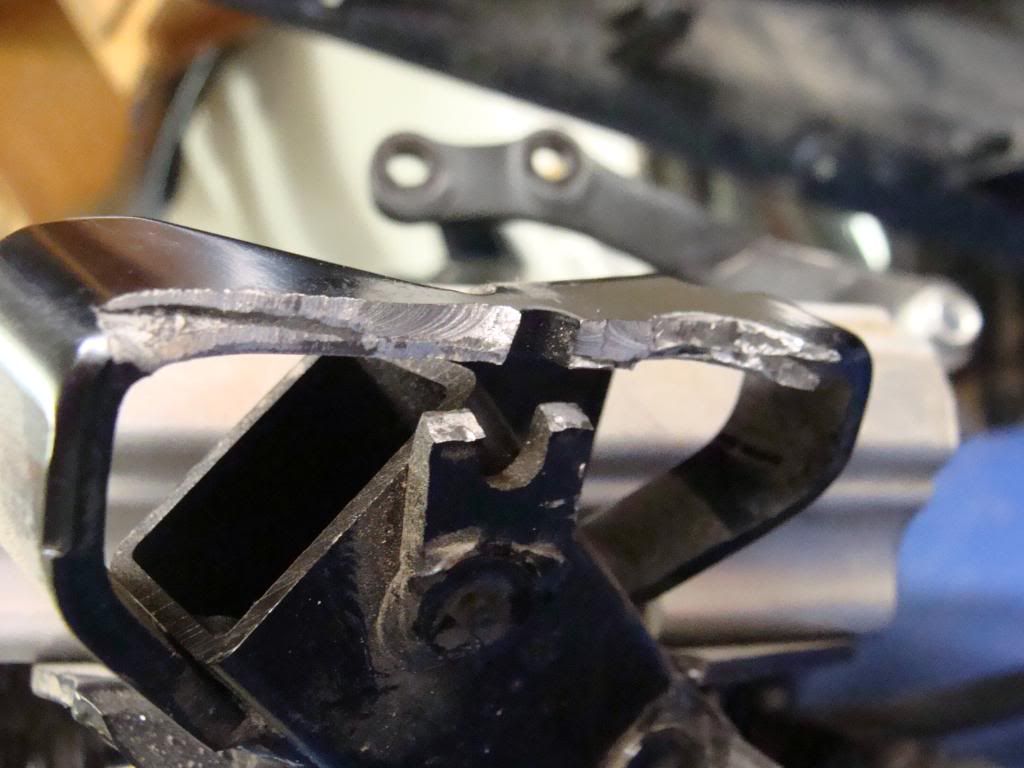
My mirror subframe broke, 2006, due to heavy Solteks and dirt road.

All this bending stuff makes me nervous. Then again, if only running stock mirrors and smooth pavement, probably OK.

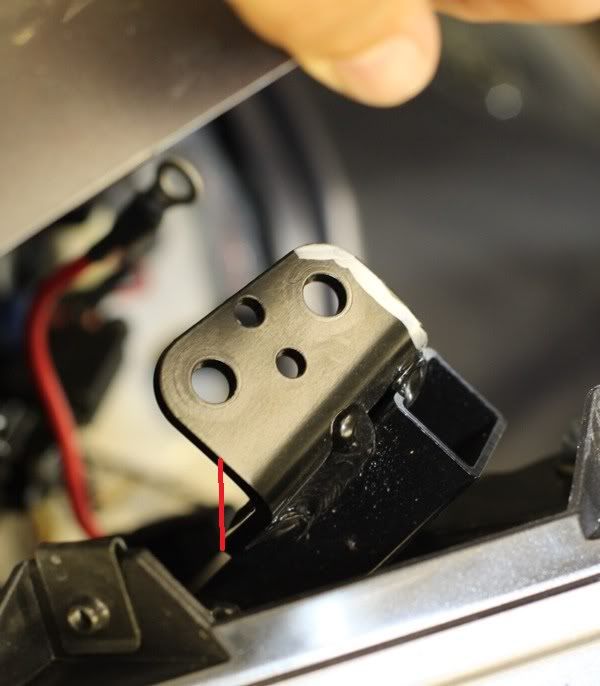
Here is what it should look like. The red line is where I re-enforced the stock brackety to support the Solteks. I purchased new front stay, then re-enforced.

FJRFix.jpg


Here is where mine broke, and the same area I think you're flexing by crashing/rebending into place.

DSC02491.jpg


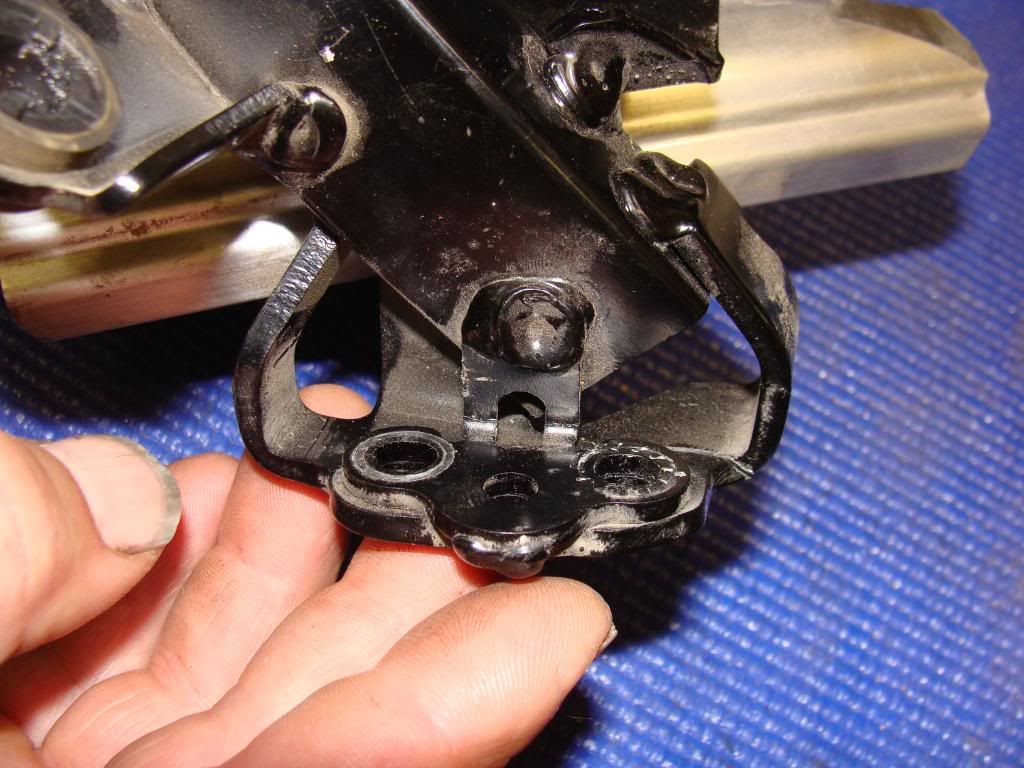
Proper alignment before weld job.

DSC02496.jpg


That sounds reasonable enough, but I've never seen, nor heard of the mirror arm itself being bent or broken in the inevitable drops so many of our bike have experienced. The arm itself seems able to take the initial strain of the drop without a problem! :unsure:
Except mine :blink: . But it probably wasn't a gentle lay-down as most of them are.

 
Top