Wilbers ABS install

Yamaha FJR Motorcycle Forum

Help Support Yamaha FJR Motorcycle Forum:

This site may earn a commission from merchant affiliate links, including eBay, Amazon, and others.

exskibum

~<>~<>~<>~<>~
Joined
Jun 27, 2005
Messages
3,140
Reaction score
651
Location
Lincoln Hills, CA
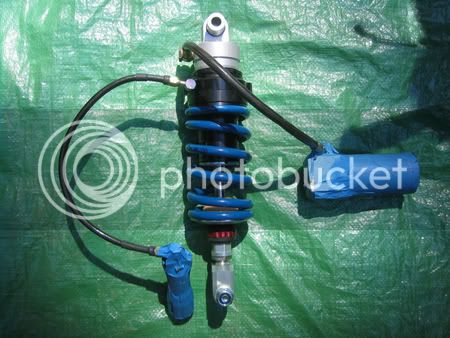
As usual, Warchild's excellent illustrated directions in "Installing the Wilbers Shock Absorber" on fjrtech.com beats the crap outta the Yamaha Service Manual. This install specifically addresses the Model 640 with the remote hydraulic preload -- same as I got. So, I'm cruising along, flipping pages as I do the install. But . . .

It appears that the patient for the mod in his instructions was H. Marc's non-ABS Feejer. And there's apparently a lot of room above and to the right side of the shock on that bike, which is significant when it comes to routing the SS braided line with the remote preload adjuster at the end of it. I'm thinking: "Hmmmm, the pics of that space sure don't look like what I'm looking at!" And then I see Warchild's discussion of the situation I'm facing: "(you ABS guys will have a treat doing this, I'm sure!)"

NO SHIT, Dale!!!!! :headbonk:

So, where to start? First, you gotta figure this out BEFORE you get the upper shock bolt installed, or you won't have any space in which to stuff the SS line and the adjuster while you scratch your head and read Dale's prediction.

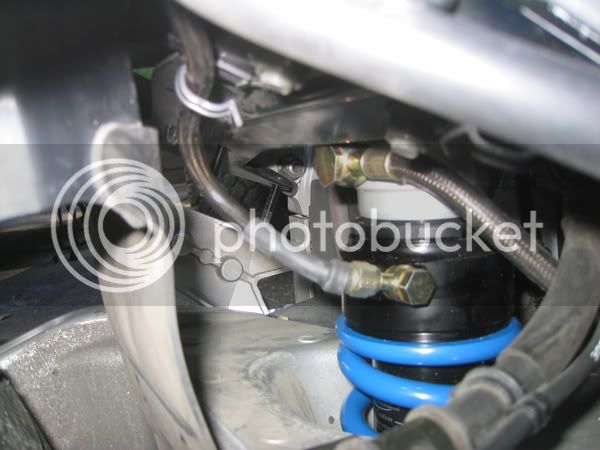
The solution was to remove the cross bar (mounting plate) that had held both the stock pre-load level assembly and its clips that secured the cables from that assembly to the stock shock. There are 4 allen headed bolts holding the cross bar to the subframe which have to come out, and there are two nuts securing the rectangular aluminum ABS hydraulic unit to the top of the cross bar which must also come off. I also pulled the plastic tool tray that sits under the front seat halfway out (leaving it connected by the wiring to the ECU that is a part of its plastic bottom on the left side of the bike). This gives you a little room to maneuver and manipulate the SS line.

With the bottom of the new shock sitting on a block of wood so that it was vertical (through the hole for the shock in the swing arm) but below the level necessary to install the top shock bolt, I then threaded the adjuster unit past the right front corner of the rear fender with the cross bar out of the way and situated the line just inboard of the ABS hydraulic unit (now in something of a contorted and inverted S shape, while I suspect that in the non ABS, it's in more of a simple U shape). This is the ONLY place there is any room to put this, and there isn't much room, even at that. Having the ABS hydraulic unit loose allows you to rock it outwards enough to situate the line just inboard of where the ABS hydraulic unit resides when it's bolted to the cross bar.

I also sliced two pieces of bicycle inner tube lengthwise and wrapped them around the SS line with electrical tape to protect the SS line from a couple places where it is impossible to avoid contact between the SS line and (1) the front right corner of the fender and (2) the inside portion of the ABS hydraulic unit and its connectors. With the ABS bike, you pretty much have to do the routing of this line before and during the time that you are mounting the top of the shock with its bolt.

Clean install, but routing that SS line for the remote hydraulic preload adjuster was by far the most time consuming part of the operation. (To keep from scratching up the anodized adjuster while I tried to thread it and its SS line into position to mount it on the exhaust hanger, I wrapped it in Handi-Wrap with some tape.) Mounting the shock was a piece of cake. Because I was putting on a new tire, lubing the drive shaft spline and doing Toecutter's lock pin pannier securing mod, I had the mufflers off and the rear tire out, which undoubtedly made it easier.

Thanks for the steller installation guide, WC, :clap: but a big NO SHIT!!! to its one line discussion of installation on an ABS bike. :axed: :haha:

:cigar: :cigar:

 
Last edited by a moderator:
Mine is a non-ABS and I still removed the mounting plate to thread the preload adjuster in. It seemed like the best way to get it in place without scratching it up.

If I were to do it again I would probaby take my dremel to the inner fender and make a little notch so the preload hose was a little further away from the brake reservoir. I'll have to look and see if there would be any interference with the tire at full compression. I may still do this the next time I'm working in that area. Maybe put a short piece of wire loom around the hose so it doesn't rub into the fender too much.

 
RICH,

SHOULDA DONE A SEARCH MY FRIEND. I POSTED UP THIS PROBLEM LAST YEAR WITH PICS ON THE SLEAZY BOARD. IT'S EASIER TO CRACK THE PRELOAD HOSE FITTING AND ROTATE THE HOSE DOWN A LITTLE. NO NEED TO MESS WITH THE BRACE AT ALL. No need to loosen the ABS control box also.

( WHOOPS damn caps ) :D

Any way for those who go this route just BARELY crack the fitting loose, if it loosens to much the oil will leak out. We told Wilbers this and they were supposed to rotate the fitting downward on the ABS versions.. guess that didn't happen :unsure:

 
I agree with Highlander. On my '05 ABS I did not remove the bracket for the preload adjuster (but I did cover the exposed studs) nor loosen anything ABS and I also had to route the hose for the remote L/H speed adjuster as well as the remote preload.

Last year I spent some time at GP suspension tuning and we removed and installed the shock numerous times while correcting spring rates.

 
RICH, SHOULDA DONE A SEARCH MY FRIEND. I POSTED UP THIS PROBLEM LAST YEAR WITH PICS ON THE SLEAZY BOARD.
Thanks, Dave:

But I never go over there anymore. :lol: Besides, I had grease and garage filth on my hands by the time I realized that WC's instructions were for a non-ABS bike. Tonight, though, I'll probably wander over there to check what you had to say about that install challenge.

If you're talking about the fitting at the top of the shock, I have to say I briefly thought about that, but decided I could get it to work anyway, without too much in the way of kinks. The fitting on the adjuster IS pretty much at the angle it needs to be at -- not straight up where it'd interfere with the subframe. Seems to me that if different (angled) fittings were used, it would have been much easier to have a shorter line that passed just below the cross bar (on both the ABS and non'ABS versions) between the shock and the adjuster.

It's all good and I'm happy with the result. I gotta get back out to the garage and finish a few more things that I have on the menu before I take it out for a test, though. But now I have that same fancy knob thing I first saw on your bike. :)

EDIT TO ADD: I just checked that thread, and I can see that you guys just rotated the banjo on the shock rearward and ran under the cross bar. I like that it's easier to remove with that configuration, but there's way too much SS line to make that real clean, it seems, though I can see how you could coil or bend it around to take up that slack. Better would have been to take 8 inches or so out of the line and run it under the bracket for ABS and non-ABS bikes. Leaving mine as is now that it's done, though -- no issues with sharp stuff the way I have it in there. I HOPE. :rolleyes:

 
Last edited by a moderator:
SHOULDA DONE A SEARCH MY FRIEND. I POSTED UP THIS PROBLEM LAST YEAR WITH PICS ON THE SLEAZY BOARD.
I've been banned from the 'Board, it was hard to do but I managed ;) Is there a chance you could repost here with pics for us criminal elements :lol:

 
Last edited by a moderator:
I bought the full tilt Wilbers model(and own an 04 ABS model) and printed out the photos that were posted about the rotating of the fitting. I left the photos with Klaus, so if you have an ABS bike (and he still has the pics, he could do it prior to shipping). I don't live that far from the Wilbers place so I picked mine up and Klaus took care of it. By the way, he's a good guy, really likes bikes and has some rare iron @his shop.

 
Rich, I did the same thing to mine. I dropped the bracket and routed the S/S braided line over the bracket and under the ABS/tool tray. That seemed to be the easiest way. I didn't the sharp edges on the underside of that "U"-shaped bracket.

 
SHOULDA DONE A SEARCH MY FRIEND. I POSTED UP THIS PROBLEM LAST YEAR WITH PICS ON THE SLEAZY BOARD.
I've been banned from the 'Board, it was hard to do but I managed ;) Is there a chance you could repost here with pics for us criminal elements :lol:
Here's a couple of pics Ionbeam, I tried to find my write up but you know the search function sucks on sleazyboard.

You can see the angle of the preload adjuster after I adjusted it. It came from Wilbers pointing to the 12 o'clock position.

Again I must stress the fact to BARELY crack the hose loose, then twist the hose into the correct position. I recieved feedback from two riders with problems, one loosened the fitting too much and had oil leakout, another somehow snapped the fitting and had to send the shock back to Klaus.

WILBERSSHOCK.jpg


WILBERSLINEROUTING.jpg


I don't see the big deal. I sorta did what Highlander did, and just wrapped the parts and fished them through. Took some fenagling, but I didn't have to do anything special to get my Wilbers with all the extra doo dads in there. I thought the whole process was pretty easy.

Still "waiting" to hear if the '06 takes the same shock. Matty going to de-install his Wilbers from his '04 and re-install it on the '06 if it fits...and no GB ensues in the mean time.

 
Mine is an ABS 05 and I might have adjusted the fitting. Mine has the High / low remote damping adjustment besides the remote pre-load. It was surprisingly simple to install. ;)

 
I was going to post on this a few weeks ago. I had a bitch of a time routing the pre-load as well. I did wrap it in bubble pack w/e-tape to protect it but I did't figure it was going to take that long to route.

My problem was the SS line was always too short to reach nicely to the mounting bracket. Now I see the problem. I didn't turn the fitting like Highlanders photo shows.

For those with ABS that haven't done this yet here is a photo of the area you have to snake the pre-load control through. :eek:

FJRabs.jpg


This is what the angle of the fitting looks like when it comes from the factory. You can see the stress on the line after routing in this shot.

Wilbers.jpg


Thanks to Warchild for the FJRtech Wilbers install article--the attention to detail is stellar, and I need all the help I can get! Wilbers Install

Also thanks to Highlander for the suggestion to tweak the preload fitting. I changed mine to about an 11 o'clock angle and ran the hose under the cross member, avoiding that ABS jungle pictured above. As mentioned, the hose is a little on the longish side using this 'shortcut', but was able to do some lazy turns and utilize one of the clips from the stock preload lines. Works well!

It pays to go last on the Group Buy and let you guys figure all this stuff out ... :drinks:

 
Last edited by a moderator:
I just finished Installing mine..... 3 hours front and rear...

For my '05 with ABS, I ended up just taking loose the 4 ABS bolts and then fished the remote preload through there.... all in all wasn't too bad...

I found that the front springs were much more a challenge..... but, she's all done now... and I have to say, I never went out on the street looking for bumps to find that they were no longer a problem.... just floats over them like spreadin butter on bread... GOD DAMN.... Best $800.00 I ever spent...

Thank You Klaus for a super sweet product, and Thank You Warchild for getting us the great deal on the Group Buy.... I LOVE IT SO MUCH !!!!!!

 
Got back from Europe Friday night and with rain all weekend this became the Wilburs shock install day (2004 ABS).

Not clear to me from the documentation with the remote preload adjuster where zero is? Klaus's note was that my shock was factory set at 12 clicks (out of 22? 24?), but, after it was all buttoned up, I started turning in preload to see what effort was involved and how audible the clicks are. I was able to turn it at least 22 clicks clockwise, but none counterclockwise, so I suspect it was set at "0" (we're all human). Pleasant surprise that the remote preload knob is accessible with the right bag still mounted, but would be easier without it mounted.

WC's article is indeed da shit! The only note I'd add near the beginning is that you really need an SO or buddy to assist you to disconnect (and reconnect) the various shock and dogbone bolts all of which require holding from both sides of the bike. I got it all apart solo, but needed my wife to hold some wrenches while I torqued things back up.

I cracked the banjo bolt slightly and rotated the preload stainless line to about 10 o'clock and it routed neatly underneath the crosspiece, and doesn't appear to have any sharp bends or chafing points.

I know I'll enjoy this change immensely - may sneak out for a fine-tuning ride tonight if it clears as predicted. :D

 
RICH, SHOULDA DONE A SEARCH MY FRIEND. I POSTED UP THIS PROBLEM LAST YEAR WITH PICS ON THE SLEAZY BOARD. IT'S EASIER TO CRACK THE PRELOAD HOSE FITTING AND ROTATE THE HOSE DOWN A LITTLE. NO NEED TO MESS WITH THE BRACE AT ALL. No need to loosen the ABS control box also.

( WHOOPS damn caps ) :D

Any way for those who go this route just BARELY crack the fitting loose, if it loosens to much the oil will leak out. We told Wilbers this and they were supposed to rotate the fitting downward on the ABS versions.. guess that didn't happen :unsure:
Got my GPS upgrade back as I had a much heavier spring installed. Just a caution - when you decide to slightly loosen the banjo bolt make sure to unload the preload adjuster first.

Don't ask.

 
Just to add onto this old thread....

I swapped the Wilbers onto my 06, no major problems although it's slow work. Couple tips...

There is now the linked brake valving crammed in there with the ABS controller, top bolt is a bear to reinstall.

The ECU is also in the way, the preload hose should be rotated to about the 7 o'clock postition to clear the sharp edges of the ECU.

The preload bracket needs another hole drilled into it, as the rear subframe is different.

But the Cali smog can is now out of the darn way !! :yahoo: Clear area to route the Hi / Low res if you bought that option

 
Top