Gen 1 fork rebuild

Yamaha FJR Motorcycle Forum

Help Support Yamaha FJR Motorcycle Forum:

This site may earn a commission from merchant affiliate links, including eBay, Amazon, and others.

garyahouse

newbs need the forum
Joined
Aug 15, 2010
Messages
2,157
Reaction score
597
Location
Spring Hill, Florida
Researching this forum in preparation for my front fork rebuild, I came across this thread describing a home-made special tool for disassembling the front forks here: CLICKY

My question: because I assume the OP was working on a Gen 2, I need to ask, does the Gen 1 require this same size tool? The picture shows a 26mm 6pt. socket welded to the end of a 3/4"x16" pipe.

EDIT: NOW THAT I'M DONE, I THOUGHT I'D DROP IN THIS EDIT. AS FAR AS I KNOW THERE ARE NO VIDEOS AVAILABLE FOR REPLACING SEALS OR BUSHINGS ON AN FJR. HOWEVER, THE FOLLOWING LINK SHOWS A VIDEO OF A VERY SIMILAR FORK. IT'S ALMOST IDENTICAL TO THE FJR FORK. WATCHING THIS VIDEO WOULD HAVE BEEN A HUGE HELP TO ME AT THE BEGINNING OF THIS PROJECT IF I'D FOUND IT SOONER. SEE IT HERE:


Gary

darksider #44

 
Last edited by a moderator:
No you don't really need that tool.

Instead, to get the bottom bolt out of the cartridge (after draining the oil out) reinstall the spring, spacers and top cap, and increase the preload adjuster to maximum. This will put enough pressure on the cartridge to keep it from spinning when you loosen the bottom bolt. You can also use an impact gun (if you happen to have one) but I've been able to easily loosen them with an allen socket in a ratchet handle with the lower fork leg clamped in a vice (soft jaws on the vice).

Tightening is the same process in reverse.

BTW, the procedure he used for the upper bushing and fork seal are pretty much exactly how you would do that part on a 1st gen. No need for the long (exhaust pipe) bushing driver on our 2 bushing first gens, but you will want a piece of 2" PVC pipe to drive the upper bushing and oil seal in.

To get the new upper bushing driven in, slide an old bushing down over it, then one of the flat washers, then you can use the 2" PVC pipe to tap the seal down into place.

 
Last edited by a moderator:
No you don't really need that tool.
Instead, to get the bottom bolt out of the cartridge (after draining the oil out) reinstall the spring, spacers and top cap, and increase the preload adjuster to maximum. This will put enough pressure on the cartridge to keep it from spinning when you loosen the bottom bolt. You can also use an impact gun (if you happen to have one) but I've been able to easily loosen them with an allen socket in a ratchet handle with the lower fork leg clamped in a vice (soft jaws on the vice).
I'm going to partially disagree based on my own experience with my 08 the first time I took it apart. Yamaha had put so much loctite on the bottom bolt of one of the forks that I could not get it loose even with an impact; a friend who used to work for RaceTech also could not get it loose, but fortunately he had a welder, I had a 26mm socket and a pipe, and he was able to make a 26mm extended socket to hold the cartridge.

 
Last edited by a moderator:
Gary,

When are you planning this? I assume over your Christmas break?

If you need an extra hand give me a shout, as I would love to help on this procedure for the learning experience.

Maybe the timing could work? Could it wait for a tech day in Mims, FL?

Tony

 
Last edited by a moderator:
Researching this forum in preparation for my front fork rebuild, I came across this thread describing a home-made special tool for disassembling the front forks here: CLICKYMy question: because I assume the OP was working on a Gen 2, I need to ask, does the Gen 1 require this same size tool? The picture shows a 26mm 6pt. socket welded to the end of a 3/4"x16" pipe.

Gary

darksider #44
If you do decide to make a tool Auto Zone has the 6 point socket for about $9.99 If I remember correctly. If you can loosen the bottom bolts without it you will be all set. If you can't then the tool may come in handy. I didn't realize you could do the job without it until I was all done and figured that out. But I did get to use my new welder and had fun making it.
smile.png
If you want I can ship you mine to use if interested. I won't be doing mine again until I hit 125K miles.

Give yourself plenty of room to work in and I do think there were a couple of little tidbits left out of the instructions that would of helped. If I recall them I will edit this post or add to the mayhem later.

Dave

 
Note that on the advice of Lee at Traxxion, I did not use loctite at all when installing the AKs.

He said it was not necessary with stock cartridges either, also, the tool used in removal was not required when putting the thing together, as long as the inside of the fork was scrupulously cleaned prior to assembly.

 
It's a real challenge doing this stuff as a rookie working alone out in the workshop. Seems as though there's precious little advice available for the little details of disassembling Gen 1 forks. But I am going to figure this out. I put the left fork vertically in the vice. With a 17mm wrench on the top of the preload adjuster and a 14mm wrench on the nut just below the cap, (at the very top of the dampening rod)... I gave it them good crank to break em loose. I'm trying to remove everything above the dampening rod. No luck. Not used to pulling that hard on open end wrenches. Decided to walk away as I was concerned that too much muscle might break or strip something.

I'm going to be patient, but I'm passing up some great riding weather. Middle seventies and wonderful all day today. UGGGH.

Gary

 
Last edited by a moderator:
No you don't really need that tool.
Instead, to get the bottom bolt out of the cartridge (after draining the oil out) reinstall the spring, spacers and top cap, and increase the preload adjuster to maximum. This will put enough pressure on the cartridge to keep it from spinning when you loosen the bottom bolt. You can also use an impact gun (if you happen to have one) but I've been able to easily loosen them with an allen socket in a ratchet handle with the lower fork leg clamped in a vice (soft jaws on the vice).

Tightening is the same process in reverse.

BTW, the procedure he used for the upper bushing and fork seal are pretty much exactly how you would do that part on a 1st gen. No need for the long (exhaust pipe) bushing driver on our 2 bushing first gens, but you will want a piece of 2" PVC pipe to drive the upper bushing and oil seal in.

To get the new upper bushing driven in, slide an old bushing down over it, then one of the flat washers, then you can use the 2" PVC pipe to tap the seal down into place.
Gotcha. I'm assuming that I remove the cap assembly from the top first. It was awful tight on my first attempt, as described in my post above.

Then: I simply flip the fork upside down afterwards, pour out all the oil, and then reassemble the spring and the cap, tighten up the preload, and use my air gun to back out the allen-head cap screw located at the bottom of the fork. That should allow me to pull the cartridge out by just grabbing the damper rod and lifting it out???

Gary

 
Gary,When are you planning this? I assume over your Christmas break?

If you need an extra hand give me a shout, as I would love to help on this procedure for the learning experience.

Maybe the timing could work? Could it wait for a tech day in Mims, FL?

Tony
Hey Tony

I'm already in process. It'll be done in probably a week or two. But I'll be a pro at this by the time I muddle my way through it. Still wanting to help out? Thinking about taking a ride up here? One thing that's surprised me thus far is how EASY it's been to do what I've done thus far. Getting the forks off is such a piece of cake.

Gary

 
Gary,When are you planning this? I assume over your Christmas break?

If you need an extra hand give me a shout, as I would love to help on this procedure for the learning experience.

Maybe the timing could work? Could it wait for a tech day in Mims, FL?

Tony
Hey Tony,

Thanks for volunteering. Sorry, but I've already got one of the forks off and sitting in my vice. It's a work in progress, but I don't expect to have it done real soon. As far as needing a hand, if you've done this before, we need to talk as I've got a number of questions. If not, so far it's been pretty easy. The fork weighs about 10 pounds and it's easy enough to get in and out of the triple tree. Still interested in coming up to the house? You're always welcome, of course. Concerning Mims, check our Fla. riders thread... let's plan something.

Gary

 
Last edited by a moderator:
Hey Gary,

The cap assembly does comes off as one piece as you were trying to do. The 14mm lock-nut will back off from the cap by holding the preload adjuster. The threaded end of the damper rod is bottomed out in the blind threaded hole in the cap. Try and use a good 17mm box wrench or deep socket on the preload adjuster, as that is soft alloy. The lock-nut is just a steel nut.

The lock-nut doesn't really need to be all that tight (torque spec is 18 ft-lbs) and it shouldn't have any loctite on it. You could heat things up some if you can't budge it on the assumption that some numb nutz was in there before you and either overtightened it or loctited it.

 
Last edited by a moderator:
Just an FYI, I loosened up the the cap before I took them out of the tripple tree. It is much easier to break it loose while It is still on the bike.

Gary, do you have the service manual to help you through this?

Dave

 
Last edited by a moderator:
Thanks, yes I do have a service manual. First thing I did was drop the fork a little so I could get a socket on it without having to mess with the handlebars.

Thanks Mcrider007 And FJR4me for confirming that the socket I need to make that long extension tool is indeed a 26mm. That is one hard socket to find. I thought surely Sears or Harbor Freight would have it, but nope. Gotta keep searching. I'll try Auto Zone tomorrow. So far, none of my friends have that odd duck socket. Oh well. And concerning the advice given by Fred (thank you) about NOT needing this special tool, I'm going to make one anyway as I intend to help others do this in the future and it would be nice to have one around just in case. Besides, my buddy Ted from church is itching to do this welding project for me, so I'm going to go ahead with it. Rummaging around his garage, he already found a 16 inch length of 3/4 inch pipe. He'll have this special tool whipped up in no time, all I need is that socket.

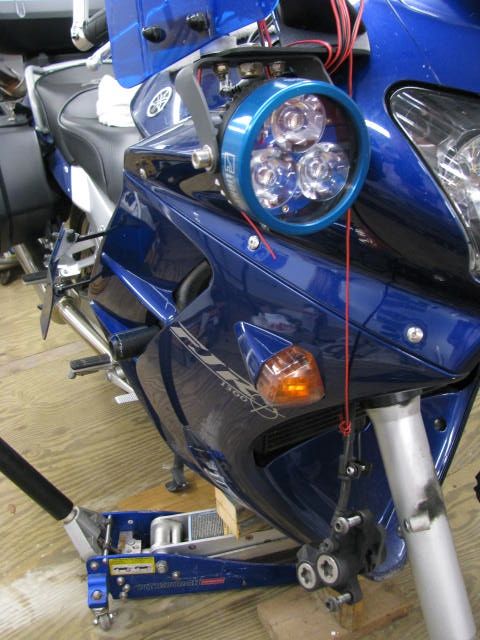
So anyway, here's a few pics of my progress:
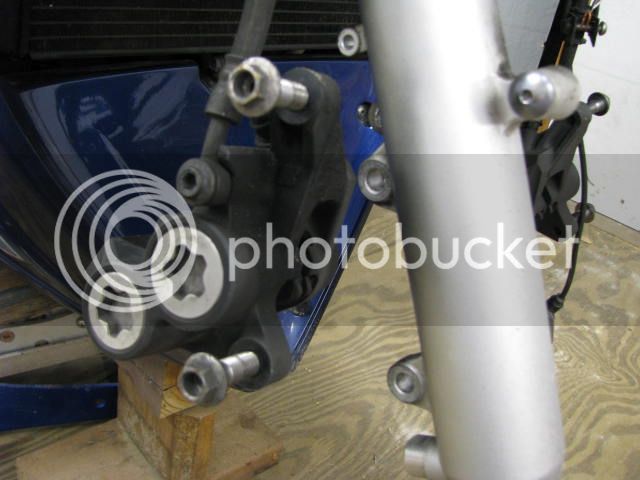
First we removed the fender and wheel and the two bolts from the calipers and used some wire to hang them from the mirrors;
IMG_0043.jpg


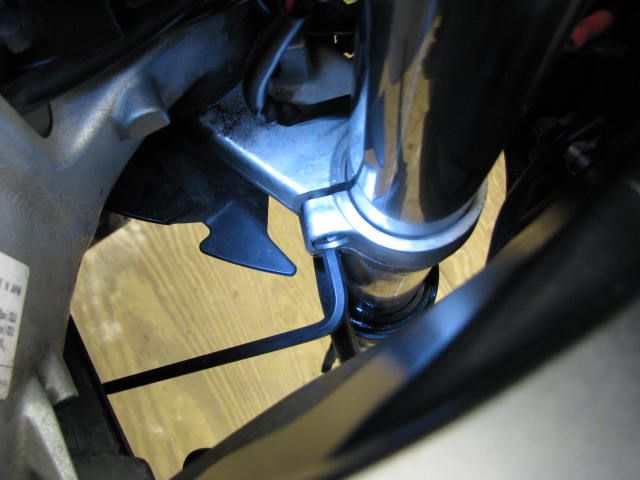
Once the calipers were supported, I loosened up the two pinch bolts in the lower triple tree: contrary to what the manual says, you don't have to remove anything to do this. The allen wrench fits up in there just fine.

IMG_0067.jpg


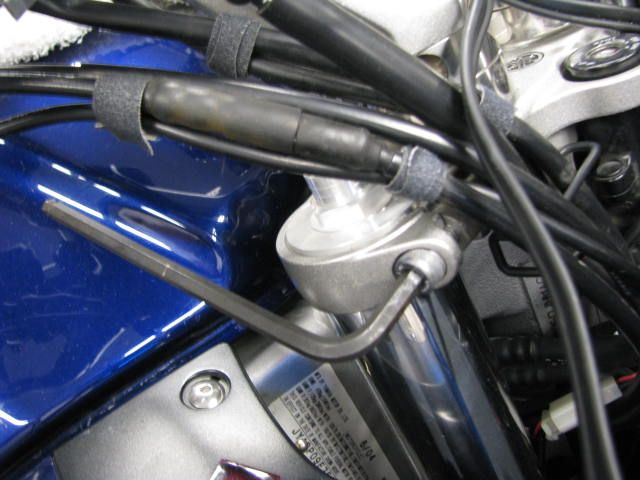
Next, I loosened the top bolt and dropped each fork...

IMG_0066.jpg


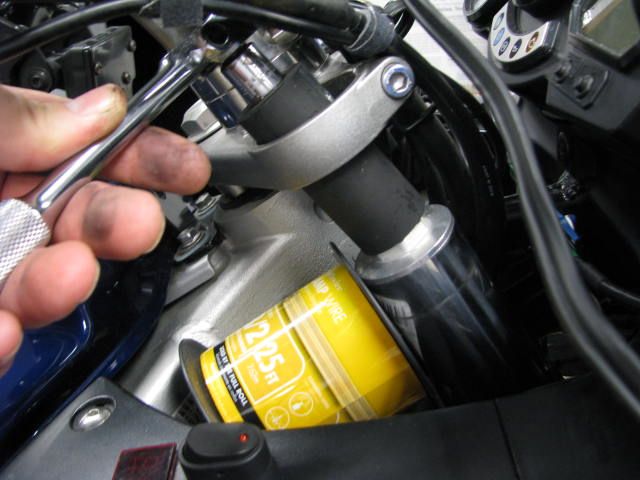
about 3 inches, and then re-tightened one of the bolts in the lower triple tree. With the fork held firm, I loosened the 24mm cap nut on top of the fork. Doing it this way enables me to leave the handlebars on. There's no way to get that socket in there with the handlebars in the way... without dropping the fork tube a little. Note that quality Harbor Freight 24mm impact socket in dazzling flat black...

IMG_0068.jpg


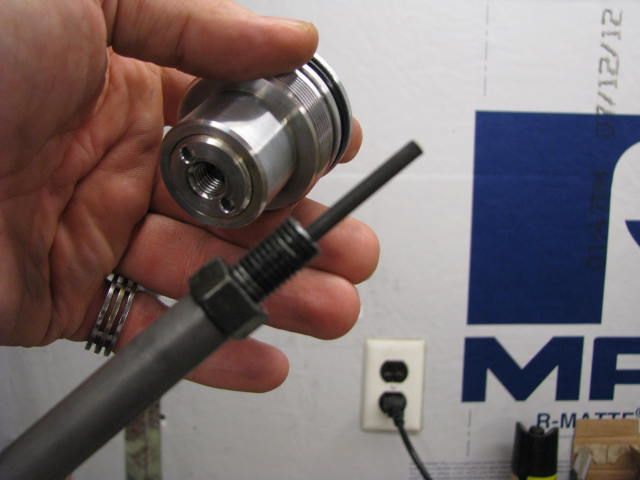
Then I loosened the bolt again and slid the fork out of the bike:
IMG_0046.jpg


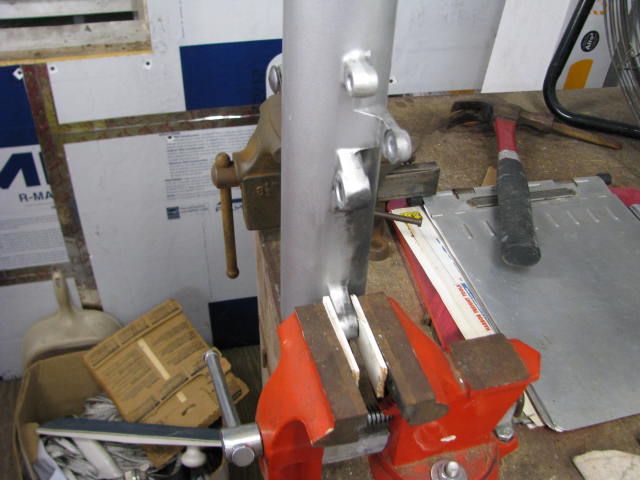
Then I clamped it in the vice
IMG_0044.jpg


and attempted to loosen this rascal. But it was NO GO trying to use the open end of my 17mm wrech... too tight.
IMG_0045.jpg


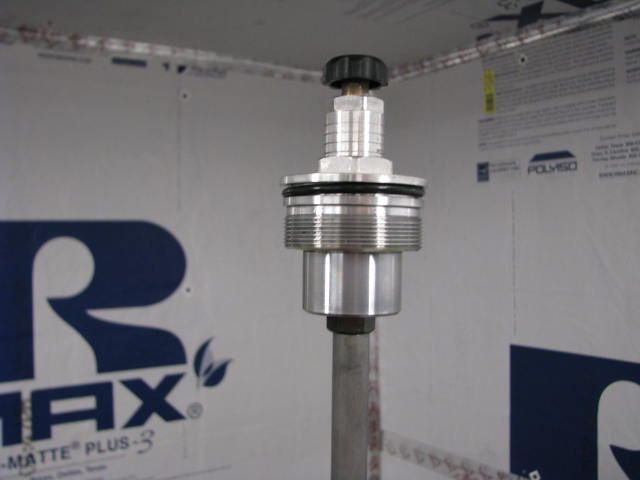
First I gotta get that knob off the top so I can get my box end 17mm past it...

IMG_0055.jpg


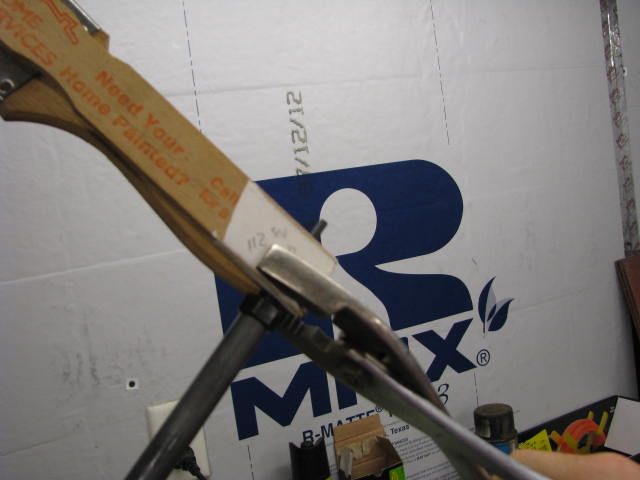
So after waiting a while and getting some more advice from the forum, I grabbed my 14 and 17mm wrenches and gave it a good twist:
It took a little more torque than I thought it would, but it popped loose just fine:
IMG_0057.jpg


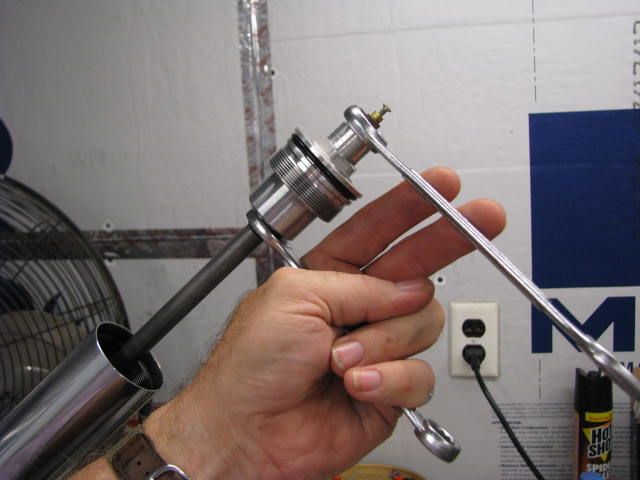
The cap assy screwed off easily:
IMG_0059.jpg


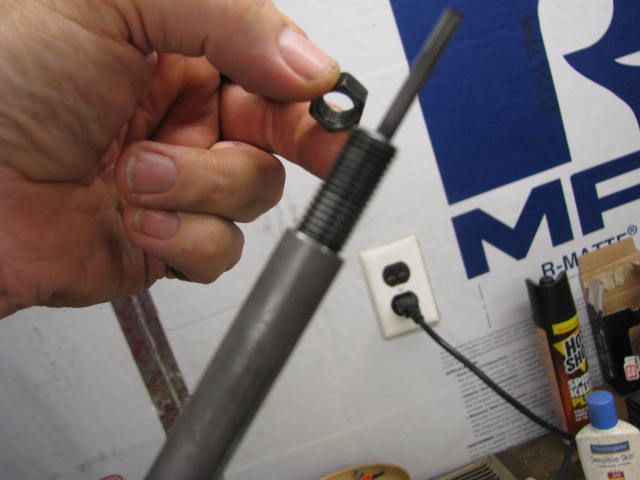
But the nut wouldn't come loose. So I grabbed the threads with my pliers and a couple strips of scrap wood (to protect them),
IMG_0060.jpg


Which allowed me to unscrew the nut easily:
IMG_0061.jpg


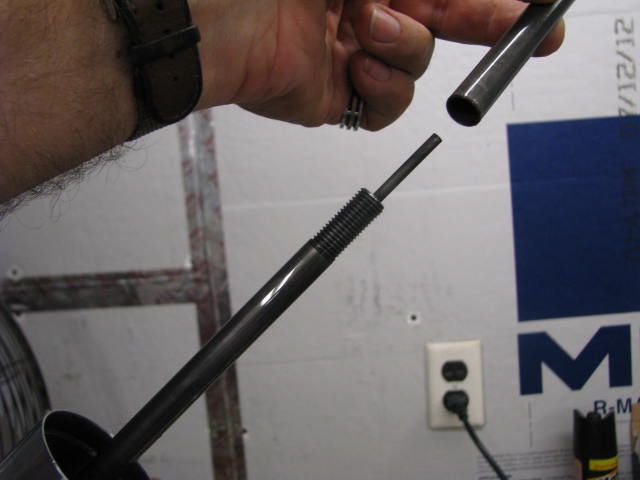
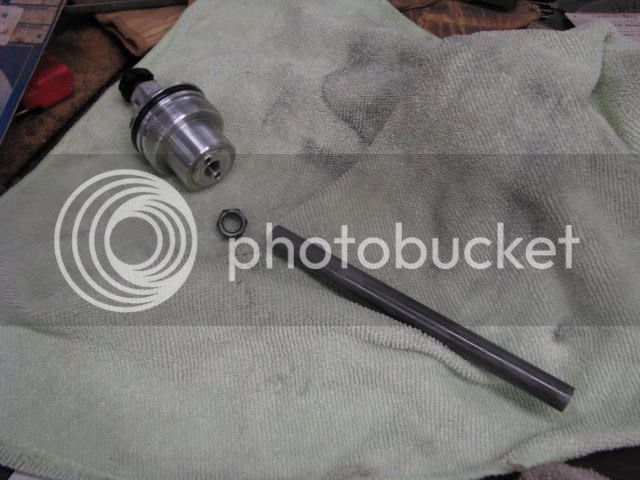
Then I slid this spacer tubie thingie out...

IMG_0062.jpg


And set everything aside to keep it in order:

IMG_0063.jpg


Though it's hard to see the allen headed bolt up inside the bottom of the fork thanks to the lack of good lighting in this picture, that'll be the next thing I take loose once I finish taking the fork apart and draining the oil out... and I complete the special tool with its 26mm socket to hold the other end. I'm guessing this is the process that can be done just as easily most of the time according to FredW's advice about using the spring tension of a re-assembled fork to hold the rest of the assy in place RATHER than requiring any special tools.

IMG_0047.jpg


We'll try to tackle some more of the project tomorrow. I'm working on this alone and when I've got the umphh to get out there after a long day at work each night. But I do have great lighting in the workshop and I can't complain about the 65 degree temps out there each night. Gotta love Florida this time of year.

Tomorrow I'll be pulling the large diameter washer out once I find my magnetic pick-up tool and begin disassembling this thing. Not sure of exactly what I'm doing, but it's going well thus far.

EDIT: I FOUND THE MAGNETIC PICK UP TOOL, BUT IT WAS NO MATCH FOR THAT WASHER. IT WOULDN'T COME OFF. I FOUND OUT WHY LATER ON IN THIS THREAD...

Gary
darksider #44

 
Last edited by a moderator:
Nice pictures, I thought you used the wrong nut at the top but Fred was kind enough to correct my mistake.

 
Last edited by a moderator:
Nice pictures but you used the wrong nut at the top to separate the cap from the damping rod. You're lucky you didn't strip the threads on the height adjustment/preload adjuster.
Ummm... no he didn't. The damper rod is threaded into the bottom of the preload adjuster. The wrong way to do it would be to hold the bigger cap nut. Here's the procedure from the FSM

ForkLegDissassembly.jpg


Also, Gary, when you get to these larger size metric hex fasteners, there is generally an inch based socket that is a "close enough" fit. That 26mm would be close to a 1 1/32" socket if you have or can find one of those easier. 1 1/32" would be a .0077" (< 0.2mm) looser fit than an actual 26mm, which certainly isn't enough to worry about.

 
Last edited by a moderator:
Nice pictures but you used the wrong nut at the top to separate the cap from the damping rod. You're lucky you didn't strip the threads on the height adjustment/preload adjuster.
Ummm... no he didn't. The damper rod is threaded into the bottom of the preload adjuster. The wrong way to do it would be to hold the bigger cap nut. Here's the procedure from the FSM

ForkLegDissassembly.jpg
I can't argue with your logic or the FSM diagram, it just isn't the way I recall doing it (and after looking at the pictures I think using either of the top nuts will give the same result)......but I am going to edit my previous post.

 
Last edited by a moderator:
MCRIDER: thanks for the input. The larger nut you describe may well have worked, but it seemed unwise as the service manual showed a pic of using the 17mm preload nut rather than the 24mm fork cap nut. However, I can see that if I indeed did this by utilizing that 24mm nut as you recommended, I wouldn't have had to remove the adjuster knob. Oh well, it's done now.

Also, thanks Fred.

I was talking with my buddy Ted (he's gonna do the welding) about just that yesterday. Your numbers are correct, but unfortunately, that 1 1/32 is a pretty rare socket as well. However, I just got off the phone with Auto Zone and they've got a 26mm shallow well 1/2 drive for 8 bucks. Oh yeah. Also called Ted, he's set to go as well with the welder. My project is coming together nicely so far.

Last night I drained a little oil out of the fork tube by accident as I was snapping pictures; I wasn't planning to drain the oil just yet. OOPS. What a mess. However, I was surprised at how clean it was. What's the deal? That bike has almost 40k miles !!! Isn't that oil supposed to be seriously black and grungy?

Gary

 
Last edited by a moderator:
Gary - keep going. You're doing fine. The PVC tool works great for driving the new fork seals in.

Which fork oil did you select?

 
Just an FYI, I believe I used 1/2 black pipe which is a lot larger than 1/2". I bought the 3/4 also but it seem to be too big. You will need a square end adapter to weld on the other end also. The adapter will just drop through the 3/4 pipe.

Dave

 
Top