Gen 1 fork rebuild

Yamaha FJR Motorcycle Forum

Help Support Yamaha FJR Motorcycle Forum:

This site may earn a commission from merchant affiliate links, including eBay, Amazon, and others.
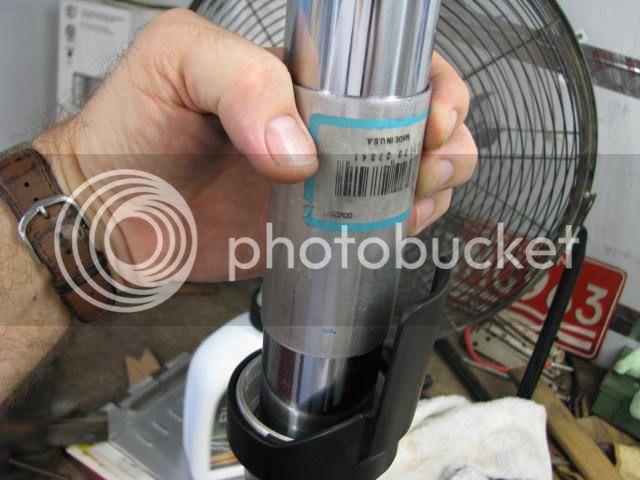
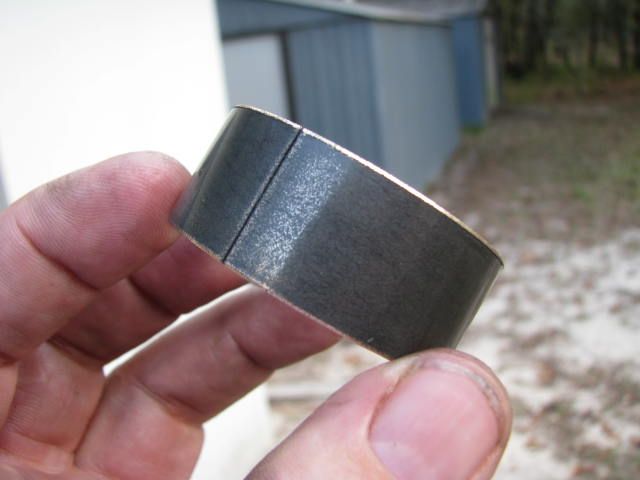
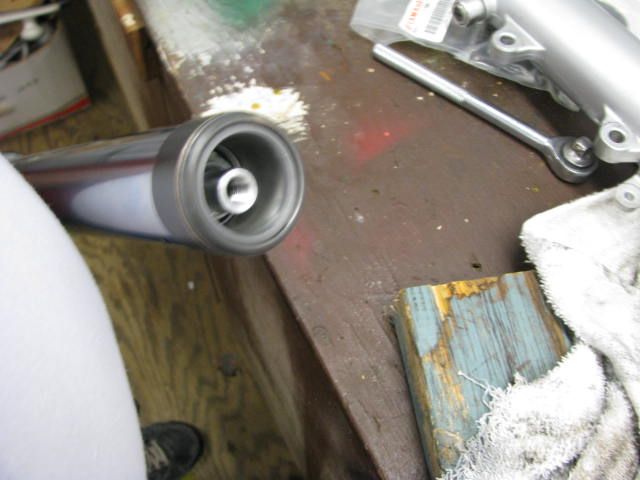
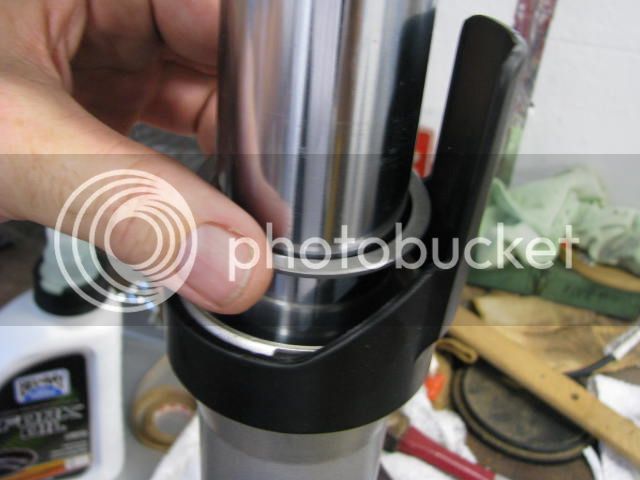
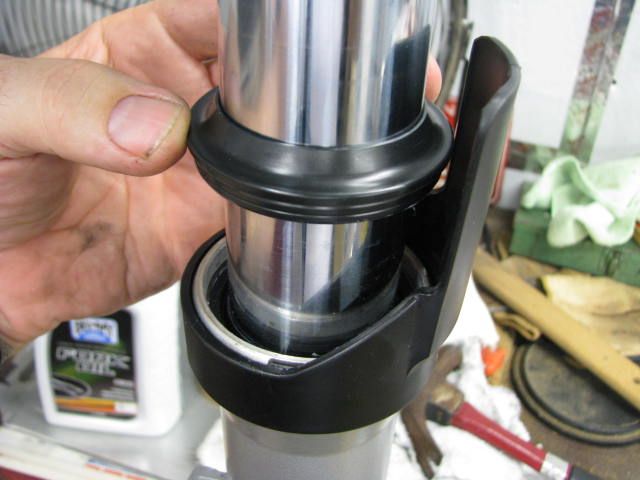
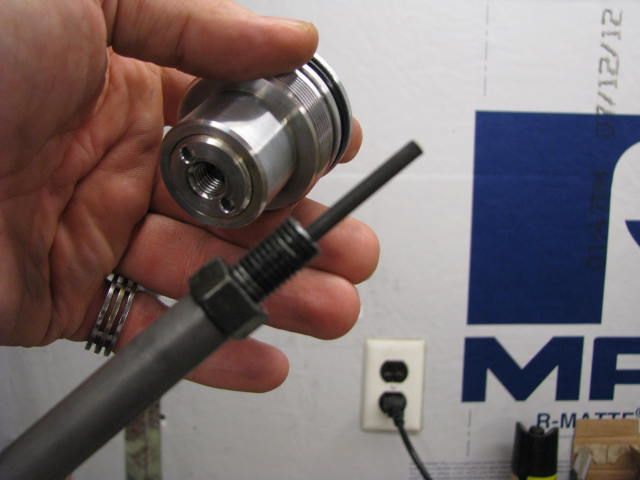
What an experience this was. Not one time in all the threads I've read - concerning the disassembly of these forks - did anybody mention difficulty with the washer I had to deal with today. I got one of the forks apart successfully, but it was a good thing that the air gun was able to take the allen-headed cap bolt out of the bottom of the fork - easy enough... without using my special tool. I couldn't use the special tool I had made, as the washer that sits under the spring... and just on top of the damper rod assembly - was "stuck" to - and therefore covered up... the 26mm nut on top of the damper rod assy. It kinda looks like it's designed to do so, it's a pretty snug fit, and takes a little tapping to break the washer loose from the damper assy. EDIT: Here's a pic of what I'm talking about:
IMG_0084.jpg


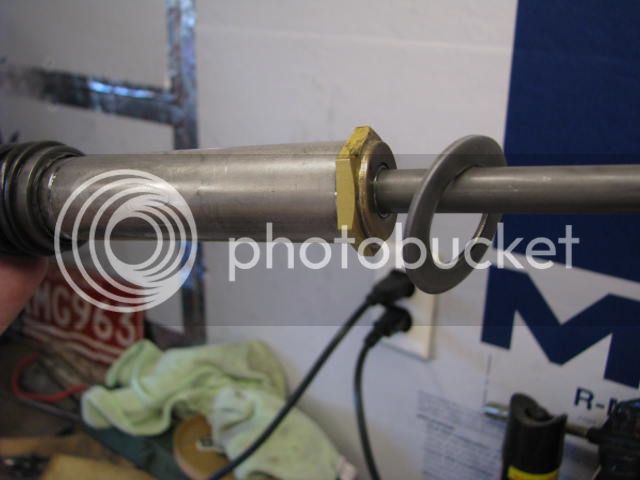
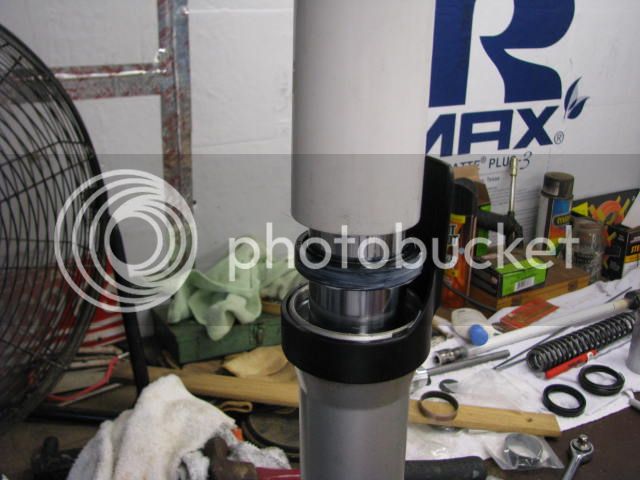
So, my special tool just sat on the bench while I disassembled the fork. Once I had it apart, I could see how that washer (on which the spring sits) is designed to fit tightly on to a flange machined into the top surface of the damper rod assembly, just above the 26mm nut. Mine kinda welded itself on there. By rocking it it back and forth with a soft mallet, sorta teeter-totter style, it popped off eventually, but that was after I removed the damper rod assy. With the washer removed, now the 26mm "nut" cast into the top of the damper rod assy is visible and accessible. Heading back out to work on it some more. Took lotsa pictures... will post later.

HPPANTS
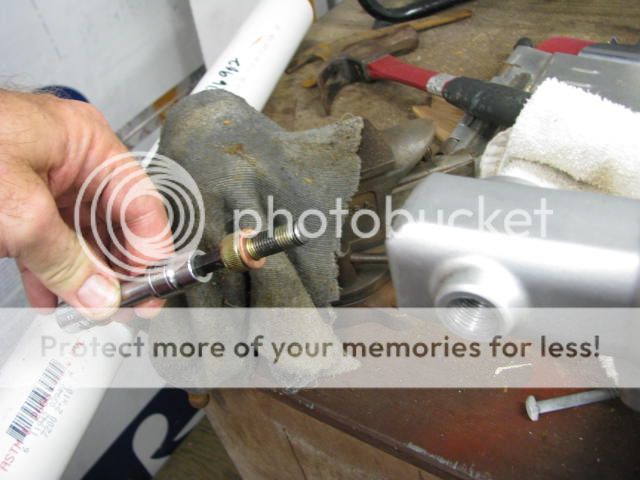
The spacer you spoke of above: Is that the washer that fits over the 26mm "nut" on the top end of the damper assy... just under the spring - that I spoke about above?

Also:
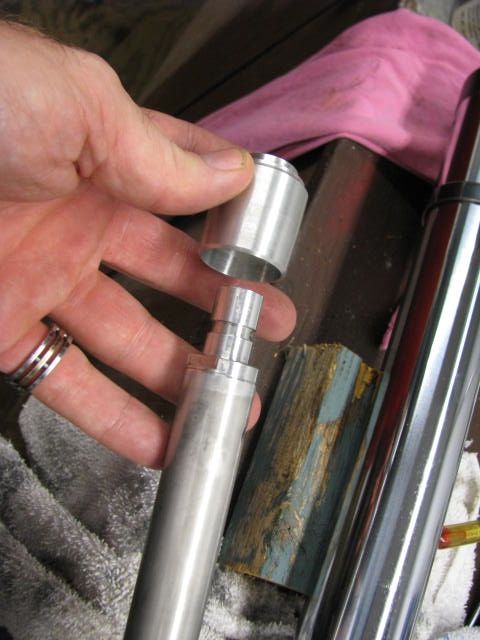
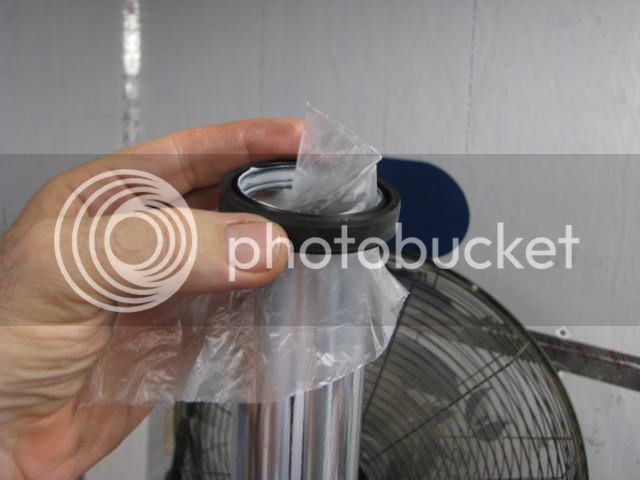
Ran into a jam. Can't drive the top bushing in (it goes under the seal). The 2" dia schedule 40 PVC simply slides over the top of it, and the bushing wedges inside the pvc... rather than driving down into the a machined pocket where it belongs. It's a smaller diameter than the oil seal that would go in afterwards. Looks like the PVC ain't gonna work for the bushing. UGGH.

EDIT:
Just read this post (CLICKY) by FJRed back in 2011. He used a Chrome exhaust tip from Advance Auto Parts - that he cut down... to drive the seals in. They still sell the same item (but it costs a little more... figures). So I bought one. Now I just gotta figure out how to cut it down nice and square and straight. This oughta be interesting???


Gary

 
Last edited by a moderator:
Actually, that is covered pretty well in this FJR Fork disassemble instruction. It is also mentioned briefly in the FSM:

5. Remove:
• washer
• damper rod assembly bolt 1
• copper washer

NOTE: @
• If the washer is difficult to remove, use an
impact wrench to loosen the damper rod
assembly bolt.

• While holding the damper rod with the
damper rod holder 2, loosen the damper rod
assembly bolt.


Yes, it is intentionally a (loose) pressed fit on top of the cartridge. You can just use a bent coat-hanger or other long hook shaped tool to reach down and knock it off of its perch so that you can get the 26mm extension socket on the cartridge. That washer only exists on 1st gens, which have a 2-stage progressive spring that is a bit tapered on the ends, so you won't see it mentioned in the second gen disassembly posts.

On second gens (and 1st gens with aftermarket springs) the bottom of the spring fits directly on the lip in the top of the cartridge that the washer was pressed into on yours. Of course, if you'd have gone with my original advice and not bothered making the tool at all, you would not have run into this issue.
tonguesmiley.gif


I already gave you a solution to driving in the new upper bushings. We 1st genners don't need the longer bushing insertion tool like FJRed made because we don't have to install a middle bushing. Just Slide the new bushing down in place and then slide one of the old (just removed) bushings on top of that. That will allow the new bushing to be pressed down far enough into the lower fork leg. Then put the washer that normally goes between the bushing and oil seal on top of the old bushing and slide the 2" PVC pipe on top of that. This washer gives the 2" pipe something to grab onto. It's a bit fiddly because that washer is a bit larger than would be optimal. You'll want to tap it in easily while arranging the parts between taps.

After the new seal is pressed all the way in, remove the washer and old bushing, reinstall the washer on top of the new bushing (where it belongs) and then press in the new oil seal over it using the 2" PVC pipe.

 
Last edited by a moderator:
Thanks Fred, you're the best. That little phrase in the service manual -about the washer - I found that after I'd fought with the washer for a while. But it never showed or discussed how to get it off, nor did I understand that it was pressed onto the top of a flange in its center. Hind-sight is indeed 20/20. However, I simply followed your advice about using an impact wrench. During all this, as I said earlier, I went ahead with getting the tool done as my buddy Ted was itching to help me out and had already made plans to build this tool for me... so I went ahead with it. That special tool did however work fine for re-torquing the damper assy when I finished. I looked at that washer and thought about that last night, but I already ordered the flange. Just a couple bucks, but not a big deal. I sure do appreciate your help Fred. Wish you lived down the street.

On another note, how long does that bushing insert tool have to be - to get the middle bushing installed for a gen 2? How deep's it gotta go? I'll be attempting to help others do this in the future (talk about the blind leading the blind).

Gary

 
Last edited by a moderator:
Gary - the "spacer" I was referring to is called the "Tapered Spindle" in the Yamaha microfiche. It is part no. 5LV-23173-00-00. It would appear that you are past that point now.

Like Fred, when I worked on my forks, I used the old bushing to drive the new one in.

 
Last edited by a moderator:
VICTORY !!!!

I used the old bushing to drive the new... as was recommended. Oddly enough, my old bushings looked pretty good. I couldn't detect any wear when measuring the old bushings with my caliper, but then again they can't detect any wear less than say - .001 or so. The first fork is done and reinstalled (loosely for now) in the bike. The second fork is completely disassembled and draining overnight. It seemed like a good place to call it quits for the day.

I had a fit trying to get the oil seal to seat. As you know, if it's not fully seated, the spring clip or snap ring retainer (or whatever ya call it) won't slide into it's groove in the fork leg. After I installed the upper bushing and the spacer washer above it, the oil seal went in fairly easily until I reached the last .060" or so. From there I had to get serious with my rubber mallet and the 2" dia. PVC pipe I was using to drive the seal. I'm guessing that maybe the bushing wasn't quite all the way down? I'm sure that's not a good idea to do it that way, hope I didn't damage anything. It seems to slide up and down just fine and the seal is wiping down the fork leg pretty well.

One thing's for sure, my 8 year old, 40k mile oil was pathetic. Oddly enough, it seemed reasonably clean when I first started pouring it out the top of the fork legs, but the last 6 ounces or so was a dark soupy grey with lots of metallic particles. All in all this was a great learning experience. I've got a bunch of pictures, but too tired to deal with all the posting right now.

Soon enough.

Gary

 
Last edited by a moderator:
Keep going - you're doing fine.

I would assume that you verified no dirt or particles in the recess where the fork seal sits? That of course would cause trouble for driving the new seal in. Also, I coated my new seal with a film of fork oil before driving it in the lower fork leg. I'm not sure if it makes any difference, but as a matter of habit, any time I replace fork oil, I add about 1/2 of the oil first. Then exercise the fork assy back and forth to allow the thing to burp and oil to flow through all passages. Then top of the fork leg before closing everything up.

 
I used the old bushing to drive the new... as was recommended. Oddly enough, my old bushings looked pretty good. I couldn't detect any wear when measuring the old bushings with my caliper, but then again they can't detect any wear less than say - .001 or so.
I found the same thing when I rebuilt mine with over 80k miles on them. The bushing itself won't actually wear, but the teflon coating on the side that slides during operation can. Mine looked fine and could have been reinstalled. I also found that on the seal, although the shape of the edge of the lip was altered a tad (from wear), it was still perfectly serviceable and could have been reinstalled.

I had a fit trying to get the oil seal to seat. As you know, if it's not fully seated, the spring clip or snap ring retainer (or whatever ya call it) won't slide into it's groove in the fork leg. After I installed the upper bushing and the spacer washer above it, the oil seal went in fairly easily until I reached the last .060" or so. From there I had to get serious with my rubber mallet and the 2" dia. PVC pipe I was using to drive the seal. I'm guessing that maybe the bushing wasn't quite all the way down? I'm sure that's not a good idea to do it that way, hope I didn't damage anything. It seems to slide up and down just fine and the seal is wiping down the fork leg pretty well.
Sounds like you are fine. When you look down at the upper bushing, after it has driven all the way in it will be recessed down below the edge that the bottom of the seal butts up against. That was why the need to use the old bushing to drive in the new one. You can also take a big (wide) screwdriver and fit it on the top and tap on it to feel that the bushing is all the way down.

One thing's for sure, my 8 year old, 40k mile oil was pathetic. Oddly enough, it seemed reasonably clean when I first started pouring it out the top of the fork legs, but the last 6 ounces or so was a dark soupy grey with lots of metallic particles.
I've flushed my forks out at about every 25k +/- miles and yes the amount of metallic looking gook that comes out each time is pretty astounding. It's hard to conceive from where that all comes, and has been the topic of many winter bench racing discussions.

 
Last edited by a moderator:
Keep going - you're doing fine.
I would assume that you verified no dirt or particles in the recess where the fork seal sits? That of course would cause trouble for driving the new seal in. Also, I coated my new seal with a film of fork oil before driving it in the lower fork leg. I'm not sure if it makes any difference, but as a matter of habit, any time I replace fork oil, I add about 1/2 of the oil first. Then exercise the fork assy back and forth to allow the thing to burp and oil to flow through all passages. Then top of the fork leg before closing everything up.
No dirt or particles. Seals greased on outsides with lithium soap based grease. Ha- I noticed also that the service manual left several things out on the re-assembly. Like for example putting the springs back in. Good thing I was thinking. Don't suppose the bike would operate too well without them. Burping: yeah, I was exercising the damper rod assy as well as the upper fork leg itself up and down several times and it was making some really interesting sounds. Reminded me a little of sitting on the couch with the guys after Thanksgiving dinner
no.gif


Gary

darksider #44

 
I had a fit trying to get the oil seal to seat. As you know, if it's not fully seated, the spring clip or snap ring retainer (or whatever ya call it) won't slide into it's groove in the fork leg. After I installed the upper bushing and the spacer washer above it, the oil seal went in fairly easily until I reached the last .060" or so. From there I had to get serious with my rubber mallet and the 2" dia. PVC pipe I was using to drive the seal. I'm guessing that maybe the bushing wasn't quite all the way down? I'm sure that's not a good idea to do it that way, hope I didn't damage anything. It seems to slide up and down just fine and the seal is wiping down the fork leg pretty well.
Sounds like you are fine. When you look down at the upper bushing, after it has driven all the way in it will be recessed down below the edge that the bottom of the seal butts up against.
I think it was approximately flush with the bottom of the aluminum pocket that holds the oil seal. There are two pockets, the upper (larger diameter) one for the oil seal and the lower (smaller diameter) one for the bushing. After my best attempt at installing the bushing, I put a flat blade screwdriver down there to "feel" where the bushing was in relation to the bottom aluminum shoulder of that oil seal pocket. It seemed I had driven it down to be about flush. It seemed to be seated. I'm thinking that I was wrong. I'll try to do a little measuring with my dial caliper next time. That way there won't be any question. 1 minute with that caliper and a calculator will give me the numbers I need to be accurate and make sure it's seated. Tapping on it and listening/feeling for the change (associated with being seated) was a little vague. Numbers however, don't lie.

Gary

 
Last edited by a moderator:
Finished rebuilding the second fork today. I made a couple slight changes in the way I put it together to make things go a little easier. First, before inserting the chrome slider tubes, I used a little lithium grease to lube the machined bores into which the upper bushings and seals must be pressed. Next I gently tapped the seals in place using the special washer I had my bud Mark carve up for me on the lathe. Since the OD of the forks is about 1.887, he made it 1.905 ID for me, and it worked out great. I simply slipped the upper bushing in place, slipped the 1.895 ID exhaust pipe section (described in earlier post) on next, put the washer on top of that, and the 2" PVC pipe on next. All it took was a couple taps using the PVC as a slide hammer, and it was seated. I did a little measuring to be sure the bushing was all the way down in the bore, and it was indeed. Next I dropped in the seal spacer washer, and then put the oil seal in place, using the PVC pipe. It slid in place pretty easily. Afterwards, the snap ring went in easily confirming that both bushing and oil seal were seated properly. Next I discovered that the dampers could be reassembled and torqued to the req'd 25 ft/lbs. without using the special tool I had welded up. They didn't spin or shift or even move while I was cranking up the torque. Just like Fred predicted, I might add. Pictures will be coming along soon. Still have a little more work to do.

Gary

 
Last edited by a moderator:
Well the exhaust tip that I bought (see 5th picture down at this link CLICKY) probably would have worked fine, but I took it back and bought a section of exhaust pipe that fist just as well but cost 1/3 as much. Can't resist saving a buck, sorry bout that. Just had to find something with a 1.895 I.D. or slightly bigger. Thanks Advance Auto. Here's a picture of it below as I'm getting ready to put the bushing in.

IMG_0110.jpg


PUTTING THEM BACK TOGETHER:

After cleaning everything up and spraying out the lower aluminum legs with brake cleaner spray, I took a close look at the old lower bushings. They looked almost new, oddly enough. The lower bushings probably could have been reused as they didn't get damaged during removal.

IMG_0087.jpg


But I replaced them anyway; they're fairly cheap. After I cleaned out the lower fork legs, and all the various components,

IMG_0090.jpg


Into the the outer tube (above), I dropped in the oil flow stopper (seen below -- looks like a small cup). The damper rod assy protrudes through the hole in the bottom of the inner fork (not shown) and then fits into the oil flow stopper which resides between the inner tube and the outer tube. The bolt coming up through the hole of the outer fork (shown above) then passes through the cup, through the inner fork, and finally threads into the damper rod assy (shown below)... hope that makes some sense.

IMG_0091.jpg


I put this new bushing on the lower end of the inner fork tube:

IMG_0088.jpg


It slid right on the end. Below the damper rod assy is slid into place and I'm ready to insert the whole mess carefully into the outer fork tube.

IMG_0095.jpg


Oh, and I took this washer, on the upper end of the damper rod assy., off for now. I want to leave the 26mm nut exposed so I can torque the damper rod assy. in place.

IMG_0084.jpg


Then I put the bolt with its copper washer back in the bottom of the outer fork leg... and into the damper rod assy:

IMG_0100.jpg


It's time to torque that same bolt using my fancy dancy damper rod tool: first,

I stick my welded wonder about 12" down the inner tube and grab onto the 26mm end of the damper rod:

IMG_0099.jpg


This is a lousy picture, but since I'm working alone, I put the breaker bar on the floor, stood on the handle, stood the fork upright, hooked up my 35 year old Kmart torque wrench, and torqued it to 25 ft./lbs. The rag you see is wrapped around the fork to keep the yuch out.

IMG_0102.jpg


Next, I check the length of the spring. Book says 10.28 inches minimum. Mine checks in at about 10 3/8" which is fine. FIrst I drop in that pesky washer that I removed earlier from the top of the 26mm nut on the damper rod assy, drop the fancy dancy damper rod tool back in, tap the washer (I think it's called a spring seat) a couple times to seat its ID onto the lip at the top of the damper rod assy, and install the spring along with it's top washer.

Hurray, lower end is complete.

EDIT: I'm trying to provide some pictures that I wish I could have looked at myself before trying to do this... to better illustrate how all this goes together. My thanks to MCRIDER007 for noticing my oversight: corrections have been made.

Gary

 
Last edited by a moderator:
When I did my 05 forks (and a friend's 04) the oil cap that goes on the bottom of the cartridge had to be installed first because it was too big to fit through the hole at the bottom of the fork tube. It will fit through the hole at the bottom of the GEN2 fork tubes.

Maybe your fork tubes have the larger holes at the bottom.

 
Tell us again why you went to all this work when essentially all you did was a fork oil flush and change?Did I miss something?
Leaky seal. When I took the forks apart to remove the seal, it damaged the leading edge of the upper bushings. It raised a bur on the seals from both forks. It appears to me that you can't remove the seals/bushings (using the slide hammer method) without damaging the upper bushings... creating a bur on the leading edge. Could the burr be filed? Could they be reused? For the cost of those bushings (relatively cheap) I'd rather not chance it. But how was I to know that my forks would go 40 k miles and my bushings would still look like new? Only way to find out was to do the surgery. However, I did need to replace the seal, so it was time well spent.

Gary

 
When I did my 05 forks (and a friend's 04) the oil cap that goes on the bottom of the cartridge had to be installed first because it was too big to fit through the hole at the bottom of the fork tube. It will fit through the hole at the bottom of the GEN2 fork tubes. Maybe your fork tubes have the larger holes at the bottom.
Thank you. I was trying to remember which order I did those caps. Now that I think about it, you're right. I'll change the order of the pictures above.

Gary

 
I had a few more pictures to throw on the forum.

Below I'm driving the upper bushing in: I put the new bushing in place, set the old bushing on top of it, and drove it in. I used a custom made washer just on top of the exhaust tube spacer shown here. It was cut to a 1.892 ID and about a 2 1/4" OD. It enabled me to slam the whole assy down with my 2" PVC pipe. Hope that makes sense.

IMG_0110.jpg


After the bushing was installed, I dropped in the spacer...

IMG_0111.jpg


Next I slid the fork seal with a little lithium grease over this baggie (recommended to prevent tearing the seal)

IMG_0112.jpg


Next I installed the fork seal with my 2" PVC. Notice the coating of white lithium grease.

IMG_0113.jpg


Then I installed the dust seal

IMG_0119.jpg


And poured in the oil until it read about 4 1/2 inches below the top of the fork tube, pumped the damper assy up and down, pumped the fork up and down, and let it set 10 minutes to get all the bubbles out. Then I added oil until it reached 3.94 inches (100mm) below the top of the inner fork tube. I used 5 weight BelRay fork oil. It's pretty close in viscosity to the original Yammie oil that came with the bike. It took about 3/4 of a quart to fill each fork leg.

IMG_0120.jpg


The Springs go in after the oil is filled... make sure the length is at least 10.28" Mine were about 10. 38 or so.

IMG_0073.jpg


Then I put the top washer on the spring, and the remainder of these parts, in the opposite order that I took them off. One item to be careful about: be sure the threaded rod bottoms inside the aluminum fork cap. I had to grab the threads with a needle nose with a couple small pieces of plastic hose slipped over the ends (so as not to damage the threads). Sorry, no pic of that. But I had to stop the threaded rod from turning in order to get it to thread all the way in to the cap. It doesn't need to be real tight, just get it bottomed properly...

IMG_0059.jpg


Finally I ran the lock nut up to it and torqued it to the proper setting... except that I used a torque wrench rather than the one shown below. Sorry no actual picture of that.

IMG_0057.jpg


There is so much more to be said, needless to say I didn't do a real good job of documenting every step in order, but I only wanted to provide some pictures to kinda fill in the missing links of just what's inside these forks and what it looks like.

Gary

darksider #44

 
Last edited by a moderator:
You have a lot more guts (and ability) than me to mess with doing this by yourself. Looks like you did a real nice job. Thanks for taking the time to document your steps & post pix along the way.

 
Old thread resurrection time. Thanks for all the photos and info in here! I just did mine and thanks to all the folks here, it went pretty smoothly.

 
Top