dcarver
Well-known member
Owned.
'They' said it would happen, the aluminum front sub frame, holding them heavy assed Solteks would eventually break. I even predicted on that thread that I would have the first failure, since I ride 6 miles every day on a really phooked up washboard dirt road. The last mile is not county maintained, and right about now it will rattle your fillings out. All the truly street ******* (thanks RenoJohn, love that term) probably will never have anything to worry about, but for the Soltek-equipped Adventure Riders (sounds grandiose, eh?) contingent, beware, you're failure will eventually become evident.
OK, so I don't have pix of the failure *YET*, will have some come this Saturday, so be patient. I decided I don't have the skill/tools/patience/working non-arthritic fingers to mess with pulling all the front plastic off to get to the sub frame. Coincidentally, a most *EXCELLENT* technician, whom I wrote glowing praises before on this forum, is opening his own independent shop so the logical choice was to have Ivan the Great once again fix Crzy8. As a matter of interest, Ivan repaired Crzy8 after the carbonization problem and then again after the Deer Strike. To say I trust Ivan with my life, since he works on my bike, is the truth. Ok then, enough about Ivan (for now) and back to the problem.
The mirrors mount on a welded tab, an ear, of the aluminum sub frame that holds the front of the bike together. It's designed to hold a low weight mirror on silky smooth paved roads. So I, and others, have hung a huge mass called Soltek HID lights, mounted on a lever arm, to that ear. Dirt roads, vibration, and sooner or later something has to give. I promise, pix coming soon.
The question for the now is this - I, like most all others, have mounted the Solteks on Skyway brackets. The brackets are fine - beefy beyond belief and with quality.
Please keep this thread on topic, those who have been burned by Skyway aux fuel tanks, Thank You. I feel your pain but this ain't the place, so sincerely, Thank You.
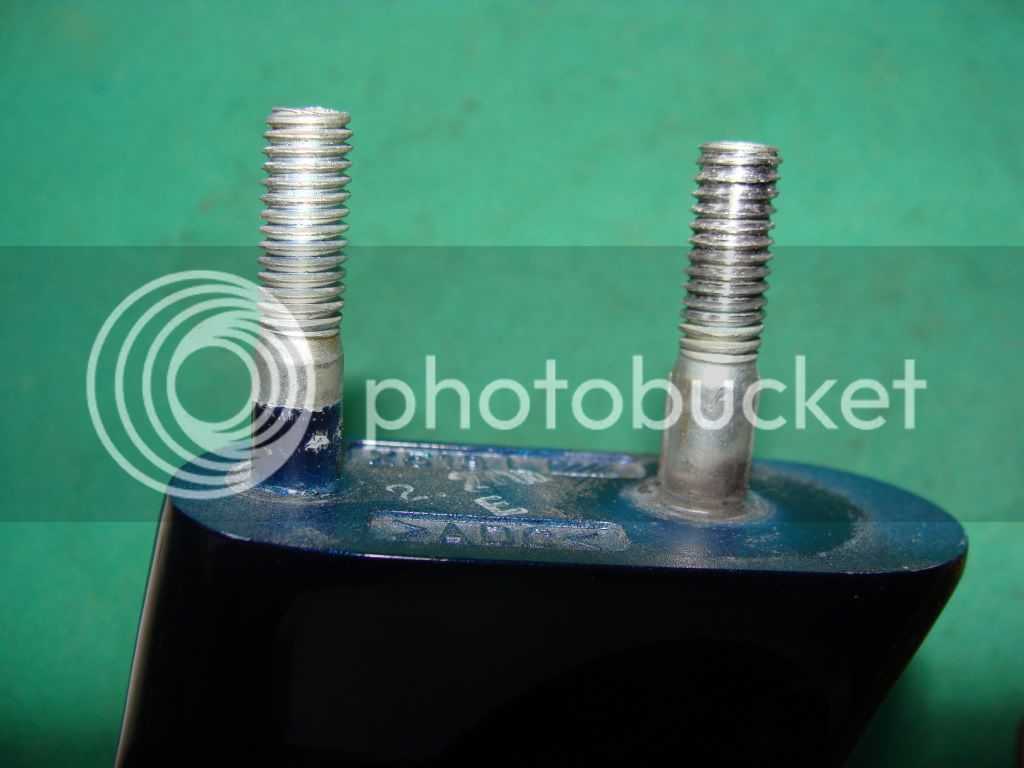
These mounts consume about 1/8" of the two studs epoxied? into the mirror. The nuts holding the mirror + Soltek brackets barely have perch on the remaining threads. I want to thicken the plate for the ears, and add triangulated bracing too. This means the mirror studs need be lengthened so the nuts have threads to secure to. Keep it clean pervs, you know who you are..
My question is this, to all you handy fabricators/welders out there - is it possible to cut the existing two studs down, then weld a threaded extension on, above the securing nuts, without melting the plastic of the mirror the stud is epoxied/glued into? Will it be strong enough?
I did try to extract the existing studs, they won't budge without damage.
Maybe some pix would help.
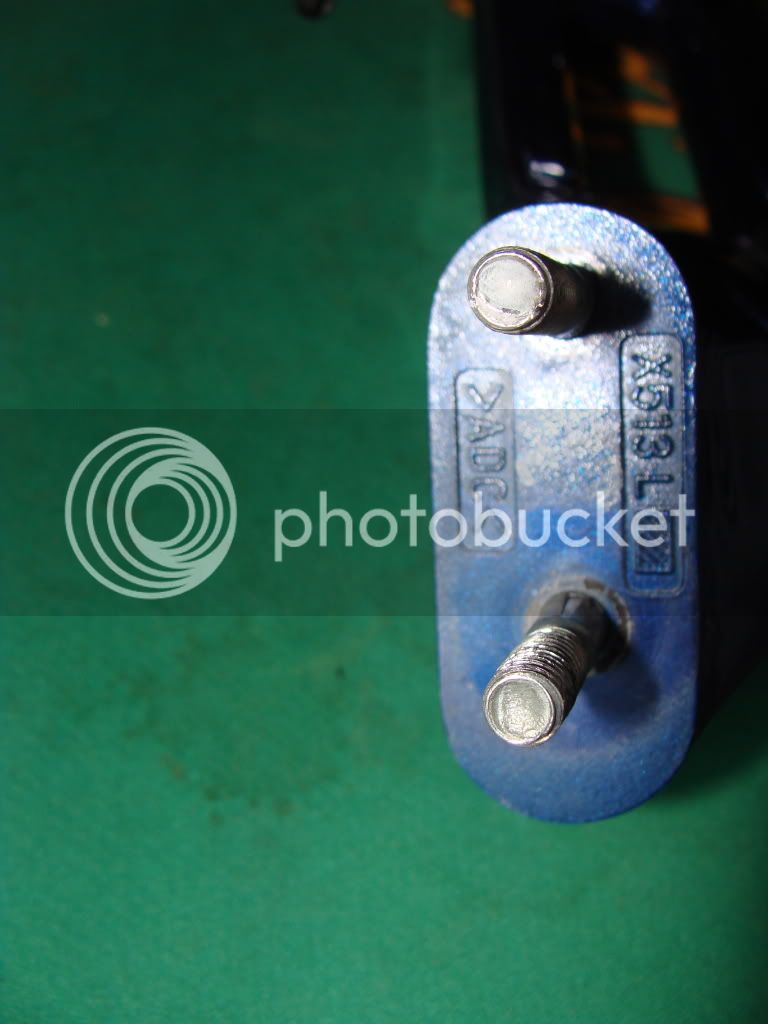
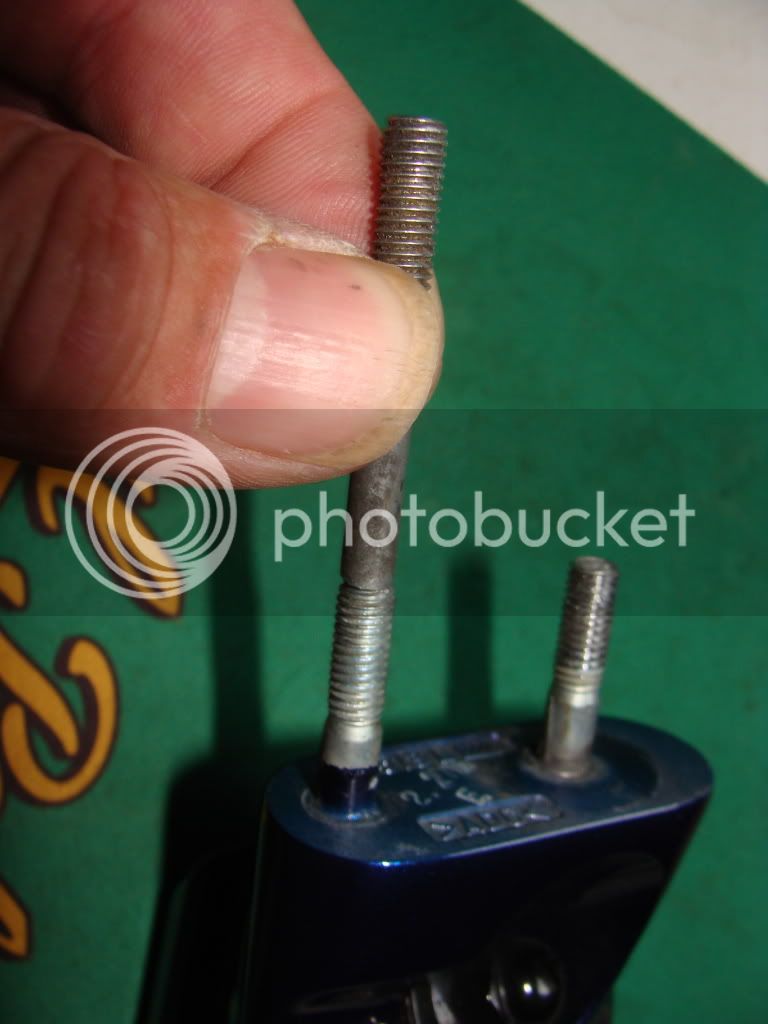
Stock mirror studs. They need be lengthened to accommodate the Skyway brackets + additional thickness on the mounting 'ears' I plan to use. I want to thicken the plate for the ears, and add triangulated bracing too. This means the mirror studs need be lengthened.

The studs are typical of the ones you put everyday 10 MM nuts on..

Here's what I want to do - as not defined by the pix -
1. Cut the existing stud above the threads.
2. Weld a (shorter) extension on to the existing stud, above the area where the securing nut would locate.

Once again, pix of the sub frame this Saturday.
'They' said it would happen, the aluminum front sub frame, holding them heavy assed Solteks would eventually break. I even predicted on that thread that I would have the first failure, since I ride 6 miles every day on a really phooked up washboard dirt road. The last mile is not county maintained, and right about now it will rattle your fillings out. All the truly street ******* (thanks RenoJohn, love that term) probably will never have anything to worry about, but for the Soltek-equipped Adventure Riders (sounds grandiose, eh?) contingent, beware, you're failure will eventually become evident.
OK, so I don't have pix of the failure *YET*, will have some come this Saturday, so be patient. I decided I don't have the skill/tools/patience/working non-arthritic fingers to mess with pulling all the front plastic off to get to the sub frame. Coincidentally, a most *EXCELLENT* technician, whom I wrote glowing praises before on this forum, is opening his own independent shop so the logical choice was to have Ivan the Great once again fix Crzy8. As a matter of interest, Ivan repaired Crzy8 after the carbonization problem and then again after the Deer Strike. To say I trust Ivan with my life, since he works on my bike, is the truth. Ok then, enough about Ivan (for now) and back to the problem.
The mirrors mount on a welded tab, an ear, of the aluminum sub frame that holds the front of the bike together. It's designed to hold a low weight mirror on silky smooth paved roads. So I, and others, have hung a huge mass called Soltek HID lights, mounted on a lever arm, to that ear. Dirt roads, vibration, and sooner or later something has to give. I promise, pix coming soon.
The question for the now is this - I, like most all others, have mounted the Solteks on Skyway brackets. The brackets are fine - beefy beyond belief and with quality.
Please keep this thread on topic, those who have been burned by Skyway aux fuel tanks, Thank You. I feel your pain but this ain't the place, so sincerely, Thank You.
These mounts consume about 1/8" of the two studs epoxied? into the mirror. The nuts holding the mirror + Soltek brackets barely have perch on the remaining threads. I want to thicken the plate for the ears, and add triangulated bracing too. This means the mirror studs need be lengthened so the nuts have threads to secure to. Keep it clean pervs, you know who you are..
My question is this, to all you handy fabricators/welders out there - is it possible to cut the existing two studs down, then weld a threaded extension on, above the securing nuts, without melting the plastic of the mirror the stud is epoxied/glued into? Will it be strong enough?
I did try to extract the existing studs, they won't budge without damage.
Maybe some pix would help.
Stock mirror studs. They need be lengthened to accommodate the Skyway brackets + additional thickness on the mounting 'ears' I plan to use. I want to thicken the plate for the ears, and add triangulated bracing too. This means the mirror studs need be lengthened.

The studs are typical of the ones you put everyday 10 MM nuts on..

Here's what I want to do - as not defined by the pix -
1. Cut the existing stud above the threads.
2. Weld a (shorter) extension on to the existing stud, above the area where the securing nut would locate.

Once again, pix of the sub frame this Saturday.
Last edited by a moderator:


![fjackets Real Lambskin Leather Biker Jacket — Quilted Cafe Racer Zip Up Moto Leather Jackets For Men | [1100085] Johnson Brown, XL](https://m.media-amazon.com/images/I/41I7Pm1f+vL._SL500_.jpg)


