Changed CCT but now won't start --HELP

Yamaha FJR Motorcycle Forum

Help Support Yamaha FJR Motorcycle Forum:

This site may earn a commission from merchant affiliate links, including eBay, Amazon, and others.
Before removing the existing CCT, wedge SOMETHING in that gap to maintain slipper tension on the chain. A hunk of wood, a chisel, stuff a rag in the gap. The point is, keep the tension on the chain.
Thats a good idea too. Just make sure whatever you put in there stays in place until your done.

 
For insurance purposes I can see tying up the chain. Now lets remember SkooterG's comments on all the people with CCT issues, and the chicken little syndrome, it wasn't like 50% of the forum, the percentage was small. In that same vain, doing the CCT without tying the chain is disastrous.
I wonder how the Yammer dealer does it? I bet they have no clue and just pull the CCT out and swap it.

I must admit, some here have had issue with the chain slipping when removing and replacing the CCT. I would have to think that is the out of the ordinary, but something that each person must decide what to do when they attempt this.

I for one will probably do the tying of the chain now, just for piece of mind if I replace a CCT again.
I remember Ionbeams long, frustrated saga of getting back on the road.

Finally, after two bum ebay engines, had the local dealer fix the old broken one.

It ran like crap when he got it back...the chain was one tooth off I believe

Folks reported on the forum the TWO timing marks on the cam gear I believe...another Yammy bike (R1?) used the same gear as parts and there is a mark for that bike and another mark for the Feej

Maybe some can comment on that stuff as I'm too lazy occupied to look it up... :rolleyes:

 
Before removing the existing CCT, wedge SOMETHING in that gap to maintain slipper tension on the chain. A hunk of wood, a chisel, stuff a rag in the gap. The point is, keep the tension on the chain.
Thats a good idea too. Just make sure whatever you put in there stays in place until your done.

AND YOU REMOVE IT WHEN YOU'RE FINISHED!!!

 
I remember Ionbeams long, frustrated saga of getting back on the road.Finally, after two bum ebay engines, had the local dealer fix the old broken one.

It ran like crap when he got it back...the chain was one tooth off I believe
Actually, it was the balancer shaft chain that was skewed on Ion's Phoenix.

[edit] I see that he is reading this. He may post the same...

 
While tie-wrapping the chain down around the crank sprocket is better than nothing, it really is removing the slack in the chain at the wrong place. The correct place to remove the chain slack is right where the CCT pushes against the chain slipper, so I believe the BEST way to keep the chain tight is to use the slipper to tension it.
Agreed Howie. Again, I use tie-wraps because I'm most likely to have the entire top end off, removing cams and making valve adjustments too. So the tie-wrap technique allows me to pull cams out/in without losing my timing. I pull them really tight!

:)

 
Having gone down this same sad, sickening road, I have a suggesting for those DIY'ers R&R'ing their CCTs.
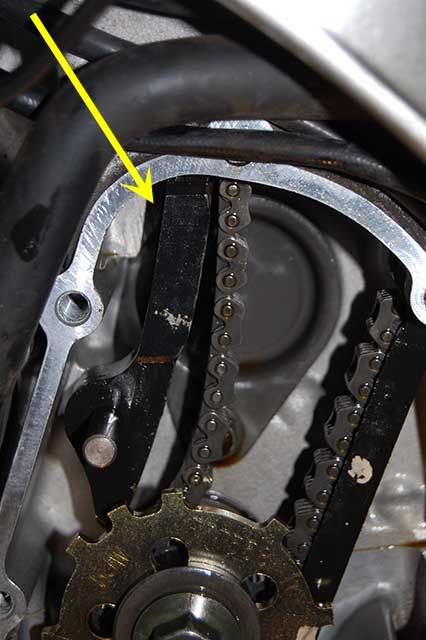
Observe the picture:

curse-1.jpg


The arrow indicates a gap between the engine block and the rear-most cam chain tensioner-slipper.

Before removing the existing CCT, wedge SOMETHING in that gap to maintain slipper tension on the chain. A hunk of wood, a chisel, stuff a rag in the gap. The point is, keep the tension on the chain.

While tie-wrapping the chain down around the crank sprocket is better than nothing, it really is removing the slack in the chain at the wrong place. The correct place to remove the chain slack is right where the CCT pushes against the chain slipper, so I believe the BEST way to keep the chain tight is to use the slipper to tension it.

Push the slipper against the chain, remove the CCT, replace the CCT, extend the new CCT's plunger, remove your wedge and you should be good-to-go.

I know this doesn't help the OP one stinkin' bit, but perhaps someone else can benefit.
Thank you for your suggestions. I've just printed all the information everyone has contributed and will be going over it tonight. If I can, I'll start removing the necessary parts tonight. I'll also be documenting the process and hopefully be able to post my steps with my final step being..."Hooray it starts right up and sounds normal!"

Duke

 
Is there not a simple cam / camchain / TDC process on the FJR? I haven't read my FSM for this yet but on my Suzuki, this problem could be mitigated very easily. Crank is positioned at TDC, 2 cam sprockets have marks at 9 and 3 o'clock that line up with the horizontal surface of the head. Count 21 rivets of the chain as they correspond to tick marks on the cam sprockets, when they're indexed, you're done. Button it up and go ride.

Maybe I'm missing something but did Yamaha just completely miss the boat and overcomplicated a simple task?

 
Last edited by a moderator:
Am I missing soemthing here? I'm not trying to make more of this than it is, and I'm almost as dumb as wood (Bust is in fact dumberer than wood) but... I believe Duke may have been turning the CCT screw and plunger the wrong way and getting bad feed back from what he thought was out when it may have been in.

5. Installed new CCT but notice resistance in trying to place the CCT into its' position. Talked to Yama. tech- he mentioned as long as you can thread the bolt it's normal.....

7. Released the plunger and confirmed it by turning it CW- BUT noticed that I didn't feel the plunger release; almost like it was pressed up against something.

8. Called same Yama tech. - said it should be okay, try starting it.
#5 that is bad advice, there should be no resistance when installing the CCT bolts, as long as the CCT plunger is retracted and locked in that position.
#7 Turning the plunger CW retracts it back into he CCT and will eventually lock in the retracted position. If it didn't release after being retracted, it should have been turned CCW. If it was left retracted Duke had zero tension on the cam chain when he tried to start it. If it didn't slip a tooth then, it sure did afterward. With the CCT fully extended during installation, you will get resistance, huge. The plunger is not spring loaded, once out, it's out and stays out.

Duke my apologies if I'm misunderstanding what you did; however, it seems you retracted when you should have extended and vice versa. Am I wrong?

#8 More bad advice.

I can understand from those that have been doing the alignment first and the chain slacks. With the moon and planets aligned there should be no or little tension. Just randomly shutting down the motor the odds are not likely to fallen in the slacked mode.

Duke also doesn't mention re-hooking up any connectors, did you disconnect something and not re-hook it up (hence no starting)? Just askin'

Either way it seems like you need to re-time that bad boy.

BTW - For all the other comments on alignment etc, I just killed the motor the night before and tore into it, no issues (thank God) Just doing the CCT change.
Sorry guys, I meant to say CCW for the release and CW for the retraction. I did have to disconnect the O2 sensor connector (I think it's for the O2, regardless it's the connector right by the throttle sensor). I disconnected it so I was able to have more room to drop the CCT out from the bottom. Afterwards I did make sure to reconnect everything.

 
This is an update from my original post regarding my 2003 FJR not starting after I had changed the CCT.

Well, I removed the valve cover and noticed that the intake cam was off by one tooth and the lower cam shaft was off by 720 degrees so, after standing around and trying to figure out how to solve this problem w/o making things worst; decided to take a chance and do the following:

1. zip tie the exhaust cam to the chain

2. remove the CCT to gain slack for the chain

3. lift the chain off the intake cam and rotate it forward one tooth and set it to the correct timing position

4. zip tie the intake cam

5. pushed back the chain from lower cam shaft

6. rotate the lower cam shaft to correct timing position

7. pull the chain forward onto the lower cam shaft sprocket

8. zip tie the chain to the lower cam shaft

9. re-installed the CCT

10. poured a little Yama. gear oil on all the rockers and cam chain

11. checked valve cover gasket (looks good) and reinstalled valve cover

12. replaced O rings and reinstalled coolant pipe and pair tubes

Since I had everything apart, I decided to check my intake and exhaust valve clearance and was very delighted to find out that everything (intake & exhaust valves) were within tolerance via specs. from the manual.

As of now, I have yet to start the motorcycle as I am waiting for the new CCT (because I purchased a new CCT in 2004, I noticed that it was not the redesigned one based off of the part #). I figure why take anymore chances. The CCT should arrive this Thursday or Friday, and you can bet I will most definitely take all necessary steps to ensure the cam chain stays in place before removing the CCT and installing the redesigned CCT.

I'll keep everyone updated on the final outcome of this ordeal.

I would like to pass on my most sincere thank you for all of you and your generous and insightful suggestions/tips/ and guidance! I am a lifelong learner and live by my philosophy of "Learning is not enough, you must apply your knowledge." I am confident I would not have learned everything I now know w/o this forum and knowledgeable members.

Thank you,

Duke

 
An aside: I had never owned a CB500 back in the day, and I had always wanted one. I worked in a Honda dealership when they were introduced. What a great bike for its era.

Many years ago I saw one on ebay and I was daydreaming, and attracted to the picture. The owner advertised it as "perfect engine, pulls very strong" and it was relatively low mileage. It was about 400 miles away. I punched the buy it now button, had the necessary communications with the seller, and left the next morning to pick it up, with the intention of paying cash .... $900.

I got over there, and the bike was in the guy's living room. He rolled it out and down the stairs on the front porch, and cranked it up. It sounded absolutely horrible, and would not idle. Lots of pops and bangs accompanied the garbage disposal level noises inside the engine. He would crank the throttle around, and it would fuss and fume, cough, and protest.

I told him "You've rebuilt this, haven't you." He said "Yes. The first time I screwed up the cam timing, and bent valves when I tried to start it. I bought new valves and I think its right this time."

I told him that it was not yet right....

Not wanting to have to deal with what was obviously a roach at this point, and recognizing technically that I'd "bought it now," I pointed out the incorrect description in the ebay ad, and he agreed. To be fair, and to reinforce the lesson on myself, I gave him $100 to cover his ebay fees, with the agreement that neither of us would record feedback.

I guess my point is that this sort of level of owner maintenance scares the bejezus out of me whenever I think about buying a used bike. I remember railing against Pirsig's "Zen and the Art of Motorcycle Maintenance" back when it came out.... it seemed so shallow and phony. You don't have to do your own deep maintenance to bond with your motorcycle, and the truth is, a lot of folks probably should NOT do their own deep maintenance ... its potentially very aggravating and expensive.

Having had many experiences as a mechanic and as a service manager in the Honda dealership back in the day, I'd seen these things come in and it was always trouble.

We had a sign in the shop that went something like this:

Labor Rates

$9/hr

If you watch $12/hr

If you help $24/hr

If you tried to do the job yourself and now want us to fix what you did $36/hr.

The numbers are probably off a bit, except for the first one. Shop labor rates when I worked in the shop were below $10/hr, and it seemed like a lot of money since minimum wage was about a buck and a quarter.

 
Last edited by a moderator:
"the lower cam shaft was off by 720 degrees"

If something is rotated 720 degrees isn't that exactly 2 full rotations thus putting it back to its initial starting point?

 
"the lower cam shaft was off by 720 degrees"
If something is rotated 720 degrees isn't that exactly 2 full rotations thus putting it back to its initial starting point?
I think he put that one just to see if you were paying attention :rolleyes:

 
...plus I'm not quite sure where the "lower" camshaft is.

Last time I looked there were two camshafts (intake and exhaust) and both were up high in the engine, under the valve cover.

So, by "lower" do you mean the forward (exhaust) cam? Or are you saying the sprocket on the crankshaft?

And if any of these sprockets was off by more than a tooth, I don't see how your valves aren't crunched.

 
I thought he meant crank shaft too (lower cam).

He never started, just tried to with the starter. It doesn't sound like he hit anything and damaged it. I would think if the valves hit and damaged the valves the starter would have stopped. I'm not sure the starter has enough Mpffff to get thru a good hit. Is it possible (if the vlaves hit) for the valve to just hit (kiss, etc) the piston enough to divit it but not damage the valve etc?

IMO I don't think I would try to tie wrap anything at this point and get it back the way mentioned, I'd just start from scratch and make sure it's all correct. Check double and double check again. If you have a pal that is mechanically inclined, invite them over and have them double check it for you. I know sometimes my logic after many hours of this type of complex task will not be sound sometimes and I don't see it.

Good luck!

 
Last edited by a moderator:
However, it's opened back up because the other thread was closed. Let this mish-mash fester if needed. No reason to make a well-reasoned thread elsewhere get mished...or mashed. ;)

 
OK, so it makes sense to zip tie the chain to the guides or across the center and to zip tie it to the crankshaft sprocket to keep the tension on it when changing a CCT.

It also makes sense to zip tie the chain to the crankshaft sprocket when doing a valve adjustment.

What I'm wondering about is how do you keep the timing from getting screwed up when you change the chain? I remember reading or hearing advice which made sense, that if you're in deep enough to do a CCT or valve adjustment (and already have the timing cover and valve cover off) why not also replace a $17 chain, especially on a high mileage bike? The question is how do you do this safely?

 
That advice (to go ahead and just replace the timing chain) makes sense on what level? :unsure:

Let's put it this way:

When was the last time you heard of a timing chain breaking on a motorcycle? :rolleyes:

They are constantly bathed in oil in a controlled environment with very little in the way of load on them, and therefore not subject to wear like an external drive chain. Unless you're also fitting new cam sprockets and a new crank sprocket (new crankshaft) I'd just leave the chain alone.

If you do need to remove the chain for any reason, you would have to completely retime the engine, which just means making sure the 3 marks are (really) all in the right places. You'd have to have the timing cover and the valve cover off anyway, so no big deal except that it is hard to see the exhaust cam's mark with the engine in the frame. But it can be done with (smoke and) mirrors.

 
Last edited by a moderator:
Top