CraigRegs
Well-known member
Both low beams blew out within a couple of days of each other, so I searched the forum looking for instruction on replacing headlamps. Found a good explanation from SouthernCruizer's post in this thread, and decided to supplement those instructions with purty pitchers for those of us visual learners.
I'd recommend starting on the left lamp because it is far more accessible than the right. Once you get the left changed, you'll know what to look (and feel) for on the right side.
First remove the A, B, C & D panels. Here's the view looking at the left side.
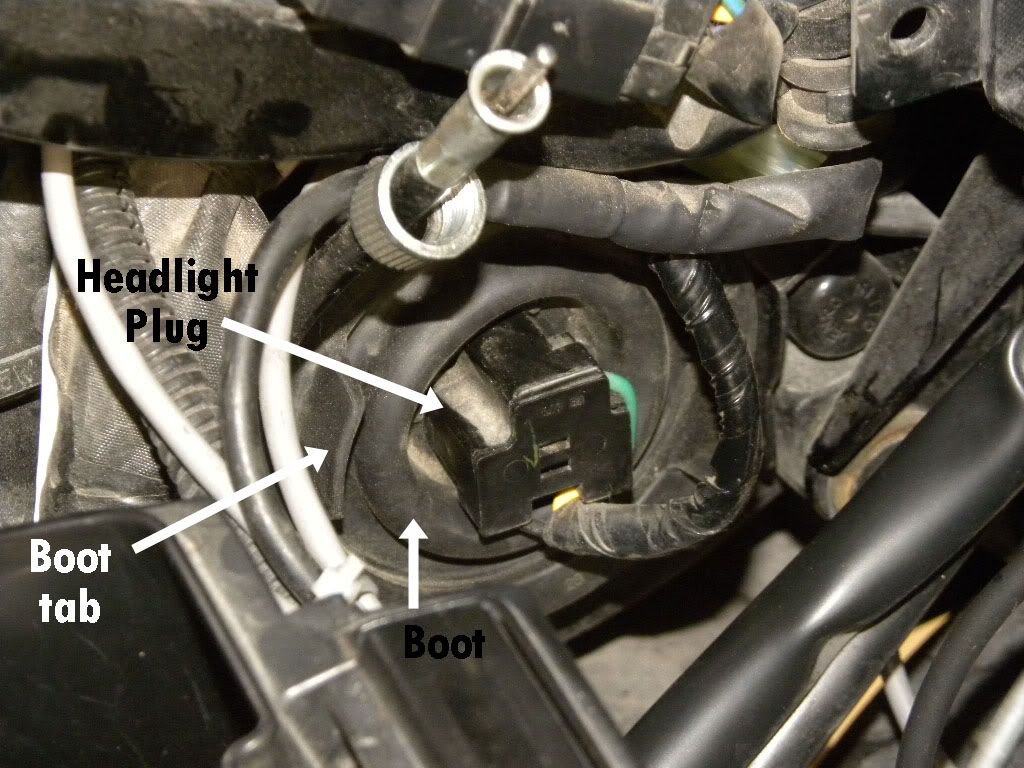
First pull straight back on the headlight plug to remove it from the bulb. Heres' what you'll see:
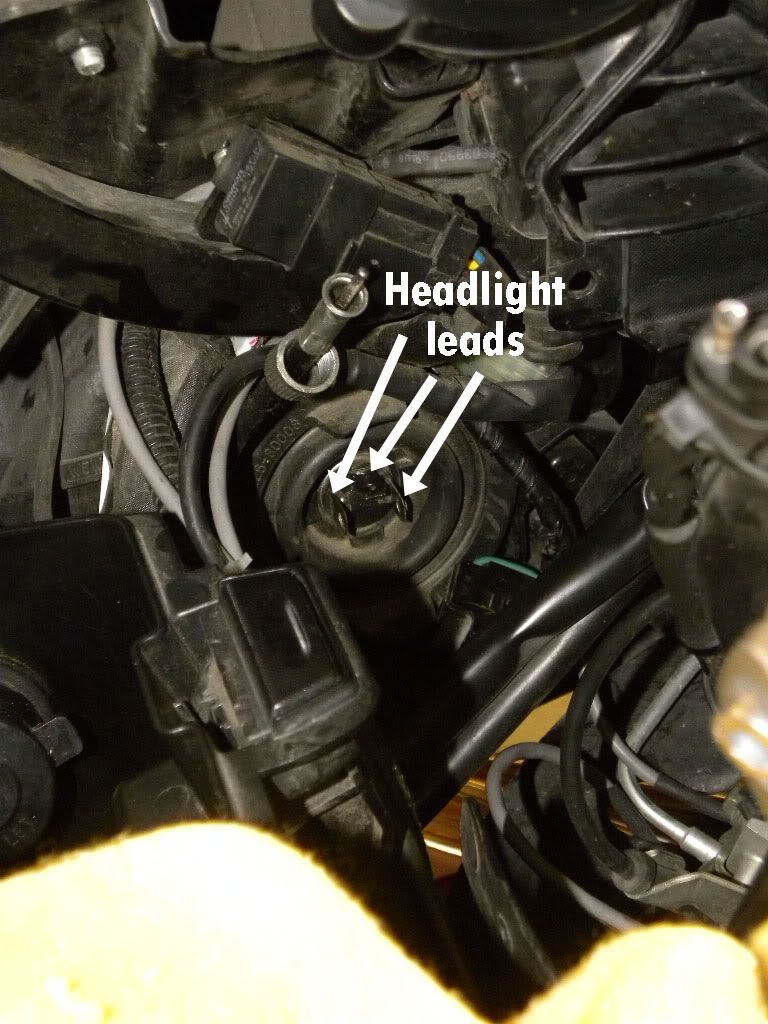
In the first photo you'll see the boot tab labeled. There are two of them on opposite sides; they may be anywhere around the perimeter of the boot. Pull on a tab to work the boot loose from the housing. It's a firm fit, it takes some tugging to work it free. With the boot removed, you'll see the spring clip that holds the bulb in place:
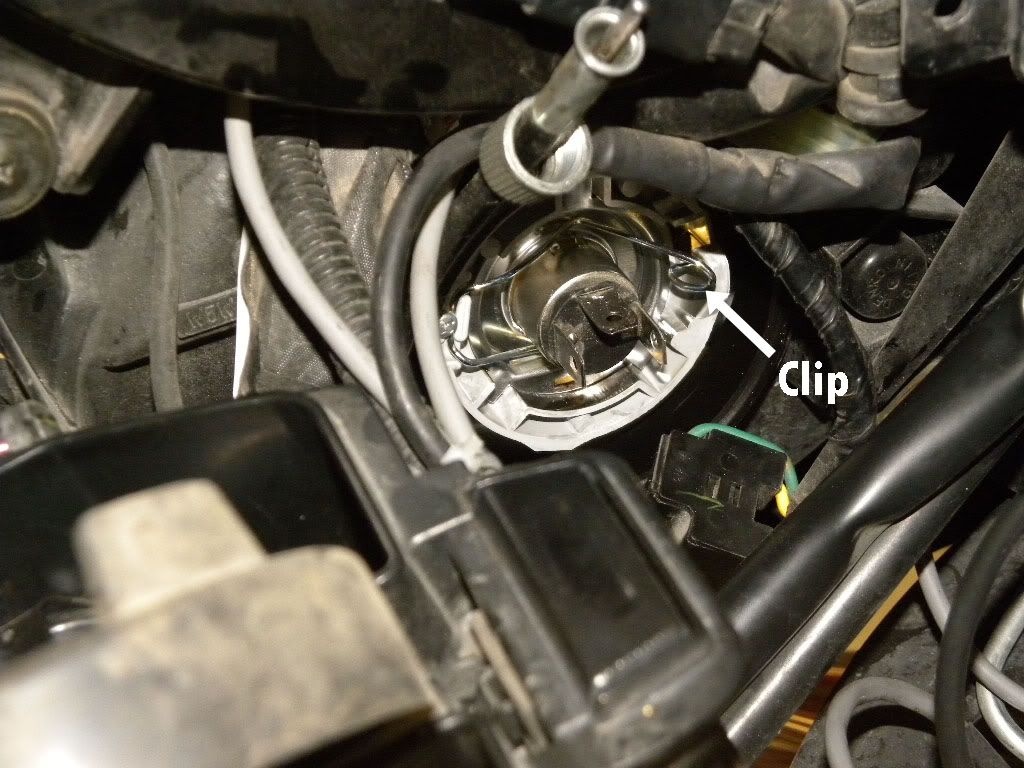
Push the loop on the end of the clip toward the front of the bike, and then up to release it. In this photo, you can see the metal hook that holds the clip; it's like a "J" lying on its back:
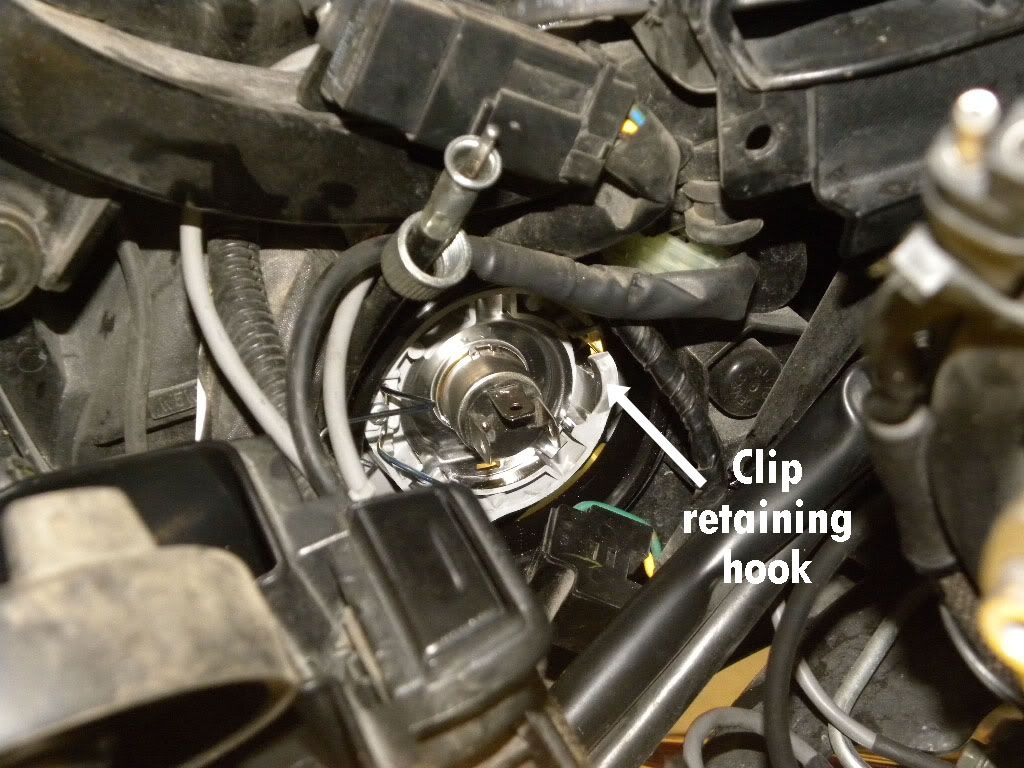
With the clip disengaged, the bulb will practically fall out. Replace it with the new bulb, orienting the bulb tabs with one at the top and one on each side. Then replace the spring clip, work the boot back around the housing and replace the plug.
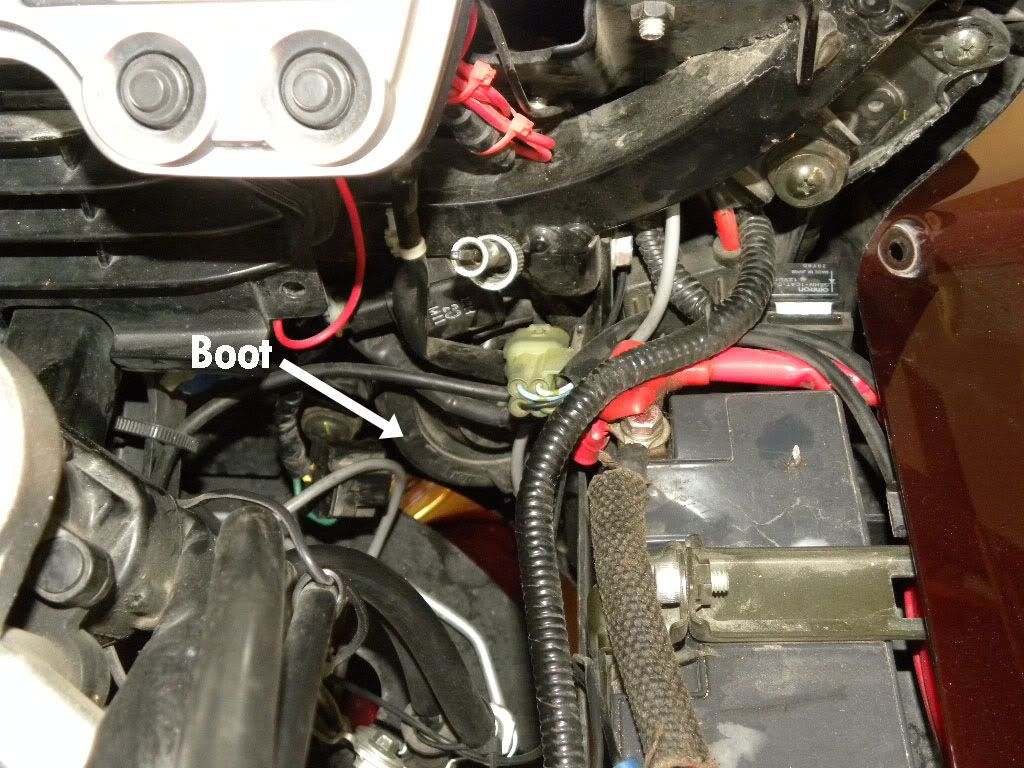
Now for the right side. This one's tucked behind the battery and lots of other stuff, so you'll be working by feel a lot. Here you can see the lower left portion of the boot. The headlight plug is hidden behind all of the wiring et. al.
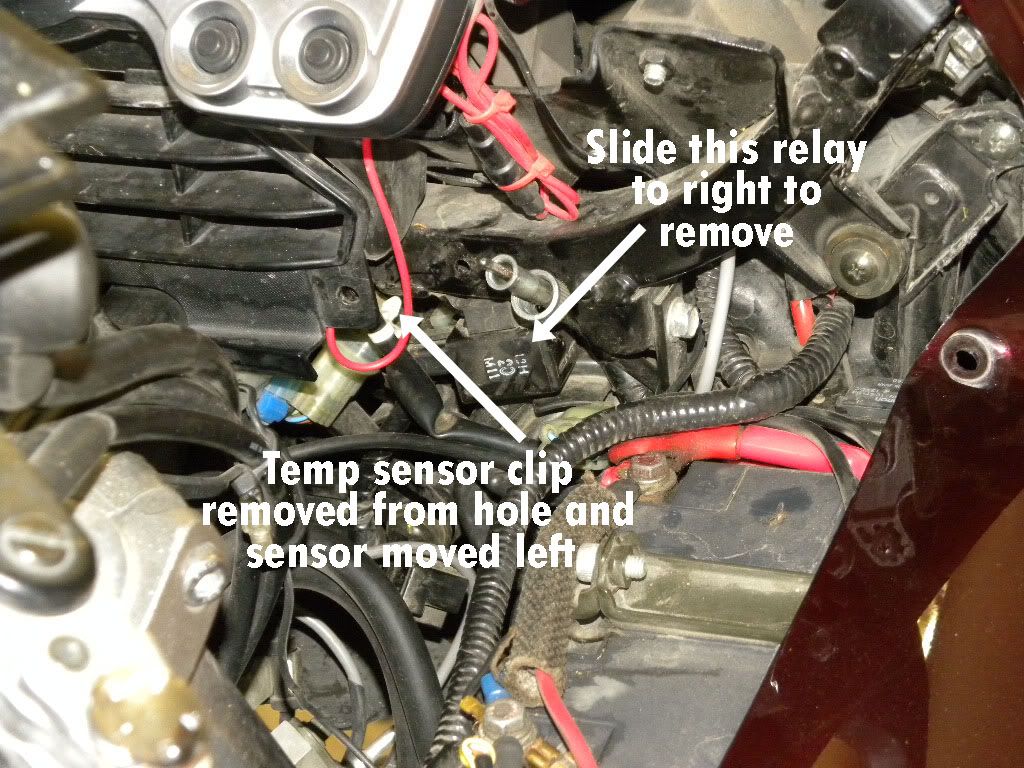
I gave myself a little bit of room by removing the temp sensor from its mount and pushing it to the left, and by sliding the indicated relay off its metal mounting tab.
After working blindly by feel, I got the headlight plug off and the boot removed:
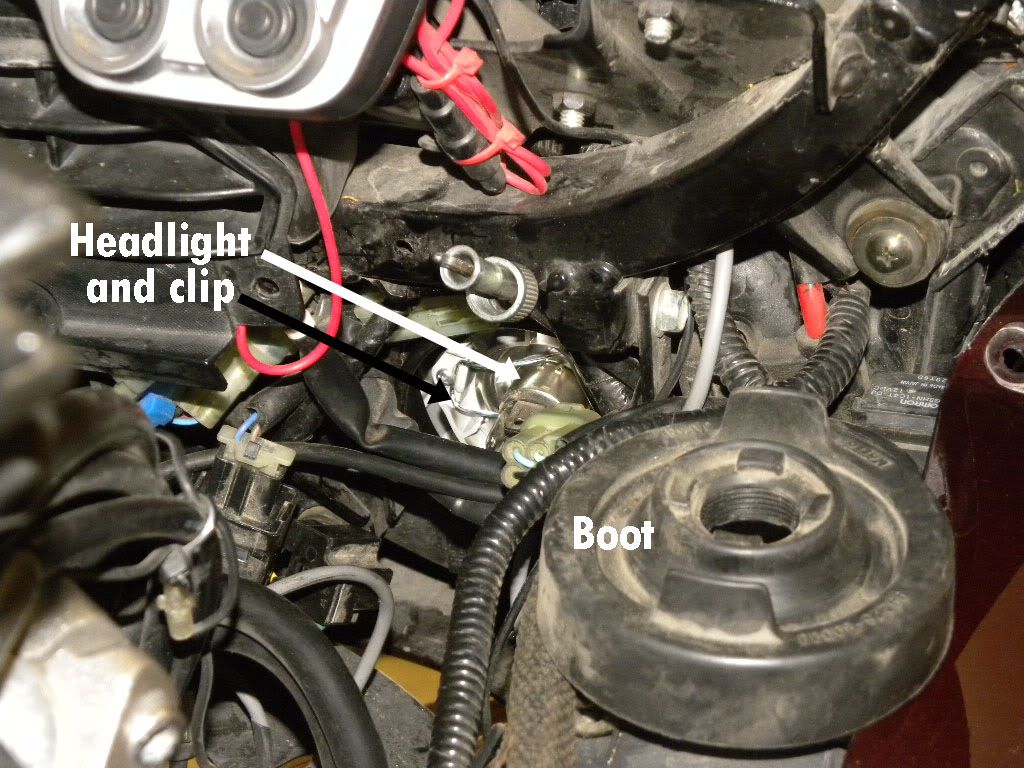
The headlight clip works just like the other; it hooks on the right side. Replace the bulb, get the retainer clip re-hooked and the boot back in place, and return the sensor and relay to their locations.
I'd recommend starting on the left lamp because it is far more accessible than the right. Once you get the left changed, you'll know what to look (and feel) for on the right side.
First remove the A, B, C & D panels. Here's the view looking at the left side.

First pull straight back on the headlight plug to remove it from the bulb. Heres' what you'll see:

In the first photo you'll see the boot tab labeled. There are two of them on opposite sides; they may be anywhere around the perimeter of the boot. Pull on a tab to work the boot loose from the housing. It's a firm fit, it takes some tugging to work it free. With the boot removed, you'll see the spring clip that holds the bulb in place:

Push the loop on the end of the clip toward the front of the bike, and then up to release it. In this photo, you can see the metal hook that holds the clip; it's like a "J" lying on its back:

With the clip disengaged, the bulb will practically fall out. Replace it with the new bulb, orienting the bulb tabs with one at the top and one on each side. Then replace the spring clip, work the boot back around the housing and replace the plug.
Now for the right side. This one's tucked behind the battery and lots of other stuff, so you'll be working by feel a lot. Here you can see the lower left portion of the boot. The headlight plug is hidden behind all of the wiring et. al.

I gave myself a little bit of room by removing the temp sensor from its mount and pushing it to the left, and by sliding the indicated relay off its metal mounting tab.

After working blindly by feel, I got the headlight plug off and the boot removed:

The headlight clip works just like the other; it hooks on the right side. Replace the bulb, get the retainer clip re-hooked and the boot back in place, and return the sensor and relay to their locations.


