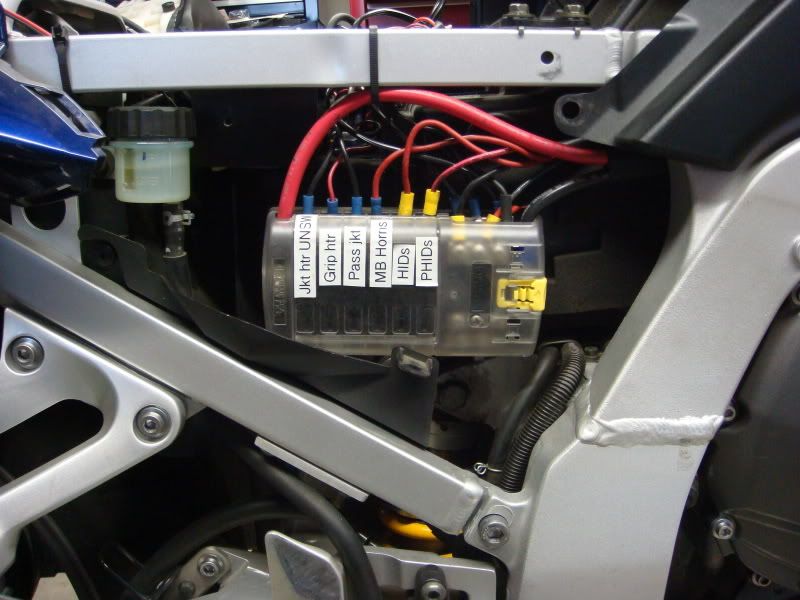
Some have asked me to post more details about parts and install locations or tips. Here goes.
First, I am NOT an expert, rather a medium NOOBIE. I've soldered and crimped before, but that's about it. This is easily a DIY job with the right parts, people, and patience.
If you are installing a new Starcomm, you should get all the audio wires you need from Jeff, as well as the PPT switch if you want one.
If you are installing the Garmin 2730, make sure you have the motorcycle install/wiring kit; you can buy on ebay. It does NOT come with the 2730, you have to order it. It includes the necessary wiring as well as the actual mount.
If you are installing power to an IPOD, cell phone, or FRS, you have some options. You can get a cheap car charger and just cut the wires and solder/positap them to the wires running from the fuseblock. Or, you can install a powerlet adaptor. I went with the former option.
Whether you install a centech, blue sea, or a Fuzeblock, You will need at least one wiring loom with two wires to bring power to the block from the battery. You can try to have the group get the right loom/ gauge in bulk, I ordered
a loom and install kit from Eastern Beaver which custom makes them for the AP2 and includes a relay. You will want Eastern Beaver to add another 14-18 inches on the relay wire (beyond the extra length they add as an option) to be able to tap into the rear running lights. If you are mounting the fuseblock in the tray under the rider seat, you will need about 60-68 inches from the battery to the fuseblock; consider adding another 8 inches if you want to play with more options on running the wire. If you are mounting under the rear passenger seat, I would get at least 80 inches to be safe.
The second loom you will need depends on where you want to bring power to your gadgets. I ran a three pair wire loom from the fuseblock up to the fairing to power the gadgets on my n/line shelf. I think it was 60" or so, it doesn't hurt to get 80" to be safe so you have extra length to run to a ram mount, or even longer if you want to run wires into a tank bag to house your gadgets.
For those installing the Fuzeblock brand, you just need a 2wire loom, in the same lengths as above. The Fuzeblock has the relay build in, so you only need about 6-14" of hookup wire to tap into the running lights. (TW for noobs, the tap is necessary to trigger the switched relay so that it only powers your switched outlets when the bike is turned on).
Auburn FJR can comment on the guage: I think it was 12 gauge at least. The wire in the looms from the fuseblock to my n/line shelf were 14ga.
I copied Auburn and installed the Starcomm vertically, see pix below, and mounted the Starcomm front headset jack next to the glove box. All the wires from the fuseblock to the accessories on my n/line shelf, as well as the audio wires from the starcomm to my accessories, I wrapped in silicon tape (for heat protection) and ran along the left side of the frame. You can't see any visible wires, and I used a ton of zip ties as well as nylon braiding sleeves to make the job look stock. I also used shrinkwrap to finish off the ends of the wires.
All the braiding and heat shrink tubing was bought from Vetco Electronics in Bellevue in bulk; they also sell wire looms. Silicone tape was bought at Shucks. One positap is needed to tap into the running light wire, and I used six positaps to connect the power/ground wires running from my radar and GPS and IPOD to the wire loom running to the fuseblock.
Centech AP2 mounted in tray under rider's seat:
Detail. Note the wire loom on the left running up to my accessories on the n/line shelf
Starcomm Advanced, mounted vertically using wide velcro strips to hold:
Detail. I like this location for the Starcomm, makes it easy to run all the audio wires and access the volume pots:
I mounted the Backup XP brake light module under the rear seat, note the ground wire on the right to the frame.
Here is the loom with three sets of wires running to my n/line shelf. The loom is covered in a nylon braid, cause I felt like it. There is space between the speedo/tach and the front fairing to route the wires without having to cut into the fairing.
Here is where I mounted the Starcomm helmet outlet. I didn't want to see wires hanging out of my seat. Also a good location for a powerlet adaptor. Used a dremel to cut the plastic, and a grinder bit to shape the hole. Very easy.
I had an extra holder left over from the Starcomm which I used to hold the lead from the fuseblock to my heated vest outlet. It looks cleaner than having the wire hanging out of my seat.


