Lessons Learned on changing the CCT

Yamaha FJR Motorcycle Forum

Help Support Yamaha FJR Motorcycle Forum:

This site may earn a commission from merchant affiliate links, including eBay, Amazon, and others.
I just finished changing the CCT on my bike and the engine does sound quieter even if I never thought it noisy except for one brief incidence.

I didn't do the slotted bolt trick, but I think that's a good idea for those who prefer it. No two cats are skinned alike.

I considered enlarging the frame hole a bit, but didn't do that either. I bought a kit of Craftsman metric ignition wrenches for ~$22. I also cut a 1/4" drive 8mm socket shorter and it fit better. That way I could use a flexible drive and extension to run the pair of bolts in; final tightening with the ignition wrench and regular 8mm.

Another good tip previously mentioned is using plastic electrical tape to hold bolts to tools or in some cases slightly alter tools temporarily for certain jobs.

That's about it from me except to say thanks to everyone posting here.

 
Just a FYI for the collective.
I have a 2008 and it does NOT have the "updated" Blue Dot CCT.......no blue anywhere.
The OEM one may not, my '07 had the revised one and your '08 will have too. IIRC, the revision took place sometime in '07. I have bought three or four for changes on other bikes, one did not have the blue dot but was the revised one (part no. 5JW-12210-10-00 now 1MC-12210-00-00).
Ah...well that's good to know!

I was just going to change mine out at about 30,000 miles just to be safe...Thanks for the info.

 
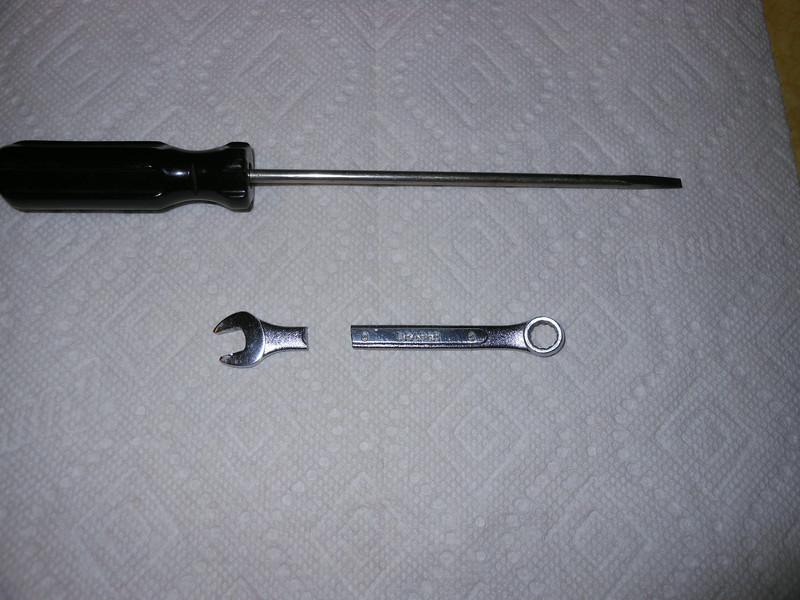
Well that came out easily, once I had cut a small wrench to a length that would clear the clutch cover, and ground my longest, thinnest scredriver down to a size that would back-off the tension.

Parts arriving tomorrow, let's hope it goes back together without fuss :D

 
Twigg

Take the right side crank shaft cover off as well as the valve cover. Make sure the marks line up correctly - Visually - when you install the new tensioner.

This can cause major damage if you skip several teeth. Make the extra effort to get it right. It's not rocket science, just pay attention to detail, as I'm sure you are.

Good luck.

Brodie

smile.png


Thanks Brodie.

I removed the cover and zip-tied the chain guides before I moved the CCT.

Here are the "special" tools I had to make:

The screwdriver had to be ground to fit the CCT back-off screw, and that wrench will never be the same again

DSCN0095-L.jpg


Hey, that wrench looks quite a bit like mine.

I used two wrenches, the cut one and another uncut box wrench. The cut one I heated and straightened the box relative to the handle, that way I could flip it and get a different position for really tight spaces. Also, between the 2 two wrenches, the 12 point broach are slightly out of phase from each other. Anything to get the needed wrench swing.

I figure hand tools are cheap compared to my time. If I have to heat the tip of a flat blade screw driver to redirect it, or cut a wrench, I'm all on it. I just make sure to replace it the next time I go to the store. Some of my handiest tools are the ones that I modified to make it work. I even have a stainless bicycle spoke that I cut and reshaped the end for extracting the pins in the Sumitomo connectors on the bike. I just used it again today.

Brodie

smile.png


Last edited by a moderator:
I felt like a vandal, cutting that wrench, but I decided that I wasn't damaging a tool, I was making one :)

It's good to be among engineers ... or at least guys with a few practical skills.

 
I'm not an engineer, just a Machinist. Though I've heard the difference between them is that a Machinist has to wash his hands before going to the bathroom.

I do count it an honor to learn from the really smart people on this FJRForum. I try hard to give back to the community but I'm still at a deficit.

Brodie

rolleyes.gif


I try hard to give back to the community but I'm still at a deficit.

Brodie

rolleyes.gif
From my reading so far, I doubt this :) There seems to be everyone here ... from the guys who could rebuild an FJR engine with a nutcracker and a torque wrench ... in the dark, to those who have the dealer change their oil!

For my own part, many years ago I learned how to machine parts to tolerances of +or- 2/10 000 ths of an inch, which we referred to as a "gnat's cock" ... The real experts could get to half a gnat's.

 
+/-.0002, yup that's close. You learn to factor in ambient temprature in your measurement.

Try turning and holding +/- .001 on a 40 inch segmented turbine shroud with a 45 year old tubular micrometer and ww2 vintage standards (calibrated of course), in the winter time, on graveyard shift - no problem.

Brodie

;-)

 
Last edited by a moderator:
+/-.0002, yup that's close. You learn to factor in ambient temprature in your measurement.
Try turning and holding +/- .001 on a 40 inch segmented turbine shroud with a 45 year old tubular micrometer and ww2 vintage standards (calibrated of course), in the winter time, on graveyard shift - no problem.

Brodie

;-)
I couldn't do it any more. It's at least 30 years since I have used a lathe, milling machine or surface grinder.

My Dad could ... He worked in a toolroom that built and repaired injection moulding tools. They had to "fit" to those tolerances and if he had to lap the material down, that's what he did. I can see him now at his bench with a small hardwood stick and some diamond paste.

Production tolerances were wider ... usually +or- 0.002", but the tooling was so tightly made that the halves made a sucking sound, and a "pop" when you separated them.

 
Back to the CCT bolts...

I have 4 different 8mm combination wrenches, two of the type with the fine ratcheting box end, one regular combination with 6 point box, and one with a 12 point box end, and between them all I can generally (changed a few of them now) find one that will break the factory tightened bolts loose.

Once loosened, I have a pack of tiny ignition wrenches (you know the ones that Sears throws into a tool set to up the "piece" count?) and found that one of the inch size box ends (forget which one exactly) is a "close enough" fit on the 8mm bolt heads to allow you to back out those bolts using that. I'd guess that a lot of you have that same packet of ignition wrenches buried in your tool boxes, so dig 'em out and give 'em a try. They may work for you (as they do for me)

 
Last edited by a moderator:
Back to the CCT bolts...
I have 4 different 8mm combination wrenches, two of the type with the fine ratcheting box end, one regular combination with 6 point box, and one with a 12 point box end, and between them all I can generally (changed a few of them now) find one that will break the factory tightened bolts loose.

Once loosened, I have a pack of tiny ignition wrenches (you know the ones that Sears throws into a tool set to up the "piece" count?) and found that one of the inch size box ends (forget which one exactly) is a "close enough" fit on the 8mm bolt heads to allow you to back out those bolts using that. I'd guess that a lot of you have that same packet of ignition wrenches buried in your tool boxes, so dig 'em out and give 'em a try. They may work for you (as they do for me)
Me too on the gnition wrenches.

 
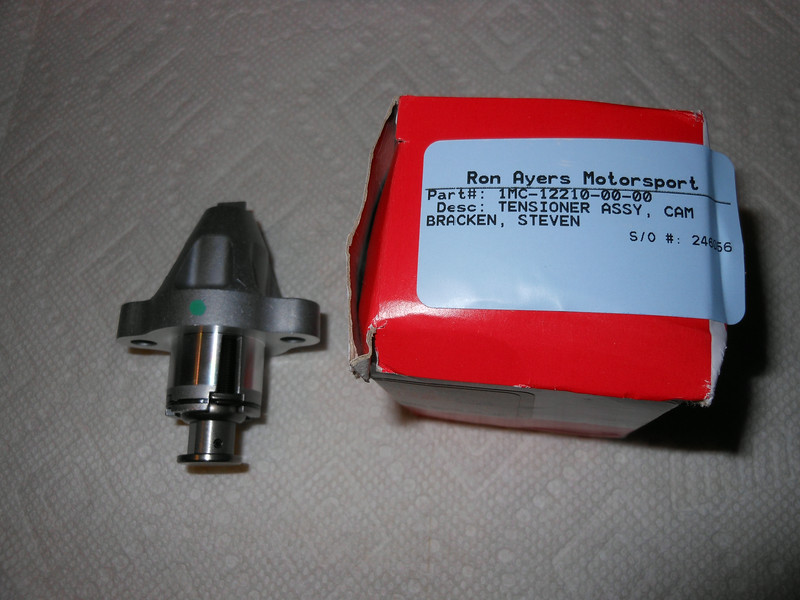
Cam Chain Tensioner has arrived, and I thought it worth mentioning because ...

I ordered the upgraded part from the first post here. That would be the "Blue Spot" part, from Ron Ayres.

What arrived can be seen in the picture:

DSCN0097-L.jpg


It appears that whatever you order, Ron Ayres is actually shipping the latest incarnation.

Now all I have to do is fit it and, btw, it will not stay retracted without the plastic locking tab ... just for information.

 
All buttoned up. Fiddly job more than difficult.

Cam chain is restored to silence.

 
A suggestion for removing/installing the lower bolt. I haven't tried it but I believe it could work and offer some efficiency.

Once you break the bolt loose with a wrench slide/force a short bit of 5/16" ID vinyl or rubber tubing onto the bolt head and rotate the bolt out with the flexible tubing. I believe there's enough room to get the tubing into position and onto the bolt. The OD of the tubing would be too big to go through the hole in the frame (screwdriver portal) but I believe it could be brought in from below or possibly from inside routed below the CCT.

 
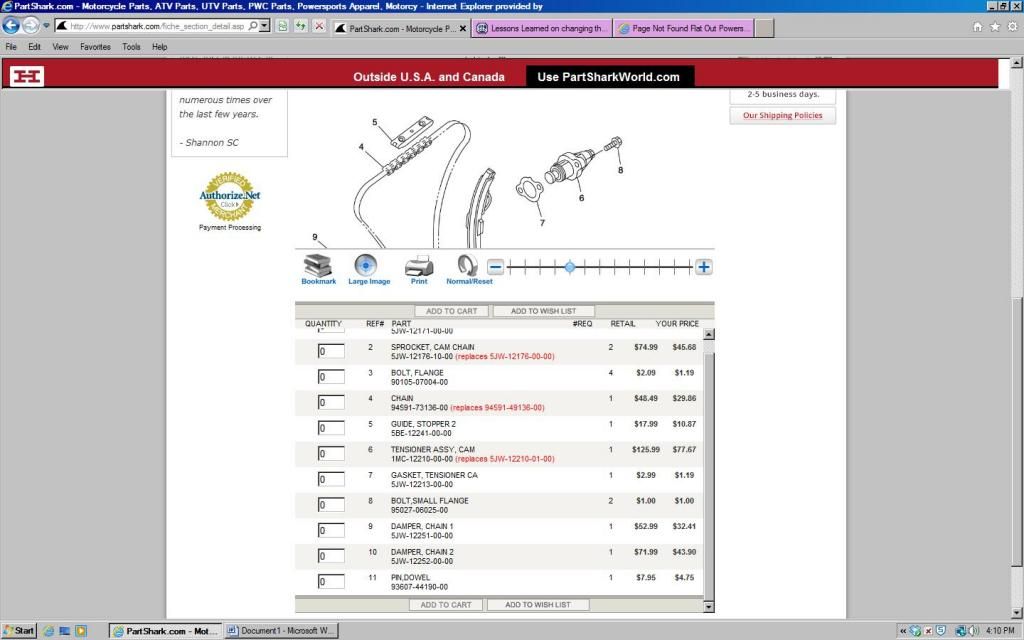
I have a question - The parts link that Yamafitter offers in the OP is no longer valid. Here's a screen shot from Parkshark.com from today (July 13, 2014). Is #6 and #7 what I need? The part numbers offered by Yamafitter do not match these. The replacement CCT from Yamaha is the way to go? Or do I need an aftermarket CCT? Thanks.

CCTpicture_zpsbda13caa.jpg


Last edited by a moderator:

Latest posts

Top