• If you have bought, sold or gained information from our Classifieds, please donate to FJRForum and give back.

    You can become a Supporting Member or just click here to donate.

Skyway's Hydration System Group Buy Dec11-24 - Act Now!!

Yamaha FJR Motorcycle Forum

Help Support Yamaha FJR Motorcycle Forum:

This site may earn a commission from merchant affiliate links, including eBay, Amazon, and others.
Status
Not open for further replies.
My hydration kit came last week and the workmanship is wonderful, Ian. I finally found the time to put the pieces together. Maybe I'm just a wuss (i.e. don't suck :D ), but has anyone felt the need to drill a vent hole in the lid of the water jug?

Cheers...

p.s.: Nice seeing you again at last Saturday's ride, Ian. Your prototype HID lights looked pretty cool! Probably need to wear shades while night riding. :dirol:

 
Maybe I'm just a wuss (i.e. don't suck :D ), but has anyone felt the need to drill a vent hole in the lid of
I haven't picked up the instructions I sent out to verify if I included this, but yes a small vent hole is absolutely necessary, unless you have the skills to suck a football through a garden hose? And i'm staying well away from mentioning who I think is capable of such a task.

Without a vent hole the tube practically seals the jug, making it darn impossible to get a drink.

I drilled a 1/8 hole in the lid, opposite to the drink tube.

 
Last edited by a moderator:
Just a heads up that I have now packaged and will ship tomorrow the last of the Hyd. kits. This includes the late comers after the GB had closed.

 
Mounted Skyway's hydration system on the bike and trekked down to LA (Huntington Beach) from the SF Bay area last Thursday with rain following me all the way down. A couple of observations to pass along:

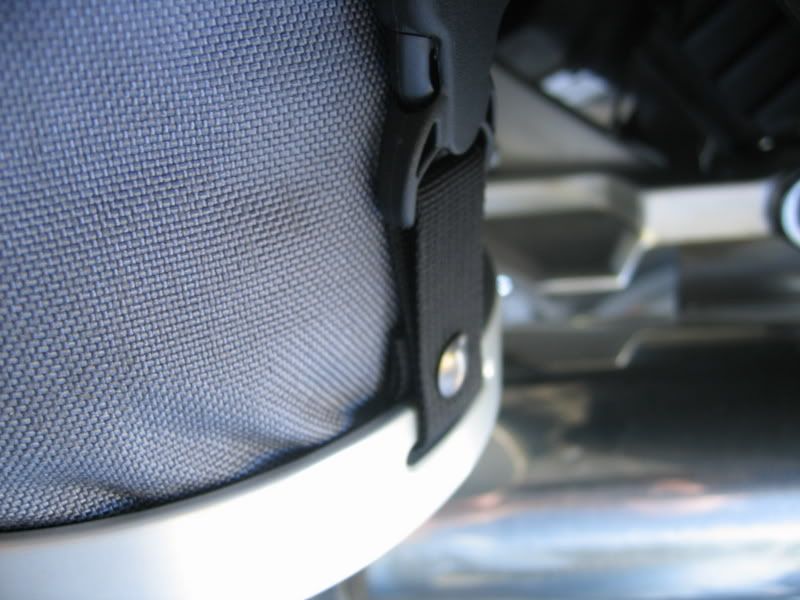
The straps that hold the quick releases to the base definitely need to be secure, and I had sewn one end of the strap around the center of the buckle. At a gas stop I found myself thinking, "Gee the jug wiggles a bit, better cinch it down a tad." Gave the upper strap a little tug and (surprise) the lower strap came undone! I've seen this mentality before: if tight is good, tighter must be better.
:) So no need to overdo it, and maybe a bit of superglue on the lower strap wouldn't hurt.
Good call on the bite valve, Ian! The scorpion helmet I bought has very little space between my jaw and the lower part of the helmet, but this bite valve could squeeze by and worked just fine. A straight bite valve would never have worked in my current setup.
I have the magnet for the bite valve attached to the side of my tank bag. And while it worked pretty well, I'd managed to inadvertently knock it off a few times. Fortunately, the tube only
almost
reached the ground. I'll have to think up a better way to secure it.
Thanks again, for a great idea well implemented. Now if only I could find some Fizzies to add to the jug like I remember as a kid. :D

Cheers...

 
Last edited by a moderator:
Ian showed us how to secure the straps at a FJR ride,35 FJRs. Someone had one and tugged on the straps and they came off. I got a longer strap material and did a weave that won't come undone from pressure. Just make sure they are secure otherwise you might lose one going down the road. I have been thinking of a safety strap from the rear strap handle to the frame or? Just in case.

 
I'm still getting messages from members who are asking for this. You can order a single unit if you want, just follow the link below. The GB is over, but the farkle can still be ordered.

Clicky here Skyway's FJR Hydration System

 
Thanks Ian,

I just got home from the 2 week vacation (in the hospital) and got to play with it tonight, And this thing is soo cool! I had a friend thread that neoprene sheath over the hose! :blink: Her hands and sense of humor are quite tired!

Adam

 
Last edited by a moderator:
Gave the upper strap a little tug and (surprise) the lower strap came undone! ...
I removed the slider buckle, and bolted the lower strap together.

IMG_0244.jpg


This is a binding post (you can loc-tite it also):

1293-12-L.JPG


I've seen aluminum ones at Lowes and Home Depot, I used a Nickel over Brass from www.tandyleather.com

 
Last edited by a moderator:
I've tried a few different paths for routing the drink tube, but am not really happy with any of them. Anyone want to share their methods for tube routing? Thanks.

 
I did something similar to Rickster. Instead of using a binding post I also removed the buckle and instead rivited the straps together. I am working on the tubing and if I get enough time I will probablly us a velcro setup to install the bitevalve near the tank like I saw in some old LDR pics. Take care, PM. <><

 
Just want to give everyone a heads up, that I have had some feedback and one unlucky rider lost their jug and bag while on a long, mission specific ride. Not good news at all. So with this in mind, I want everyone for now, to physically sew (or some type of mechanical holding device) the strap for the time being so there is absolutely no way that the lower strap and aluminum base can be separated from one another. In the short term, this will ensure that no more losses will occur.

In the meantime, I am going to redesign the connection between bag and jug so that this will never happen again.

I will take good care of this rider and replace all straps for everyone else as quickly as possible.

Sorry for the inconvenience.

 
I want everyone for now, to physically sew (or some type of mechanical holding device) the strap for the time being so there is absolutely no way that the lower strap and aluminum base can be separated from one another.
See Post above

 
I want everyone for now, to physically sew (or some type of mechanical holding device) the strap for the time being so there is absolutely no way that the lower strap and aluminum base can be separated from one another.
See Post above
I think this may be the answer to my problem.

What's the barrel/post height on the one you're using, 1/4"?

 
Last edited by a moderator:
I want everyone for now, to physically sew (or some type of mechanical holding device) the strap for the time being so there is absolutely no way that the lower strap and aluminum base can be separated from one another.
See Post above
I think this may be the answer to my problem.

What's the barrel/post height on the one you're using, 1/4"?
Actually I used Tandy part number 1291-02 (3/8" Nickel Plated solid brass)

but in the pic in the previous post -- maybe you can see -- I folded the strap so I went through 3 layers -- and still needed a washer (barely visible in the pic.)

I would recommend the 1/4 " but it does not come nickel plated from Tandy -- they do have a solid brass one at TandyLeather.com as part number:1290-11

Screw Post 1/4" Solid Brass 100/pk: Part Number: 1290-11 1/4" long post, 1/4" long screw.

Club Price $15.00 per 100PK

Reg. Price $24.99 per 100PK

IIRC the barrell diameter of the post of the 1/4" solid brass pn: 1290-11 is 3/16" X 5/16"L

The 'screw' piece has 1/4" of threads as listed, so the screwed down tight space between the 2 ends is 5/16"

(you'd need the straps or combination of straps and a washer to stack to a thickness of min 5/16" for the binding post to be tight with the 1/4" binding posts)

Skyway -- PM me if you need specific measurements taken or want a handfull of these -- I have both the 1/4" solid brass, and the 3/8" Nickel plated brass ones.

 
Last edited by a moderator:
I've tried a few different paths for routing the drink tube, but am not really happy with any of them. Anyone want to share their methods for tube routing? Thanks.
I ran the tube from the jug on the left side inside the frame rail under the seat, (had to remove the seats), up under the tank towards the center left of the tank and (had to raise the front tank by removing the two allens, and just losing the rear bolt on the tank). Reinstalled the tank and ran the tube between the tank and the left side panel in the grove that is visable from the top and just wide enough to insert the tube and the bite valve I just let the magnet stick on the side of the tank about 2 inches below the Yamaha emblem on the left side of the tank. Seems to work ok. First time I ran the tube from the left side in this groove all the way around the top of the tank and doubled back in the groove with the bite valve stuck to the tank at the very top between the front of the tank and the steering stem. And the bars caught the bite valve between the tank and put a small dent in the front of the tank. Don't put the bite valve near the bars pivot area! Anyway, if anyone has a better way let us know. Thanks, PM. <>< :huh:

 
Here's a photo to support the parts and instructions that are being mailed out today for everyone who was part of the GB for the hydration system. The fix I'm providing should prevent anyone else from loosing the bag and water jug.

IMG_2082.jpg


I use a 12" piece of Velco Brand-One Wrap to hold my case and jug on. it works great. Just thread it into the cover and base plate in both slots and press it together. Is the material used to secure electrical cables and other items that are coiled up. Hope this helps. Also at HD or hardware stores is available in various colors.

 
Last edited by a moderator:
Ian,

I wasn't even aware there was a problem with the straps, but I'm glad I happened on to this thread as I'm installing mine over memorial weekend. Thanks for the great customer support!

 
Status
Not open for further replies.
Top