Smokers (BBQ - not grilling)

Yamaha FJR Motorcycle Forum

Help Support Yamaha FJR Motorcycle Forum:

This site may earn a commission from merchant affiliate links, including eBay, Amazon, and others.
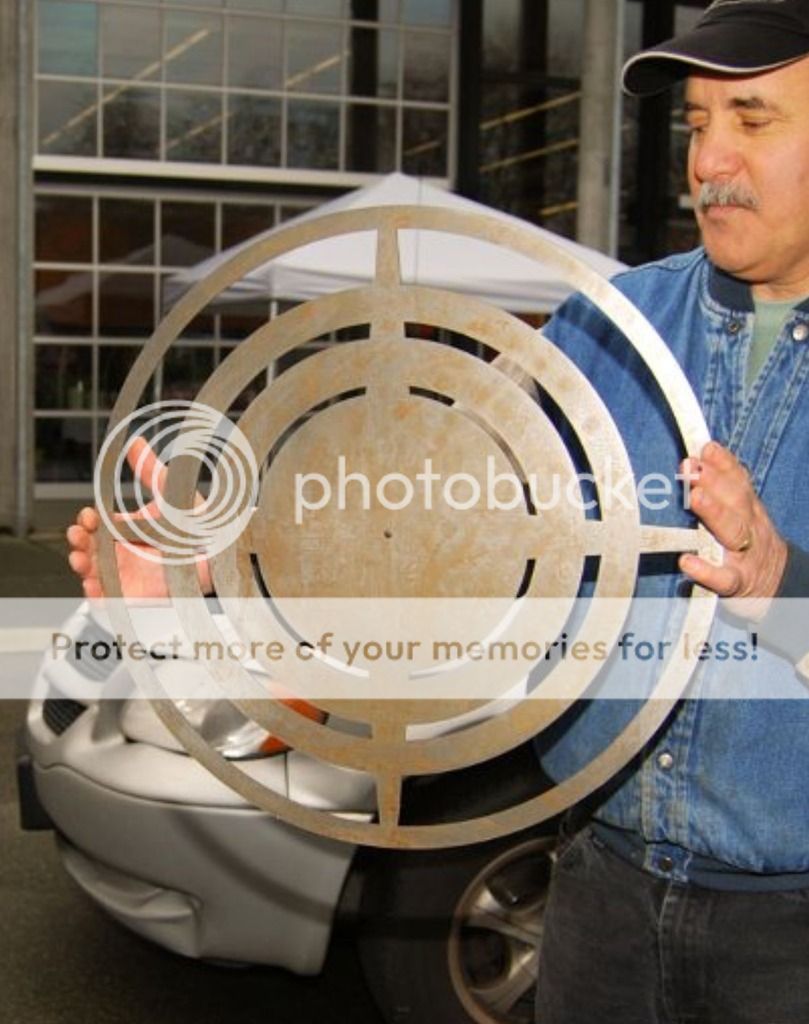
Nice, I've been trying to figure out how to put brackets in for a deflector. Never thought about just setting it there. Sometimes the simple stuff eludes me.
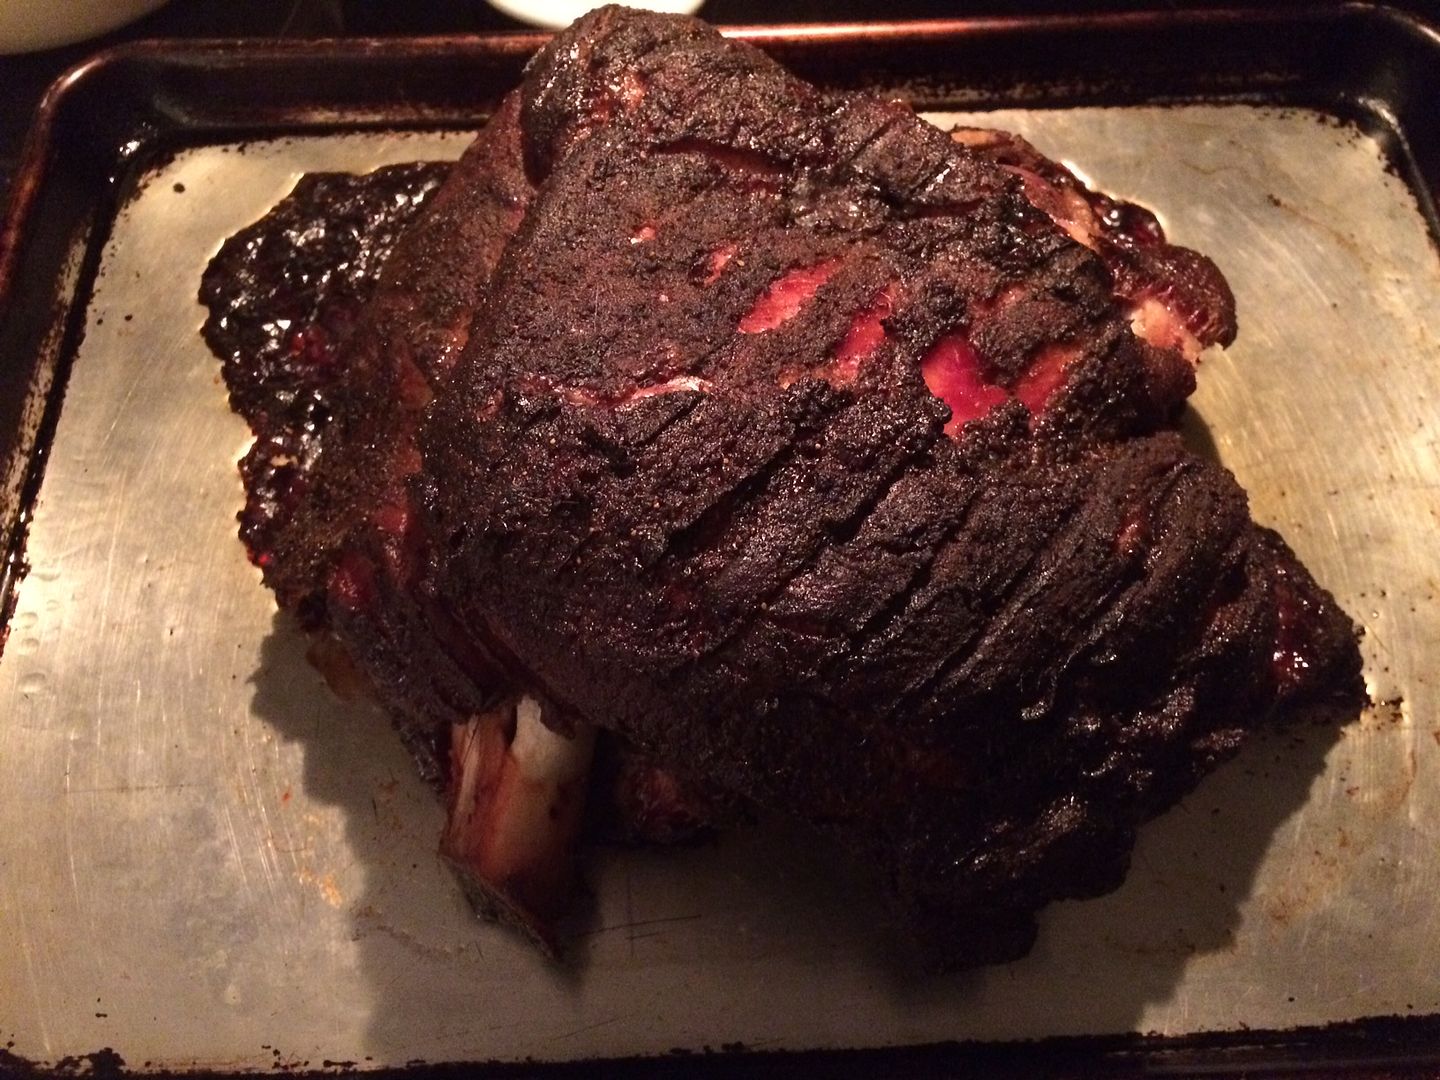
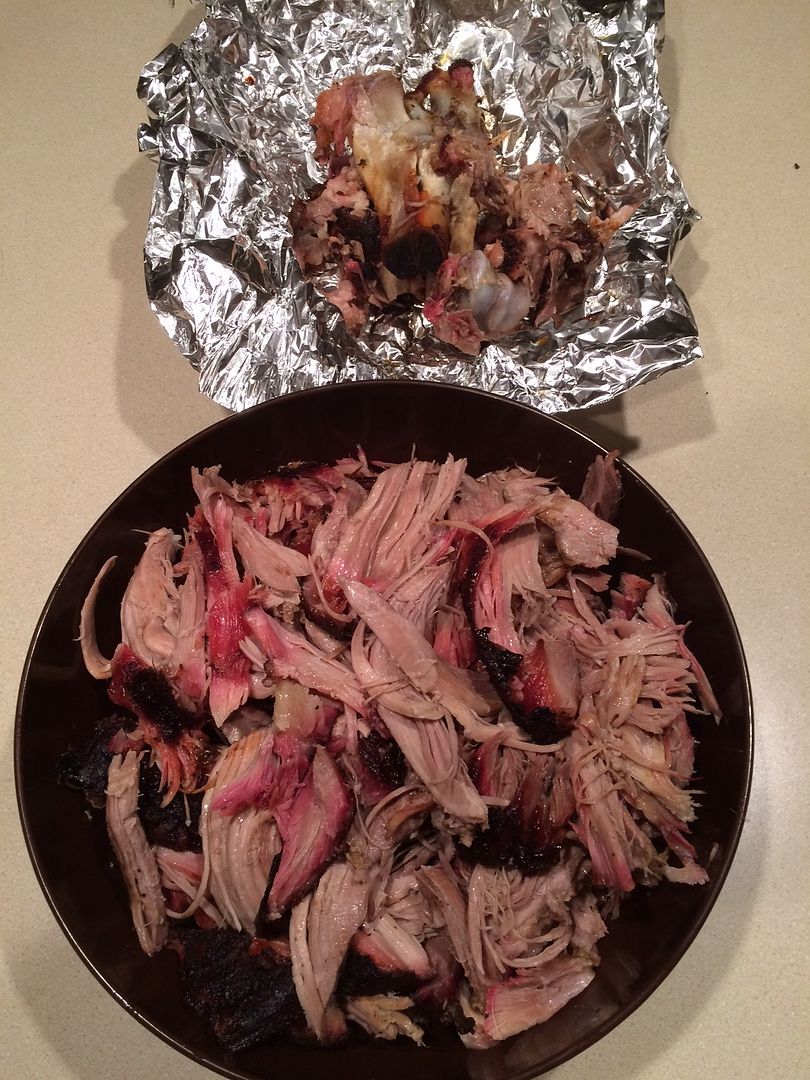
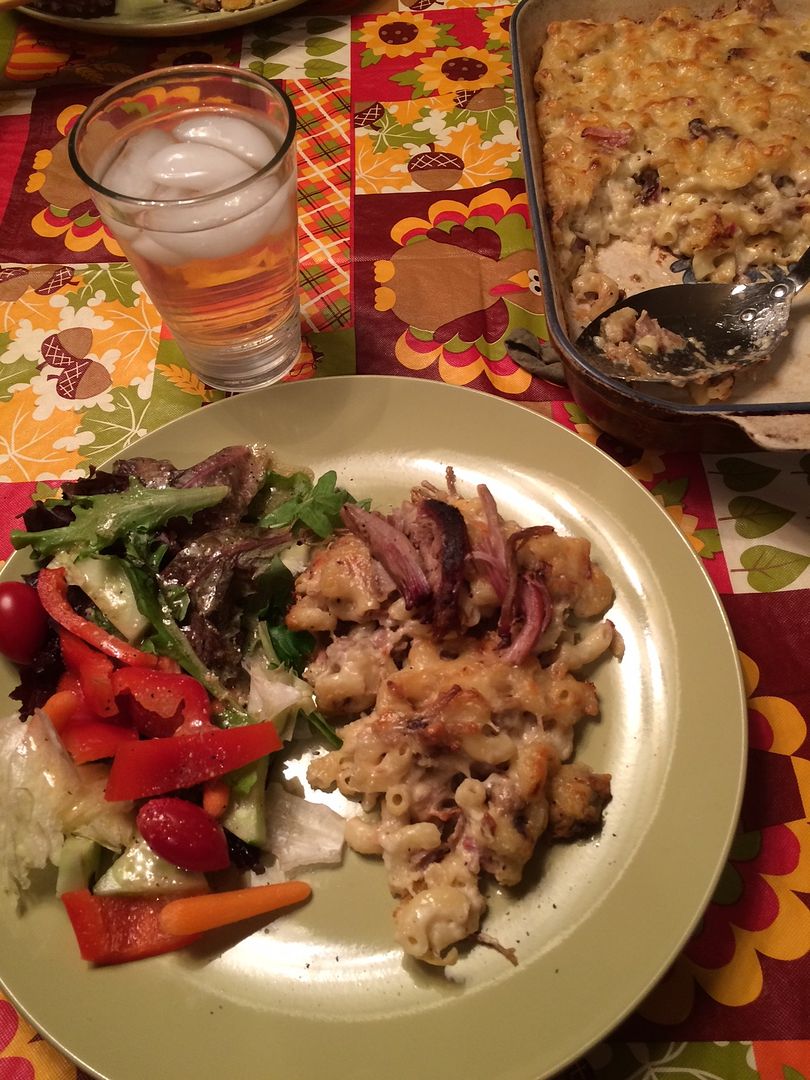
biggrin.png


Well, Jasen, after yesterday's experience, I would say maybe you do not want to follow my lead with that.

Everything started out fine, but once I got the drum up to temperature and cut back my air intake to just the normal single wide open or slightly closed ball valve, the temps started to drop. To maintain any kind of decent temperature I had to run with both 3/4" ports wide open. It could have been something else , but I think having the heat deflector sitting right atop the charcoal basket stifled the air flow through the charcoal.

I got busy with the leaves, checking the smoker temp every now and then, and when I checked the tenderloins at ~11 they were done. Pulled them off and we had them for dinner last night. Complete success there, but you've all already seen enough of my tenderloins in the past. When I pulled them off I stuck the shoulder with a meat thermometer and it was alarmingly low still. No problem, since I had no intentions of eating pulled pork yesterday anyway. I transferred the shoulder to the kitchen oven @ 280F at 9 PM, and the shoulder still did not finish until near midnight. It cooled off outside and was down in the 50's when I took the meat off the smoker.

Looks and tastes wonderful, but I think having the heat deflector in it caused the UDS to run colder by deflecting all the heat and smoke out to the sides of the drum all the time. Not sure it really accomplished anything in the smoker either, as the bottom of the meat was definitely more browned than the top, so I still flipped it half way through. I'll probably give it another shot, but that pizza pan may be better re-repurposed to making pizza on the gas grille.

IMG_0798.jpg


IMG_0799.jpg


Maybe drill some holes?
biggrin.png
You do the leg work and let me know what works. I'm sure you'll manage to suffer through eating the after product somehow.
biggrin.png


I think holes would help.... Looking at your photo (post 559) it does look like you might be snuffing your fire by having it right on top of the charcoal basket.

Likely something mounted higher, with a slightly smaller diameter and several SMALL holes around the center would flow air (and smoke) through the pit better. I think the use of the heavy cast iron does make sense....especially if you want to maintain a tempature for a real long cook like a big brisket.

Getting more smoke and having less direct heat under the food is the reason I shied away from drum/vertical smokers and went with the offset reverse. I do like the simplicity of the UDS...and I think you're on the right track with the metal plate deflector idea...just need some more testing.

I think drilling a few holes...1/4-3/8" in diameter, spaced out around an inch apart would be a place to start.......(then just add more holes if needed)

 
Last edited by a moderator:
Well Fred......

At Least -- no meat was harmed in this adventure..... Learning is the key here I'm thinking....

Nothing wrong with some trial and error....

 
Thanks for the ideas.

I was already planning on trying the deflector raised about 4-5 inches above the top of the charcoal basket somehow. The idea of drilling it with holes had not occurred to me. I'm thinking that it would need a lot of pretty big holes to make any difference in the smoke flow. And drilling the cast iron isn't the easiest thing in the world to do. I think I'll just give it a try raised up, and if that doesn't work out just go back to no deflector. The results were not all that bad without one, just different.

We had some of the pulled pork results last night and it definitely did not have as much smoke flavor as my prior shoulders cooked without the deflector. Wife said she preferred the more subtle smokiness. That might also have been my backing off on the smoke wood so it only smoked heavily for the first few hours. Too many variables to be sure.

I was definitely burning more fuel than normal with the deflector to achieve the normal 225 cooking temp, hence the need for the increased intake air. I had my charcoal basket about 3/4 full at the start, and when I dumped out the ashes yesterday it was nearly all burnt. In prior cooks I'd have some unburnt charcoal after even a long cook like that one. This explains why the temp was starting to dip a little at 9PM when I moved the shoulder to the kitchen oven.

As a side note: When you do finish the shoulder in the kitchen oven it sure makes the house smell smoky. Good in my opinion. Not so good in SWMBO's. :rolleyes:

 
No idea how well it works, but saw this photo at BBQ Bretheren after searching "heat defuser for a UDS":

1447087997_zps2bxrkzgm.jpg


Last edited by a moderator:
Yep. Here's the thread I got the photo from... Seems there's even some disagreement on using such a device to begin with:

https://www.bbq-brethren.com/forum/showthread.php?t=117498

I do see the logic in the design of the one in the photo...having it be more "open" as it radiates from the center. I had the thought of instead of using a "plate" with holes or openings cut into it, to just make a spiral out of metal tubing or band, having it tightly wound in the center and gradually spacing out as it gets to the edges.

 
Last edited by a moderator:
This whole issue may be what pushes me to go with a full sized reverse flow offset (similar to your setup Knifemaker).

I've already warned SWMBO of the potential expense next spring. ;)

 
So... what do you do with those many pounds of pulled pork from your last big cook? Why make some Mac 'n Cheese of course:

Smokey Mac 'n Cheese (to die for)

  • 1 (8 ounce) package macaroni
  • 4 tablespoons butter
  • 4 tablespoons flour
  • 1 cup milk
  • 1 cup cream
  • 1⁄2 teaspoon salt
  • fresh ground black pepper, to taste
  • 1 cup of shredded, good quality cheddar cheese, (we like Cabot's "Seriously Sharp Cheddar")
  • 1 cup of shredded Monterey Jack (we used Cabots)
  • 1⁄2 cup coarsely minced pulled pork in the bake
  • 1/2 cup pulled pork for topping after the bake
  1. Preheat oven to 400°F.
  2. Cook and drain macaroni according to package directions; set aside.
  3. In a large saucepan melt butter.
  4. Add flour mixed with salt and pepper, using a whisk to stir until well blended.
  5. Pour milk and cream in gradually; stirring constantly.
  6. Bring to boiling point and boil 2 minutes (stirring constantly).
  7. Reduce heat and cook (stirring constantly) 10 minutes.
  8. Add shredded cheeses little by little and simmer an additional 5 minutes, or until cheese melts.
  9. Turn off flame.
  10. Add macaroni to the saucepan and toss to coat with the cheese sauce.
  11. Add minced pork and stir in
  12. Transfer macaroni to a buttered baking dish.
  13. Bake 20 minutes until the top is golden brown.
  14. Top with remaining pulled pork and bake another 5 minutes to warm it up, or warm up in foil pouch and serve on the side.

IMG_0800.jpg


PS - That was just my first helping. ;)

 
Last edited by a moderator:
So... what do you do with those many pounds of pulled pork from your last big cook? Why make some Mac 'n Cheese of course:
Smokey Mac 'n Cheese (to die for)

  • 1 (8 ounce) package macaroni
  • 4 tablespoons butter
  • 4 tablespoons flour
  • 1 cup milk
  • 1 cup cream
  • 1⁄2 teaspoon salt
  • fresh ground black pepper, to taste
  • 1 cup of shredded, good quality cheddar cheese, (we like Cabot's "Seriously Sharp Cheddar")
  • 1 cup of shredded Monterey Jack (we used Cabots)
  • 1⁄2 cup coarsely minced pulled pork in the bake
  • 1/2 cup pulled pork for topping after the bake
  1. Preheat oven to 400°F.
  2. Cook and drain macaroni according to package directions; set aside.
  3. In a large saucepan melt butter.
  4. Add flour mixed with salt and pepper, using a whisk to stir until well blended.
  5. Pour milk and cream in gradually; stirring constantly.
  6. Bring to boiling point and boil 2 minutes (stirring constantly).
  7. Reduce heat and cook (stirring constantly) 10 minutes.
  8. Add shredded cheeses little by little and simmer an additional 5 minutes, or until cheese melts.
  9. Turn off flame.
  10. Add macaroni to the saucepan and toss to coat with the cheese sauce.
  11. Add minced pork and stir in
  12. Transfer macaroni to a buttered baking dish.
  13. Bake 20 minutes until the top is golden brown.
  14. Top with remaining pulled pork and bake another 5 minutes to warm it up, or warm up in foil pouch and serve on the side.

IMG_0800.jpg
OMG!!!

Food Porn Of The Year Award nominee!!!

 
Arrrgh... I'm wrestling with a purchase decision. I swung by the Home Despot on Monday to grab a replacement thermometer for the lid of my UDS (the original never did work right) and noticed that the had the Heavy Duty Brinkman Trailmaster offset grille that normally sells for $300 is on clearance right now for just $200.

Now I know that thing is no custom beauty like knifemaker built, but I think it has the potential to be a good offset with some custom tweaking and sealing the chambers with nomex gaskets and such. Obviously to score one at that price I need to shit or get off the pot quickly.

And to make the decision even more complicated I just cooked up some baby backs on the UDS (while also "working") using Kingsford blue and Apple wood chunks yesterday , just skipped using the heat deflector plate altogether this time, and everything worked perfectly and came out delicious.

 
Last edited by a moderator:
I have a similar Brinkman offset grill. It's a great idea but no amount of fiddle/fussing with the design has produced good results. Impossible to get good sealing, heat uniformity in the cooking chamber is not good and the resulting fuel consumption is essentially out of control. It would be a good challenge for a clever, creative feller like you. Not Recommended.

 
You may have just saved me $200.

(but it will probably cost me a lot more next year
wink.png
)

Is yours the Trailmaster version, Alan? Those are significantly heavier gauge steel than the less expensive Brinkman models.

I have read reviews where people have successfully used nomex and/or hitemp silicone sealant and got them pretty tight. Also, any of these offset smokers either need to be converted to reverse flow or use "tuning plates" to even out the temp in the cook chamber.

 
Last edited by a moderator:
I have a similar Brinkman offset grill. It's a great idea but no amount of fiddle/fussing with the design has produced good results. Impossible to get good sealing, heat uniformity in the cooking chamber is not good and the resulting fuel consumption is essentially out of control. It would be a good challenge for a clever, creative feller like you. Not Recommended.
+1

I used to run two of them simultaneously to do maybe 10 pork butts at a time, and it was constant work moving the meat around to try to get uniformity over the 12 hour smoking period.

For home level smoking, I really like the gas powered, but chip and chunk burning, vertical units with multiple racks. I can maintain a uniform temperature as a function of time, and I can sort the meats and pull them from the different racks so that the high racks and low racks may be on different schedules, but I don't have to rotate from one rack to the next.

The biggest problem I've run into with any of this smoking activity is the problem of maintaining a 200 F target after the ambient temperatures drop down into the 40's. Under those circumstances the typical gas burners in residential smokers don't have enough heat output to keep up, and you're better off with a real wood or charcoal fire. My solution to this is to forget about smoking when the temperature outdoors isn't comfortable enough to sit outside with a light jacket.

The other thing I might have mentioned before is that I will run the meat in the smoker for my smoke cycle, which may be 2 to 5 hours depending on the meat. But after the smoke cycle is finished, I'll wrap the meat in aluminum foil and put it in the oven if it's a cut that needs more time at 200 F. Many cuts don't need more than 2 to 5 hours. But Briskets and shoulders need the full 12 in my opinion.

Another trick I like is to take steaks and broil them just past searing on the grill, and then move them to the smoker to finish them over hickory or pecan. Leave them over the smoke just long enough to get the degree of doneness you want. It just depends on the steak, but a 1 1/4 inch thick porterhouse is pretty good after 20 minutes or so. You can always check and keep going if you like your meat a bit more on the done side.

 
I had one of the Brinkman offset units, and agree with Ionbeam. I actually left it behind when we sold the house. It used a ton of fuel and had hot-spots that I couldn't resolve with deflectors. I modified the chimney, attempted to seal the unit and added heat deflectors to channel the heat. It leaked like a sieve and rusted in spite of being in California and treated with high temperature paint. It's a better grill than smoker. P.O.S.

 
Top