Torque loss after service.

Yamaha FJR Motorcycle Forum

Help Support Yamaha FJR Motorcycle Forum:

This site may earn a commission from merchant affiliate links, including eBay, Amazon, and others.
I'm glad that your bike is now restored to full power and no damage was done.

I lasted six months as a service manager at a main Yamaha /Suzuki dealer, too much stress!

I'm a good 12,000 miles off even checking my FJR valve clearances, the prospect of lifting the cams if it's needed doesn't fill me with joy. This mis-timing problem seems very common with the FJR and there should be a better way of making the job foolproof for service techs and DIY owner's.

My previous bike was an FJ1200 (still have it), the drilled dimples in the camshafts are sighted through holes in the bearing caps when they are correctly timed, the FJR has the dimples but nothing to sight them against accurately.

Many car engines have their camshafts locked solid by special tools for replacing cambelts, with some reverse engineering a tool could be made for FJRs, would need to engage with a reference point on the cylinder head and the holes in the cam sprockets. Crank sprocket would need something similar.

Yamaha must have a solid procedure in the factory (or a tool) to produce thousands of bikes without any mistakes in the cam timing, would love to see how they do it (quickly and under pressure).

Just some random thinking out loud,

Cheers

Gary

 
Gary - fear not, my friend. Believe me when I state that if I can do it, you can too.

I screwed up MikeP1300's bike - got the whole thing way off time, and was at least smart enough to turn the crank by hand before starting the bike. That was enough to tell me I screwed up. With the help of these fine people, I fixed my problem and Mike's bike was good as new (with thicker shims to take care of the valve tolerance issues).

It ain't going to go away. And it can't eat you. It's just plastic and metal. Take a deep breath and read this forum. Good luck!!

 
There is a pretty much foolproof way to get the valve timing right. And it's the same one the factory employs to make sure they do it right the first time, during manufacture: Remove the engine from the frame first.
uhoh.gif


Given that we probably don't like the idea of all that work, doing it with the engine still mounted is probably a better plan. But I get your request, and it's something we, as an owner's group, should be able to get behind and work towards.

In the manufacturing world it's called Poka-yoking something: making it "***** proof", because like it or not, on some days even the best of us are idiots and make mistakes.

I, for one, will give this some serious thought, and we'll see what we come up with both for prevention of mistiming, and also for a device to make it ***** proof. Who knows... maybe there is a market for such a device at Yamaha. Sure seems like they are hiring some people that might need the Poka-yoke tools these days.

 
Last edited by a moderator:
<snip>...a tool could be made for FJRs, would need to engage with a reference point on the cylinder head and the holes in the cam sprockets.

Cheers

Gary
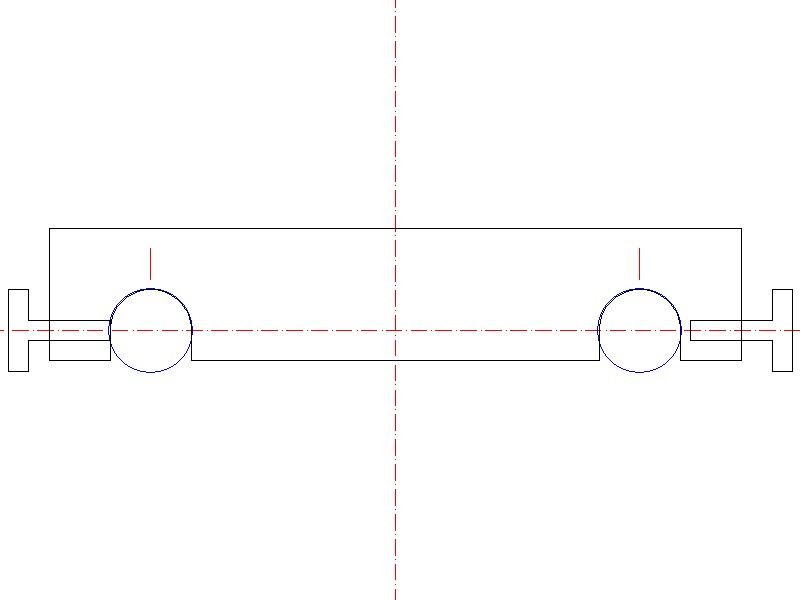
Being a victim of a mis-installed pair of cams, I have put a bit of thought into a tool to reduce or eliminate a repeat performance. I also happen to have a small CNC mill and a CNC router in the basement to make something.

Here is a 5 minute drawing that I just did. Not completely thought through; just for discussion purposes. It is the end view of a small jig that I would make from 1/2" aluminum. My thought is to use this little jig in one of two ways.

1) With the valve cover off, slide this down over the cams between the lobes. Note the vertical index lines over the center of the cam center lines. Before the cams are removed, scribe a mark on each of the cams directly below the index marks on the jig. Remove the cams, replace the required shims, then reinstall the cams with their index marks lined up with the jig.

2) Make 2 of these jigs and end drill both ends, tap, and install a bolt or thumb screw in each end. Place the two jigs over the cams - one at each end, tighten the thumb screws to secure the cams, and lift both cams out. Replace the shims as required, and then drop the two cams back into place.

This also assumes that the crank does not move between removal and installation of the cams.

Never having removed my cams myself, this is just a bit of theory on my part. I hope my ramblings make some sense.

fjr-cam-jig.jpg


Cool, something like that.

I think even with the luxury of looking at the timing marks dead on from the side things could still go wrong, the FJ1200 sprockets are in the centre and the timing marks can't be viewed easily either, perhaps that's why they have holes to sight the dimples. 'Belt and braces' we call it in the UK!

Parallax error is the term I think.

We had a 'ticking' XJ900 in the shop and rebuilt the top end with new parts (interesting that early FJRs had this problem), the owner was a PITA and gave us so much grief that the business manager said 'how much do you want for your bike?' and wrote him out a cheque there and then which caught him completely off guard, priceless. Same guy told us that we were checking the oil level wrong (centrestand v on two wheels), I showed him his manual page.

If I had a spare engine lying about I would work on this tool idea, not opening mine up to play as it's running quite well at the moment!

 
On my old KLR, the two balancer shafts were timed to both marks on the sprockets and crank AND several LINKS were slightly a different color (and almost indistinguishable).

Once the chain was scrubbed (so I could see the slight discoloration, I put just a small spot of white paint on both the links and the marks on the shafts /gears..

Doing the same (brake cleaner on a rag where the marks are), then a spot of paint, SHOULD make things MUCH easier to see when lining up the cams.


If you look very close, you can see two links adjacent to each other (ft, lower balancer) slightly different colored than most of the rest. Those links had to be centered on the mark on the sprocket. Of course the sprockets ARE splined and ALSO indexed with a punch mark on the shaft (both ends of EACH SHAFT). You can also see the one lighter colored link on the dead center of the crankshaft.

The chain for the Cam shafts are behind the two balancer's...


Last edited by a moderator:
IMHO, no need for a special tool, hardly enough room for one anyway..... Line up the timing marks (arrows) on the cam sprockets to the cylinder head as shown in the FSM, which should coincide with the crankshaft end being lined up at #1 TDC.. That is step 1 in case you move stuff later, you have proper reference points. Small zip tie to each camshaft sprocket, and zip tie the crankshaft end. Now you can remove/back off the CCT, remove and replace cams at will, and when you're done, verify those timing marks are still lined up. They should be... rotate the engine 360, check the cams rotated 180 (same timing marks), rotate again 360, cams now rotated back to your starting point...... to me this is not difficult but I've done it many times. It helps to be familiar with the timing marks. Sit on a stool and gunsight with a good flashlight, not a lot of room, but (to me) they aren't all that hard to see. Before you start, you can rotate the engine to various positions to verify what the marks look like.......

 
IMHO, no need for a special tool, hardly enough room for one anyway..... Line up the timing marks (arrows) on the cam sprockets to the cylinder head as shown in the FSM, which should coincide with the crankshaft end being lined up at #1 TDC.. That is step 1 in case you move stuff later, you have proper reference points. Small zip tie to each camshaft sprocket, and zip tie the crankshaft end. Now you can remove/back off the CCT, remove and replace cams at will, and when you're done, verify those timing marks are still lined up. They should be... rotate the engine 360, check the cams rotated 180 (same timing marks), rotate again 360, cams now rotated back to your starting point...... to me this is not difficult but I've done it many times. It helps to be familiar with the timing marks. Sit on a stool and gunsight with a good flashlight, not a lot of room, but (to me) they aren't all that hard to see. Before you start, you can rotate the engine to various positions to verify what the marks look like.......
Knowing this before going in is really helpful. I agree with Ray that it isn't hard to see if you KNOW what to look for. There are enough markings (cam shaft, cam sprockets, and crank) to know if it is correct. Like HPPants, I learned the hard way.

 
Special tools? Zip Ties.

Hahq...And there is no way in Hell I'm pulling my cams without some one around that knows WTF their doing. Haha...

 
IMHO, no need for a special tool, hardly enough room for one anyway..... Line up the timing marks (arrows) on the cam sprockets to the cylinder head as shown in the FSM, which should coincide with the crankshaft end being lined up at #1 TDC.. That is step 1 in case you move stuff later, you have proper reference points. Small zip tie to each camshaft sprocket, and zip tie the crankshaft end. Now you can remove/back off the CCT, remove and replace cams at will, and when you're done, verify those timing marks are still lined up. They should be... rotate the engine 360, check the cams rotated 180 (same timing marks), rotate again 360, cams now rotated back to your starting point...... to me this is not difficult but I've done it many times. It helps to be familiar with the timing marks. Sit on a stool and gunsight with a good flashlight, not a lot of room, but (to me) they aren't all that hard to see. Before you start, you can rotate the engine to various positions to verify what the marks look like.......
Thank you! How frikkin hard is it to sight and line up cam timing marks? There's a new-fangled invention that, along with a flashlight, makes it so easy even a zilla can do it!!

It's called a mirror. Google it, you'll be amazed!

 
The "special tool" I'm envisioning is to restrain the chain on the lower sprocket, as that is the end that generally jumps a tooth. A Ty-wrap on each of the cam sprockets is easy, since those sprockets have handy holes in them. The trickier part is restraining the lower sprocket and still having enough chain slack to move the ty-wrapped cams around on top.

I actually didn't even restrain mine there when I re-shimmed my '05, and just left the ty-wraps on up top until I got the timing right at the bottom end. The trick for me was to slightly rotate the crankshaft CCW a few degrees from #1 TDC with the valves still on their marks, to allow the chain to slip on the lower sprocket in correct time when the chain is tight.

 
Last edited by a moderator:
When I removed the cams for valve adjustment and CCT replacement I cut a piece of closed cell foam, commonly used as a packing material, to fit tightly to the lower half of the crank sprocket. This held the chain tightly to the sprocket and allowed enough slack to change CCT and/or remove cams. I also used a dab of nail polish to mark the chain and sprocket to match up the chain link and sprocket tooth. Ty wraps were also used on the cam sprockets and chain. IIRC, I was able to roll the cam while engaged with the chain far enough out of the way to change shims. The closed cell foam worked like a champ being non absorbent and stiff enough to hold the chain firmly to the crank sprocket.

BTW, the info I gained from this forum gave me the confidence I needed to attack this task. Better than a service manual!

 
Given:

When the camshafts are positioned correctly, timed properly relative to each other, the sprocket teeth are mirror images. If you look at where the sprockets are closest to each other at their centerline you'll see that the location of the teeth are identical for both sprockets.

You can easily use this relationship to get the timing right.

Get a ruler and lay it down atop the area between the two cams. This is the flat machined area containing the spark plug ports, the coolant ports, etc. Now extend the ruler over to the sprockets. If the ruler is narrow enough it will fit in the gap between the teeth on both sprockets. This is all the precision one needs to get the timing right.

Place a mark on each sprocket where the ruler intersects.

Now you have a point of origin you can use later to get the timing right.

There's no need to lash the chain to the sprockets. You can always get back to the correct location very easily using those two marks. If your ruler is the correct width you can use it to hold the cams in position as you wrestle the chain about.

While it's easy to see the machined marks on the intake cam, as we know the exhaust cam is not so easy. But, it is easy to juxtapose the sprocket teeth where the two sprockets are nearest each other.

 
I'm envious, great that the issue was resolved. I am trying to convice myself this lack of grunt is in my head and I don't ride the FJR enough to remember how it was. I need to find a local owner that is willing to swap for 15 minutes, I imagine it won't take but a few roll-on's to tell.

Did the OP mention a noticable difference ? Forgive me, there is a lot of verbage in this thead I may have missed the comment.

 
While it's easy to see the machined marks on the intake cam, as we know the exhaust cam is not so easy. But, it is easy to juxtapose the sprocket teeth where the two sprockets are nearest each other.
Good point, and good thinkin'

Assuming that one has had the "good sense" to secure the chain to the two top cam sprockets before slackening the chain, regardless of how badly you F* up the chain down below, the two upper sprockets are timed to each other correctly. So whenever the rear most (and easier to see) intake sprocket is set correctly, the (harder to see) front exhaust wheel will be also. So your only challenge is getting the chain onto the bottom sprocket to be properly aligned with the intake.

It is always a good idea to eliminate as many of the multiple variables as is possible in any problem,to give you the best chance of coming out with the correct solution. :thumbsup:

.

 
The "special tool" I'm envisioning is to restrain the chain on the lower sprocket, as that is the end that generally jumps a tooth. A Ty-wrap on each of the cam sprockets is easy, since those sprockets have handy holes in them. The trickier part is restraining the lower sprocket and still having enough chain slack to move the ty-wrapped cams around on top.
I actually didn't even restrain mine there when I re-shimmed my '05, and just left the ty-wraps on up top until I got the timing right at the bottom end. The trick for me was to slightly rotate the crankshaft CCW a few degrees from #1 TDC with the valves still on their marks, to allow the chain to slip on the lower sprocket in correct time when the chain is tight.
I think it was you that came up with the idea of jamming a 10 mm socket into the front chain slipper to avoid a slip during a change of the CCT. Works like a charm.

 
It was, and it does, but you can't remove the cam(s) that way, just the CCT.

I'm thinking something similar for the bottom sprocket to allow one to work unfettered with the ty-wrapped cams and get everthing back together with no possible errors.

 
Last edited by a moderator:
I had no trouble with the cam timing the last (and only) time I had to change shims. I found it very difficult to see the marks on the outside of the cam gears. The next time I have to pull the cams, I am going to scribe a mark on the inside of the sprockets. That, coupled with the timing marks on the crank should make it easy to verify the timing - even if I screw up the zip-tying or move the crank while it is apart.

 
Top