Yeah. During my yearly trek under the tank it's one of the things I do.Replaced spark plugs and noticed cracks in all 4 vacuum caps. They were cheapies from autozone. Looks like something to change annually maybe?
Some info here:
https://www.fjrforum.com/forum//index.php/topic/143379-throttle-body-caps-where-can-i-get-better-caps/
You are using an out of date browser. It may not display this or other websites correctly.
You should upgrade or use an alternative browser.
You should upgrade or use an alternative browser.
What did you do to your FJR today?
- Thread starter CheesyRider
- Start date

Help Support Yamaha FJR Motorcycle Forum:
This site may earn a commission from merchant affiliate
links, including eBay, Amazon, and others.
08FJR4ME
-WYNPRO-
Replaced spark plugs and noticed cracks in all 4 vacuum caps. They were cheapies from autozone. Looks like something to change annually maybe?
Some info here:
https://www.fjrforum.com/forum//index.php/topic/143379-throttle-body-caps-where-can-i-get-better-caps/
These don't crack,

https://www.fjrforum.com/forum//index.php/topic/116612-wynpro-air-induction-cover-plates/?p=573459
Last edited by a moderator:
snackbauer
Well-known member
Agree, and I installed those works of art long ago. I was referring to the little nipples (there, I said nipples) that cover the vacuum ports used for TBS.
That's weird. I still have my 10 year old original vacuum caps on mine. Guess I better look at them more closely next time? Or maybe the OEM rubber caps are worth the price?
895-14169-00-00 CAP $4.99 ea.

895-14169-00-00 CAP $4.99 ea.
Rode her 2-up in the Appalachians and down the Tail of the Dragon. Had a blast literally slicing and balling rubber off the edges of the rear tire - no chicken strips on that tire! Even scraped both pegs on the right side on one of the switchbacks.
Geezer
Parsimonious Curmudgeon
I still have all four originals. I didn't know they cost five buck each. I hope I never lose one.That's weird. I still have my 10 year old original vacuum caps on mine. Guess I better look at them more closely next time? Or maybe the OEM rubber caps are worth the price?
895-14169-00-00 CAP $4.99 ea.

$159.99
FLAVOR Men Brown Leather Motorcycle Jacket with Removable Hood (Large (US standard), Brown)
FLAVOR Leather

$17.99
$19.99
MOREOK Winter Gloves -10°F 3M Thinsulate Warm Gloves Bike Gloves Cycling Gloves for Driving/Cycling/Running/Hiking-Black-L
MOREOK-US (Ships from USA)

$91.99
Edwards Maintenance Kit fits 2003-2020 Yamaha FJR1300 Sport Touring
Edwards Motorsports & RV's

$11.99
$16.99
QUKOPSE Winter Leather Gloves for Men,Touchscreen Snow Driving Gloves with Cashmere Lining for Motorcycle Driving Riding
enshizhouchonglinshangmaoyouxiangongsi

$24.37
Fuel Tank Sticker Motorcycle Stickers for Yam&aha FJR1300 FJR 1300 Tank Pad Protector Decal Emblem Side Fairing Symbol Adventure
nanyangshixianpushangmaohanggerenduzi

$184.79
$209.99
Milwaukee Leather SH1408 Men's Sporty Crossover Vented Black Motorcycle Leather Scooter Jacket - Large
Amazon.com

$16.19
$17.99
MELASA Fleece Lined Winter Cycling Beanie with Holes for Glasses - For Men, Women
HNXCHUANG

$98.16
25-1775 Replacement for All Balls Wheel Bearing Kit (25-1775) for Yamaha FJR1300 03-16 FJR1300ES 14-18
Otisdelilah Auction

$64.99
Edwards Oil Change Kit fits 2003-2020 Yamaha FJR1300 Sport Touring
Edwards Motorsports & RV's
Bungie
FrostBack #2 - IBA # 44620
Finally got around to swapping the tires on my Gen 1 (had a car tire on back and a brand spanking new PR3) in preparation for selling it. Tried out my new No Mar tire changer.
The car tire was a total bitch. In fact, I had given up on it and was gonna bring it into the shop and pay the money to let them deal with it. Then I gave it another try. Long story short, go it off and spooned on my take off Conti's.
$100 saved in swapping fee's already. This thing is gonna pay for itself fast.
bigjohnsd
2021 BMW R1250GSA
First Service, the oil change and rear fluid change parts as well as looking her over well. Also played with the Sag and dampners a bit. Work in progress there but better.
Last edited by a moderator:
COGnosticator
Well-known member
Installed an aux fuse panel under the seat and also put on the Russell Daylong I bought used this past Friday
supertankerm60a3
Well-known member
Finished putting it back into summer 'Hooligan mode'. (Remember to old thread about putting more 'sport' in the looks of the FJR?) Removed the rear fender and put it away for next winter, installed the shorest of all stock windshields, the one with the targeting reticle on it. Finished building and mounting the small LED flushmounted turnsignals. Though those are intended to be permanent.
Does anyone have a line on any NON-load sensitive flashers so I can avoid adding load resistors?
OH, and changed the oil, for the 15th time (bought it at 53,000 and it just rolled 117,000).
The links should take you to pictures i took of the beast.
https://s1028.photobucket.com/user/supertankerm60a3/media/IMG_2130.jpg.html
https://s1028.photobucket.com/user/supertankerm60a3/media/IMG_2131.jpg.html
https://s1028.photobucket.com/user/supertankerm60a3/media/IMG_2132.jpg.html
Last edited by a moderator:
HotRodZilla
GOD BLESS AMERICA
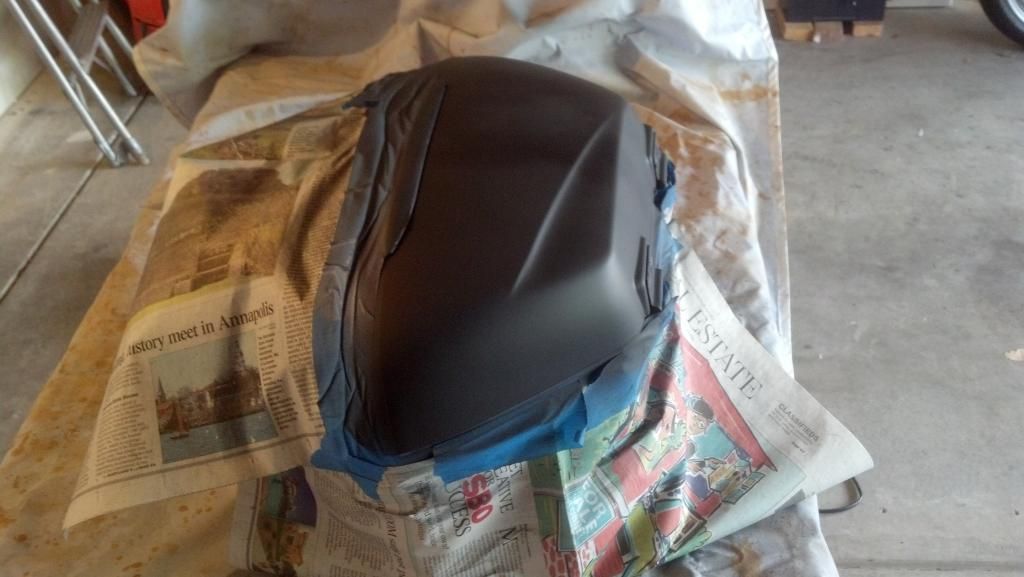
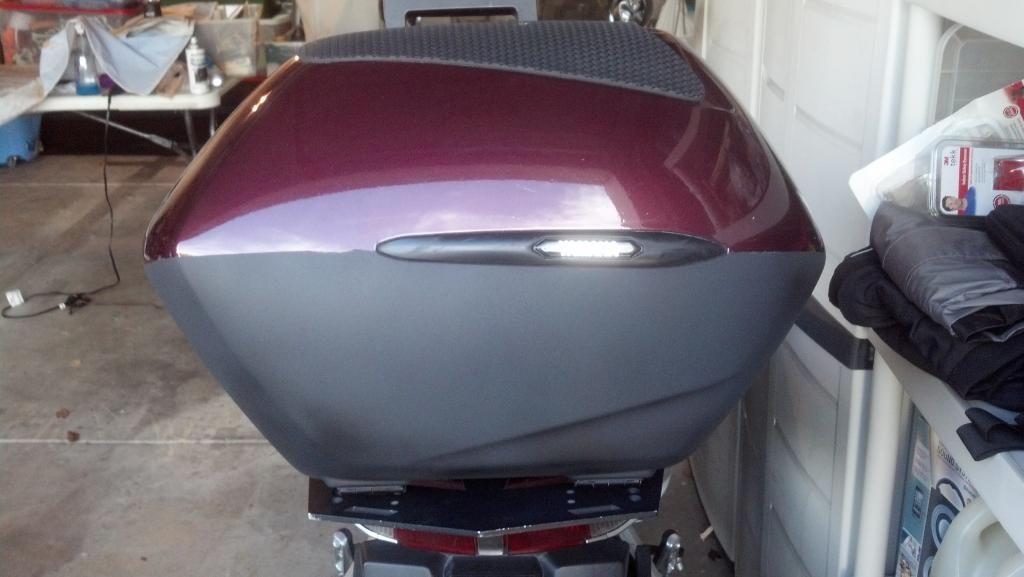
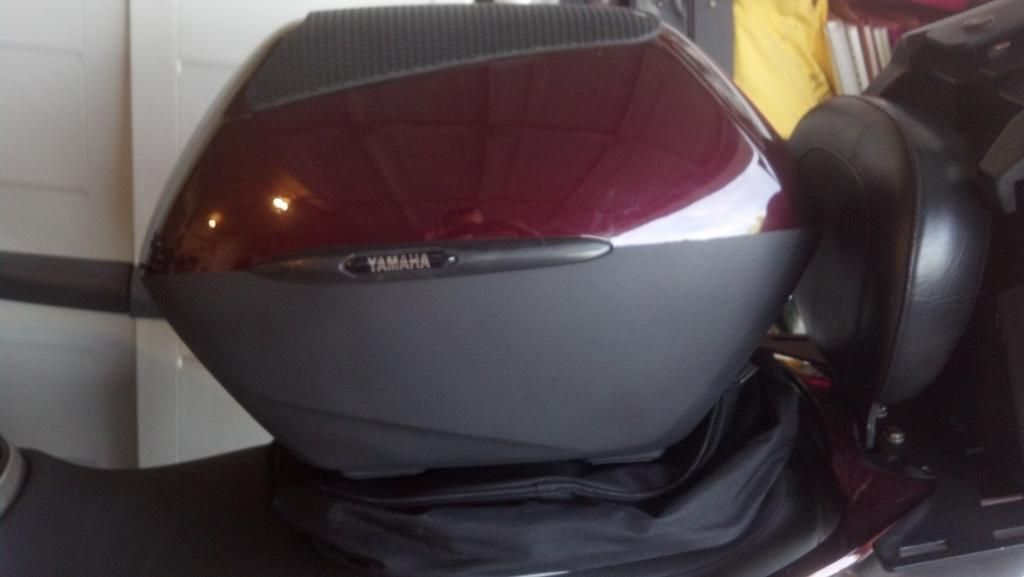
Today I painted the bottom half of my saddlebags with PlastiDip. The other day when I installed the TechSpec protectors, I noticed a lot of chipped paint at the bottom fronts of the bags. These are from rocks thrown up from the road. I also noticed chips along the bottom edge of the lid. A small mishap or two has also contributed to chips below the black Yamaha rubber logo.
They came out pretty well. Keeping the masked edges from peeling was a pain, and because of that, I donno how long they'll last. When it gets sloppy, I'll apply something more permanent.
This was my first time seriously masking something, and I'm not normally good with spray paint, so I liked that this is removable. The non-drip property kept me in check...Anyway, I think they're ok:


That doesn't look too bad. Hopefully it lasts long enough to make it worthwhile. :thumbsup:
I really need to do something similar to the lower part of mine to cover up some "oopsie" marks on the lower corner of the bags. I'll probably try and just do the very bottom front corners, and follow that diagonal line upwards, instead of 1/2 way up.
I've read that the key to getting clean tape lines is to not spry too close to the tape on the first coat(s). Then on the final coat shoot it heavy along the tape and remove the tape quickly while the PD is still wet.
08FJR4ME
-WYNPRO-
I like the road warior look.
 Scratches are K0000000L. I plan on riding mine right into the dirt til she runs no more. Yes I did ride to work today and yesterday.
Just ride,
Dave
Just ride,
Dave
HotRodZilla
GOD BLESS AMERICA
Fred, I was gonna do what you're thinking and just mask along that bottom line and up the front. Then a gravational mishap as a gas stop on Sunday added more chips that I wanted to fix; hence, half way up the bag. Idiot that I am.That doesn't look too bad. Hopefully it lasts long enough to make it worthwhile. :thumbsup:
I really need to do something similar to the lower part of mine to cover up some "oopsie" marks on the lower corner of the bags. I'll probably try and just do the very bottom front corners, and follow that diagonal line upwards, instead of 1/2 way up.
I've read that the key to getting clean tape lines is to not spry too close to the tape on the first coat(s). Then on the final coat shoot it heavy along the tape and remove the tape quickly while the PD is still wet.
I think you may be right about the mask line. Keeping it light there and then spraying heavy and removing the tape before it has time to set would probably work well.
Yoose guys are using the wrong tape. When spray-in bed liners are done (kinda the same product) the tape used has a string in it. When spraying is done the string is used to cut through the material so it has a crisp edge. I've never tried to buy any tho so I have no idea what it's even called.
HotRodZilla
GOD BLESS AMERICA
Fat lot of good you are. I'll look around. A very good friend if mine owns a body shop.Yoose guys are using the wrong tape. When spray-in bed liners are done (kinda the same product) the tape used has a string in it. When spraying is done the string is used to cut through the material so it has a crisp edge. I've never tried to buy any tho so I have no idea what it's even called.
COGnosticator
Well-known member
I installed the rack for a Givi top box on my '05 tonight. Pretty straight forward install. I sold the stock topbox because I like my Givi E52 better, it is lower and holds a lot more crap.
I also installed a ram ball on the right control to hold my radar detector which is hardwired into the aux box I installed yesterday. Also mounted my Zumo 660.
Only thing left to do before the COG national rally is mount two Pirelli GTs and the mounting ring for my Givi tank bag.
I also installed a ram ball on the right control to hold my radar detector which is hardwired into the aux box I installed yesterday. Also mounted my Zumo 660.
Only thing left to do before the COG national rally is mount two Pirelli GTs and the mounting ring for my Givi tank bag.
TomInPA
Well-known member
Removed the Streetpilot 2820 and XM puck, installed the Zumo 590LM. The wires include audio in, audio out, mic, USB and power. I have no idea what I'll use the USB for, but it all ended up tucked around the seat area where audio connections tie into the Autocom. So far it works great and the Zumo synced up to the iPhone and Smartlink App. I have a uClear Bluetooth headset, but I still am using the wires for now.to include the radar detector and bike to bike radio.
SoCalFJR1300
Well-known member
Looks good Zilla!
Nice thing about spraying a piece like that is you don't have to worry about stretching something to make all the curves.
Nice thing about spraying a piece like that is you don't have to worry about stretching something to make all the curves.
El Toro Joe
FYYFF
I got a new set of PR2's yesterday...I thought that Michelin was supposed to stop production of the PR2.
The date code on the rear tire is 0514, and the date code on the front tire is 0114...obviously not old stock.
The date code on the rear tire is 0514, and the date code on the front tire is 0114...obviously not old stock.
Last edited by a moderator:
Similar threads
- Replies
- 16
- Views
- 2K
- Replies
- 6
- Views
- 893
Latest posts
-
Looking to buy an FJR - Pre-purchase/inspection advice please!
- Latest: escapefjrtist
-
Scuffing the piece of bodywork above the left foot peg
- Latest: escapefjrtist
-
-
-


