Wicked Webby's Airbox Mod

Yamaha FJR Motorcycle Forum

Help Support Yamaha FJR Motorcycle Forum:

This site may earn a commission from merchant affiliate links, including eBay, Amazon, and others.
Per Wicked Webby's recommendation, I added 4 more screws to the right-side filter to prevent leakage past the seal:
rhs_filter_mounted_update.jpg


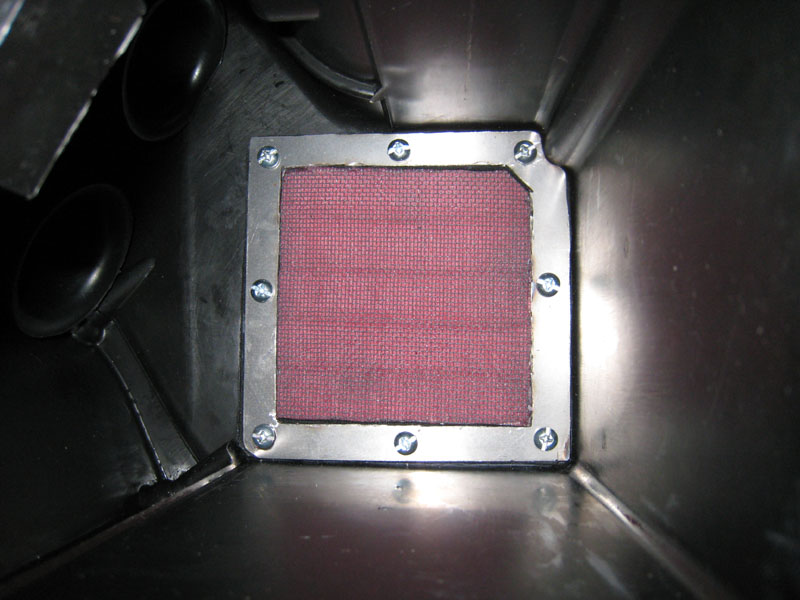
I also discovered that the silicone adhesive doesn't hold those nuts in place too strongly. I popped one off the air box while applying pressure and trying to get a screw started. I tried epoxy now, but am having doubts about it. I think the final solution will be some good duct tape framing the hole on the right side of the air box. The nuts only need to be held in place enough so that they won't pop out. The spikes driven into the plastic will take care of holding them from rotating as you tighten the screws.
Pickles,

Looks good!!

WW

 
Guys out of curiosity about how much opening area is needed into the airbox I decided to measure the filter opening in my 06 ZX-14. This bike makes considerably more HP than a FJR 1300. The ZX-14 has a filter area size that is 45.82 sq/inches. This is the actual filter area size which is the same as the opening into the airbox. With a filter in place this bike makes 192 RWHP on 91 octane pump gas. With no filter (same opening size into airbox) and using MR-11 oxygenated race fuel it makes 202 RWHP. This gives you some idea of the airbox opening size required to support considerably more HP than we are talking about making with the FJR-1300. From the looks of the pictures WW & Pickles have enough free opening area to easily support over 175 RWHP.

 
Guys out of curiosity about how much opening area is needed into the airbox I decided to measure the filter opening in my 06 ZX-14. This bike makes considerably more HP than a FJR 1300. The ZX-14 has a filter area size that is 45.82 sq/inches. This is the actual filter area size which is the same as the opening into the airbox. With a filter in place this bike makes 192 RWHP on 91 octane pump gas. With no filter (same opening size into airbox) and using MR-11 oxygenated race fuel it makes 202 RWHP. This gives you some idea of the airbox opening size required to support considerably more HP than we are talking about making with the FJR-1300. From the looks of the pictures WW & Pickles have enough free opening area to easily support over 175 RWHP.
Jstewart,

Boy oh boy you sure know how to make me miss my Zx12R! I had the full akropovic race system, velocity stacks, power commander 3r, custom tuned map, degreed cams, muzzy lockup clutch and basket, capped the Kawi Kleen air system, and of course....My own custom air filters.

That fellar spun up 190 Hp at the tire on the dyno.... 3rd gear throttle wheelies were soo smooth!!!

It was a 2000 model... So no MPH limitations :yahoo: :yahoo: !!!

WW

 
Guys out of curiosity about how much opening area is needed into the airbox I decided to measure the filter opening in my 06 ZX-14. This bike makes considerably more HP than a FJR 1300. The ZX-14 has a filter area size that is 45.82 sq/inches. This is the actual filter area size which is the same as the opening into the airbox. With a filter in place this bike makes 192 RWHP on 91 octane pump gas. With no filter (same opening size into airbox) and using MR-11 oxygenated race fuel it makes 202 RWHP. This gives you some idea of the airbox opening size required to support considerably more HP than we are talking about making with the FJR-1300. From the looks of the pictures WW & Pickles have enough free opening area to easily support over 175 RWHP.
Jstewart,

Boy oh boy you sure know how to make me miss my Zx12R! I had the full akropovic race system, velocity stacks, power commander 3r, custom tuned map, degreed cams, muzzy lockup clutch and basket, capped the Kawi Kleen air system, and of course....My own custom air filters.

That fellar spun up 190 Hp at the tire on the dyno.... 3rd gear throttle wheelies were soo smooth!!!

It was a 2000 model... So no MPH limitations :yahoo: :yahoo: !!!

WW
Yes that does bring back memories. I had one of the first 2000 ZX-12's to hit the dealerships here. Saw my first ZX-12 at the Daytona dyno shootout in March. They were not available here yet but a Canadian dealer brought one to the shootout with less than 100 miles on it and put it up on the dyno. 167 RWHP was a big deal from a stock bike back then.

Most STOCK hyabusas were making from 148 to 154 RWHP. Don't know if the Canadian bike was a Kawasaki ringer or whether the Canadian models were less restricted but I never saw another completly stock USA spec ZX-12 roll those numbers on a dyno I trusted. Couldn't wait to get my hands on one after that Daytona dyno shootout. Mine made 158 to 159 HP compleatly stock. I think the ZX-12 was at least as responsive to tuning changes as the 14 is. Mine ended up as a 1270 Muzzy piston kitted bike with a mildly ported head and degreed stock cams and made 198 RWHP. I drag raced that bike so it was stretched 4 inches and lowered. Best MPH I saw was 154.5 MPH at Bowling Green KY. I haven't been able to better that MPH yet with my ZX-14, probably because I am older and fatter now with slower reaction times. I intend to put a younger much lighter rider on the bike this summer and just tune so I expect to see better times. Like you I also made my own K&N filters from a chevrolet truck filter since they were not available.

 
Back to the air box mods. I purchased a new air box for my 08 for $28.50 including tax. I then purchased 2 Yamaha air filters for a Warrior

part # 5PX-14461-00 $14.37 each. These are pleated panel filters. I removed the perforated metal screens from the outlet side of the filters

to reduce restriction. The opening sizes you need for these filters are 4-3/4' X 3-3/4". The inlet restriction should be reduced considerably.

The filter in the right side of the box was easy, just cut out the correct size hole and insert the flanged panel filter in. These filters have a

foam seal on the back side of the flange so they seal well to the air box. The filter on the right side can be pulled and changed easily from the

outside. The left side required trimming the opening and making a metal frame to hold the filter. The left side took quite a bit of cutting and

trimming to get it right but it fits perfectly. The metal plate frame for the left filter is sealed to the air box with silicone sealer. I am going to

let it set up for a day or so and then install the airbox. I have a bunch of other maintenance to do so it will probably next weekend before

I get to try out the new airbox. I expect the PC mapping will require some adjustment to compensate for the increased airflow. K&N makes

a replacement air filter for the warrior but I didn't want to spend $50.00 each for K&N's before finding out if this would work with the much

less expensive Yamaha filters. Frankly I doubt I will ever replace the Yamaha filters with K&N's. This was a cheap but time consuming mod that I

am very pleased with how it turned out

 
Back to the air box mods. I purchased a new air box for my 08 for $28.50 including tax. I then purchased 2 Yamaha air filters for a Warrior part # 5PX-14461-00 $14.37 each. These are pleated panel filters. I removed the perforated metal screens from the outlet side of the filters

to reduce restriction. The opening sizes you need for these filters are 4-3/4' X 3-3/4". The inlet restriction should be reduced considerably.

The filter in the right side of the box was easy, just cut out the correct size hole and insert the flanged panel filter in. These filters have a

foam seal on the back side of the flange so they seal well to the air box. The filter on the right side can be pulled and changed easily from the

outside. The left side required trimming the opening and making a metal frame to hold the filter. The left side took quite a bit of cutting and

trimming to get it right but it fits perfectly. The metal plate frame for the left filter is sealed to the air box with silicone sealer. I am going to

let it set up for a day or so and then install the airbox. I have a bunch of other maintenance to do so it will probably next weekend before

I get to try out the new airbox. I expect the PC mapping will require some adjustment to compensate for the increased airflow. K&N makes

a replacement air filter for the warrior but I didn't want to spend $50.00 each for K&N's before finding out if this would work with the much

less expensive Yamaha filters. Frankly I doubt I will ever replace the Yamaha filters with K&N's. This was a cheap but time consuming mod that I

am very pleased with how it turned out

Jstewart,

Got any pics of your setup? You are going to like the extra air.

You brought up a point about, regarding flat style OEM filters....

I recall my ZX12 having flat cartridge style OEM filters.

My Buddie reminded me that the ZX14 and his C14 both have these same style air filters.

I guess flat can't be too bad... Unless its on your woman...

But then, there is always the tail section!

Hahahahaha,

WW

 
Yes I do have some pictures WW, if I can figure out how to post them I will. I want to wait until I install the air box this weekend to get some installed pictures.

Because of the amount of flat area available these filters are about as big as you can get particularly on the left side. Actually the largest available flat area is

the back of the airbox and a flat panel filter could be mounted to the inside of the airbox through the left side. I will have to look at the area directly behind the

airbox when I get it off. If it is well enough protected I may mount a third filter the same size there. I do not think the opening sizes are as big for these

two filters as the flat filters you and pickles made and this is what will ultimately determine how much air they will flow. Three of these Yamaha filters would give

me about 54 sq/inches of airbox opening which is more than my ZX-14 has. The only disadvantage to the flattened K&N filters is having to clean them more often

and thats no big deal. You know this is all your fault. If you had not posted all that stuff about all the extra power you got from this easy mod I would have still

have been happily riding my stock FJR-1300 and confined my obsession with performance to my ZX-14 and the Harley. Now I am screwing around with all three bikes. :yahoo: :yahoo:

 
Last edited by a moderator:
Yes I do have some pictures WW, if I can figure out how to post them I will. I want to wait until I install the air box this weekend to get some installed pictures. Because of the amount of flat area available these filters are about as big as you can get particularly on the left side. Actually the largest available flat area is

the back of the airbox and a flat panel filter could be mounted to the inside of the airbox through the left side. I will have to look at the area directly behind the

airbox when I get it off. If it is well enough protected I may mount a third filter the same size there. I do not think the opening sizes are as big for these

two filters as the flat filters you and pickles made and this is what will ultimately determine how much air they will flow. Three of these Yamaha filters would give

me about 54 sq/inches of airbox opening which is more than my ZX-14 has. The only disadvantage to the flattened K&N filters is having to clean them more often

and thats no big deal. You know this is all your fault. If you had not posted all that stuff about all the extra power you got from this easy mod I would have still

have been happily riding my stock FJR-1300 and confined my obsession with performance to my ZX-14 and the Harley. Now I am screwing around with all three bikes. :yahoo: :yahoo:
Jstewart,

Hahahahahaha!! I know, I know... But when has super duper fast ever been fast enough for some?

Hence, Why you gotta be messing with a ZX14? B) Cause enough is never enough!!!

Glad to see you among the ranks of the admitted malcontent!!

Webby

 
Last edited by a moderator:
Well I pulled the airbox this evening. There is no room on the back side for a third filter. Pulling and replacing the airbox for modification is a big job

and I wouldn't reccomend it unless you have a decent set of tools, a service manual (not really a lot of use), are patient and have decent mechanical

skills. You need to remove the seat, the side covers, the fuel tank and the underseat tray and ECU before you can start on the air box. Disconnect the

air temp sensor, hose for the air injection if you haven't already eliminated it. loosen the four allen head clamps on the rubber adaptors on the throttle

bodys. The # 2 cylinder clamp will require a ball type allen as you cannot get a straight shot at it. Disconnect the hose into the top of the airbox. Pull

the airbox back and up and reach under it and disconnect the small rubber hose on the bottom (very difficult to reach if you have big hands like me).

Pull the airbox out. :clapping: Unless you are anal like me just make the flat panel filters like WW & pickles did which can be done with the airbox in

place.

 
Last edited by a moderator:
The # 2 cylinder clamp will require a ball type allen as you cannot get a straight shot at it.
If you remove the fuel rail first, this isn't a problem. I would recommend doing the air box mod along with an Audiovox cruise install; many of the same parts need to come off the bike for both.

Unless you are anlal like me just make the flat panel filters like WW & pickles did which can be done with the airbox in place.
I started off working on the air box in place on the bike. I wish I would've just spent the extra time and taken it off the bike at the beginning. I ended up needing to remove it from the bike anyway to finish up drilling holes to bolt the right-side filter on.

Ans where's the pictures?

 
Patience Pickles, I am not finished yet. Besides that I am as dumb as a box of rocks about posting pictures. I have taken

pictures of the the modified airbox with the filters installed. If I can't figure out how to post them I will request help when I am finished

with the airbox install. I will take more pictures after I reinstall the airbox. I am going as fast as my work schedule (very hectic) allows.

I am also installing a assesory power plug for the data logger, installing the striping kit I recently purchased, changing the oil & filter,

changing the rear diff fluid, lubing the drive shaft splines, balancing the throttle body vaccumn levels and changing and balancing both

tires all at the same time. In addition I am trying to get the ZX-14 ready to race this season. Working around my heavy work schedule

it may be sometime next week before I finish this project.

I didn't take the fuel rail off because I was pressed for time and it was easier to just use the ball type allen to get to the # 2 adaptor but I will

probably have to remove it to reinstall the airbox. Things are very tight to fit with the rail in place. Modifying the airbox for the panel filters I

used definately requires removing it or just buying a new one (really cheap at under $30.00) like I did. There was no way to precisely cut the

airbox in place to get these filters to fit. The left side required making a poster board template and then transferring that to a piece of metal

flatstock to make the filter frame. The left side of the airbox also required modification that could not be precisely done with it installed.

 
Last edited by a moderator:
The airbox is back on and I managed to do it without removing the fuel rail. It really wasn't much trouble. Everything started up and seems OK, but the weather here is just to bad to ride. I am going to start another thread and post the pictures when I am ready. I want to do some tuning which includes installing a new Dynojet wide band commander and LCD display for datalogging. I intend to also post pictures of this install and hopefully the data logs as the tuning progresses. I will start with the basic map for the FJR that Ryan Schnitz made last year. This map was made with the air box modified by opening up the right side into the stock filter. The new arrangement using the two Yamaha Warrior pleated filters has nearly twice the opening area into the airbox so I expect it will need more fuel. The data logger should tell the story.

One caution if you remove the airbox. There is a drain hose off the bottom front left side which must be disconnected to remove the airbox. This drain hose has a small filter in the hose. You need to either make sure you reinstall the hose (difficult to reach if you have big hands) and filter or plug the drain like I did with silicone or use a rubber cap. If you leave it off and don't plug the barb drain fitting the airbox will draw unfiltered air.

 
The airbox is back on and I managed to do it without removing the fuel rail. It really wasn't much trouble. Everything started up and seems OK, but the weather here is just to bad to ride. I am going to start another thread and post the pictures when I am ready. I want to do some tuning which includes installing a new Dynojet wide band commander and LCD display for datalogging. I intend to also post pictures of this install and hopefully the data logs as the tuning progresses. I will start with the basic map for the FJR that Ryan Schnitz made last year. This map was made with the air box modified by opening up the right side into the stock filter. The new arrangement using the two Yamaha Warrior pleated filters has nearly twice the opening area into the airbox so I expect it will need more fuel. The data logger should tell the story.
One caution if you remove the airbox. There is a drain hose off the bottom front left side which must be disconnected to remove the airbox. This drain hose has a small filter in the hose. You need to either make sure you reinstall the hose (difficult to reach if you have big hands) and filter or plug the drain like I did with silicone or use a rubber cap. If you leave it off and don't plug the barb drain fitting the airbox will draw unfiltered air.
Thanks for the update!!

Webby

 
:glare: I got the wideband commander and the LCD display installed after a few problems. Fuel moto sent the wrong cabling to connect all four of my Dynojet components.

I have a power commander, wide band commander, LCD display and a DJ quickshifter. Interfacing all four requires a special DJ cable # 7695-0025 which

is stocked by DJ but apparently not commonly used. All the DJ components work perfectly together if you have the correct information and cabeling.

When I started the bike after installing the new airbox setup the air fuel ratio at idle and in the 1000 to 4000 RPM range at 2, 5, 10 percent throttle was way

to rich (in the low 12/1 AF range). I had to remove a lot of fuel to get the bike to run at idle once it warmed up (-20%). This was using the same custom base map

I had run with the other modified stock air box setup. I went on a 300 miler yesterday and the lower throttle position settings at 1000 to 4000 RPM are still not right.

I am beginning to suspect something else is wrong like I reassembled something wrong or left a connector unplugged. I hate to take the damn airbox back off to

inspect everything but thats what I am going to have to do when I get time. Today I have to do grandkid stuff.

 
So my question is why open both sides and not just one large hole along the back? I would think you could even find a rectangular K&N to fit. Then it would just be using some C-channel rivited and siliconed on to make a mounting sleeve that the filter slides in.

Then you would have a nice straight shot to the intake tubes instead of turbulent air mixing from opposite sides.

 
Don't have to even try and think back on Fluid Dynamics courses for these tidbits of knowledge:

The primary purpose for pleating of filters IS to reduce air restriction by increasing surface area.

Air travels through AIR substantially better than through a filter. When needed 100% of the OEM filter is available to be used.

That being said, I have no idea how much air the FJR needs and how much the design engineers oversized the filter. If the mod works well for you, enjoy it. To me it seems like an awful lot of work for very little gain. But then again, I don't race my FJR! :rolleyes:

 
Don't have to even try and think back on Fluid Dynamics courses for these tidbits of knowledge:The primary purpose for pleating of filters IS to reduce air restriction by increasing surface area.

Air travels through AIR substantially better than through a filter. When needed 100% of the OEM filter is available to be used.
I don't think it's that simple. To understand it better, take it to the extreme. Fold all those pleats sharply so they are nearly stacked right on each other. You now have TONs of surface area on your filter, but the air must either travel through substantially more filter material, or make some ridiculously sharp turns (not likely) to travel perpendicular to the material.

I'm still convinced that the primary purpose of the pleating is longer service intervals (junk collects in the troughs, leaving the peaks clear for airflow) and for strength. I'm willing to clean my air filter every oil change if necessary (Wicked Webby's experience is that it is not necessary), and strength doesn't seem to be an issue.

That being said, I have no idea how much air the FJR needs and how much the design engineers oversized the filter. If the mod works well for you, enjoy it. To me it seems like an awful lot of work for very little gain. But then again, I don't race my FJR! :rolleyes:
Very little gain? It's more gain to peak HP than a set of slip-on's for only about $25 and a day of work. More impressive is the gain in torque in the mid-range (looks to be about 12% gain) that no other mod will give you. That's right in the cruising-on-the-freeway-in-5th-gear range. You don't need to race to find that useful.

FJR1300DYNORuns.jpg


I don't think it's that simple.
I'm not going to belabor the point but... It IS that simple. Service life and strength are factors but flow restriction is the PRIMARY purpose. Yes there is a practical limit to how close the pleats are to each other but it is pretty close. Remember the 'path of least resistance' saying. Air through air is your least resistance, by a ginormous factor. The pressure differential between the inside and the outside of the filter is, for all practical purposes, identical all the way into the peaks of the pleats. Perpendicular through the filter is the least resistant path through the filter. Air does not have a turning radius. As air is pulled perpendicularly through the filter material it replaces air heading to combustion on the inside and is instantaneously replaced on the outside.

You asked for info from someone educated in the field. Now you have it. :)

Very little gain?
Sorry! Let me restate my opinion... Very little PRACTICAL gain. I don't dispute the improvements that are made but I'm more than satisfied with the stock power and torque. The performance gain is of "very little" practical use to me. I'd rather spend my limited free time on comfort and convenience mods. But that's just me! B)

Again, I don't dispute the performance improvements that are achieved nor wither or not the flattened filter will be sufficient. I applaud those that do this type of thing for their ingenuity and resourcefulness. :clapping: Enjoy and ride safe!

 
For those that wondered if my experiment with using two Yamaha Warrior pleated filters worked I don't know yet. I tried a whole bunch of stuff at the same time and immediately had problems. I installed the two Yamaha Warrior filters in a new airbox at the same time I purchased and installed a Dynojet wide band commander and a LCD display. Well all the software between the power commander, the wide band commander and the LCD display didn't want to play nicely with one another. Turns out my power commander software which is not a year old cannot be updated to the latest version (a warranty problem with my power commander). It took me nearly a month to figure this out because of constantly being out of town on business. The power commander ran extremly rich when interfaced with the wide band commander and LCD. I had to subtract a huge amount of fuel to get the bike to run reasonably well. I didn't know if this was a function of the changed airbox or something else for a while. At any rate after working with Jamie at Fuel Moto he determined it was a power commander problem and it is going back to Fuel Moto tomorrow for new software or complete replacement under warranty.

John

 
For those that wondered if my experiment with using two Yamaha Warrior pleated filters worked I don't know yet. I tried a whole bunch of stuff at the same time and immediately had problems. I installed the two Yamaha Warrior filters in a new airbox at the same time I purchased and installed a Dynojet wide band commander and a LCD display. Well all the software between the power commander, the wide band commander and the LCD display didn't want to play nicely with one another. Turns out my power commander software which is not a year old cannot be updated to the latest version (a warranty problem with my power commander). It took me nearly a month to figure this out because of constantly being out of town on business. The power commander ran extremly rich when interfaced with the wide band commander and LCD. I had to subtract a huge amount of fuel to get the bike to run reasonably well. I didn't know if this was a function of the changed airbox or something else for a while. At any rate after working with Jamie at Fuel Moto he determined it was a power commander problem and it is going back to Fuel Moto tomorrow for new software or complete replacement under warranty.
John
John,

Sorry to hear about the pain in the ass you've had with your PWC setup. Looking forward to hearing how your setup works out.

Also, seeing how you got them panel filters to work with your air box.

Ride safe,

WW

 
Top