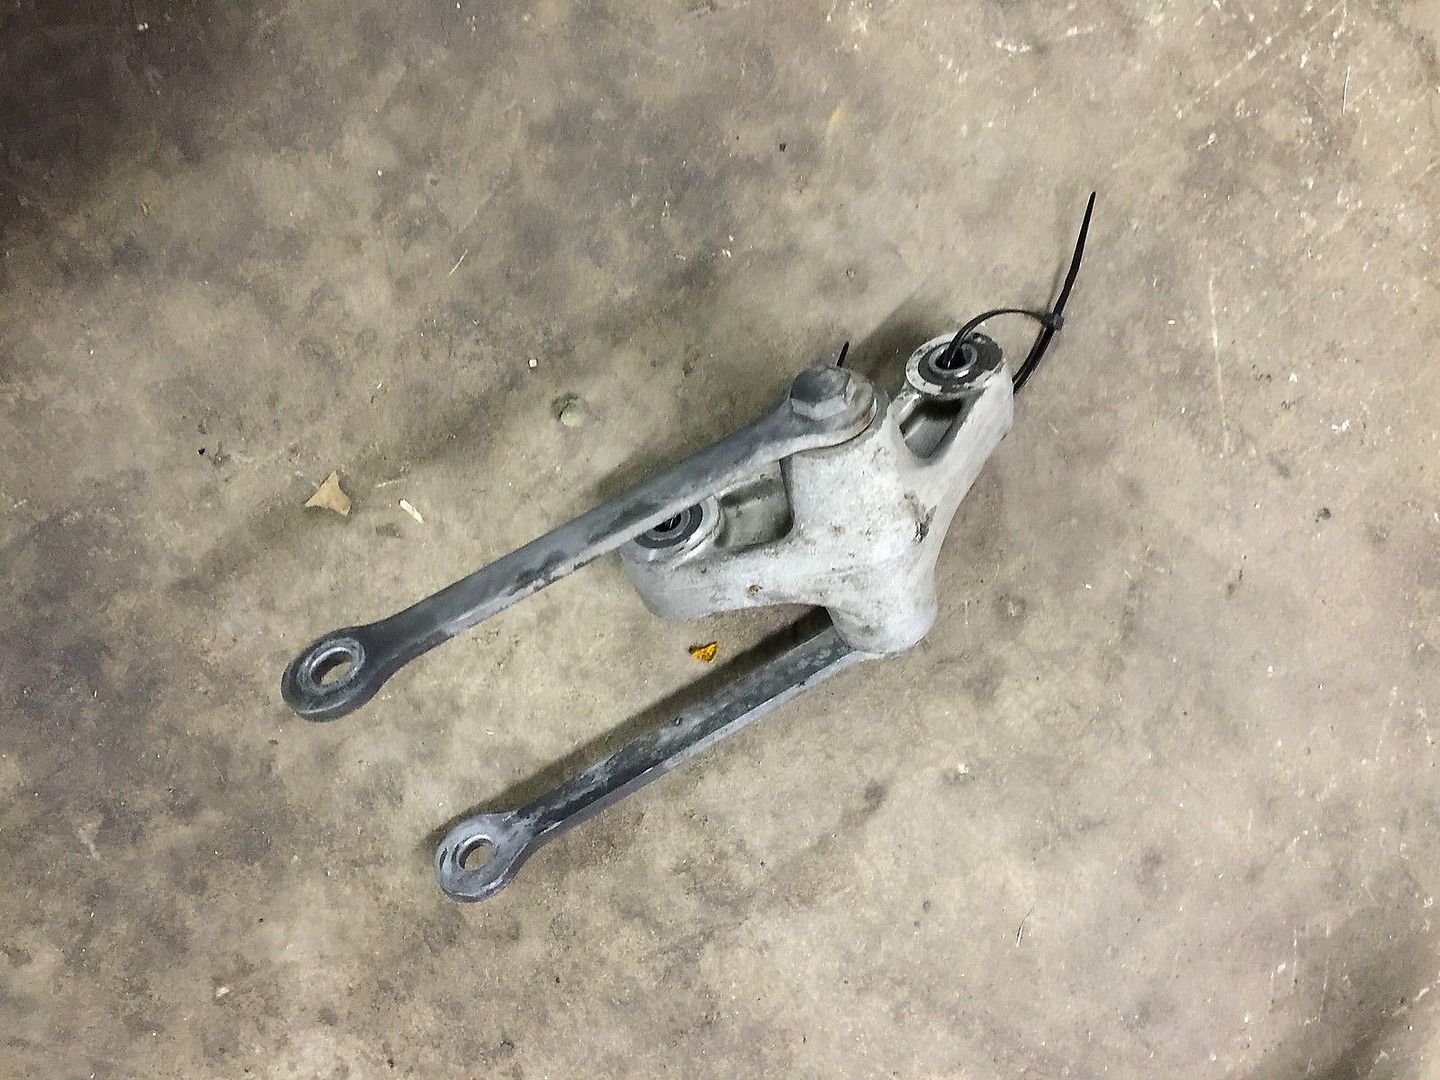
Broken Penske Clevis.

Yamaha FJR Motorcycle Forum

Help Support Yamaha FJR Motorcycle Forum:

This site may earn a commission from merchant affiliate links, including eBay, Amazon, and others.
That said - I removed the nut and the clevis opened up 1.4mm !!!!
IMG_3998_zps0tthm5j9.jpg
That is not good!

I would be looking for a 1.5mm shim to fit in the 'gap' on the left, sized as Fred has said (inside diameter to fit over the bolt, outside diameter to match the bearing/spacer).

The shim should be able to slide through with the bolt from the LH side.

 
Wouldn't a shim/washer bind against the linkage? Seems to me that the real solution is to take out the spacer and get another one machined that is 1.5mm longer. There shouldn't be contact between the linkage and the clevis, IMO.

 
Wouldn't a shim/washer bind against the linkage? Seems to me that the real solution is to take out the spacer and get another one machined that is 1.5mm longer. There shouldn't be contact between the linkage and the clevis, IMO.
Not if it's the same (or smaller) diameter as the 'spacer'............

 
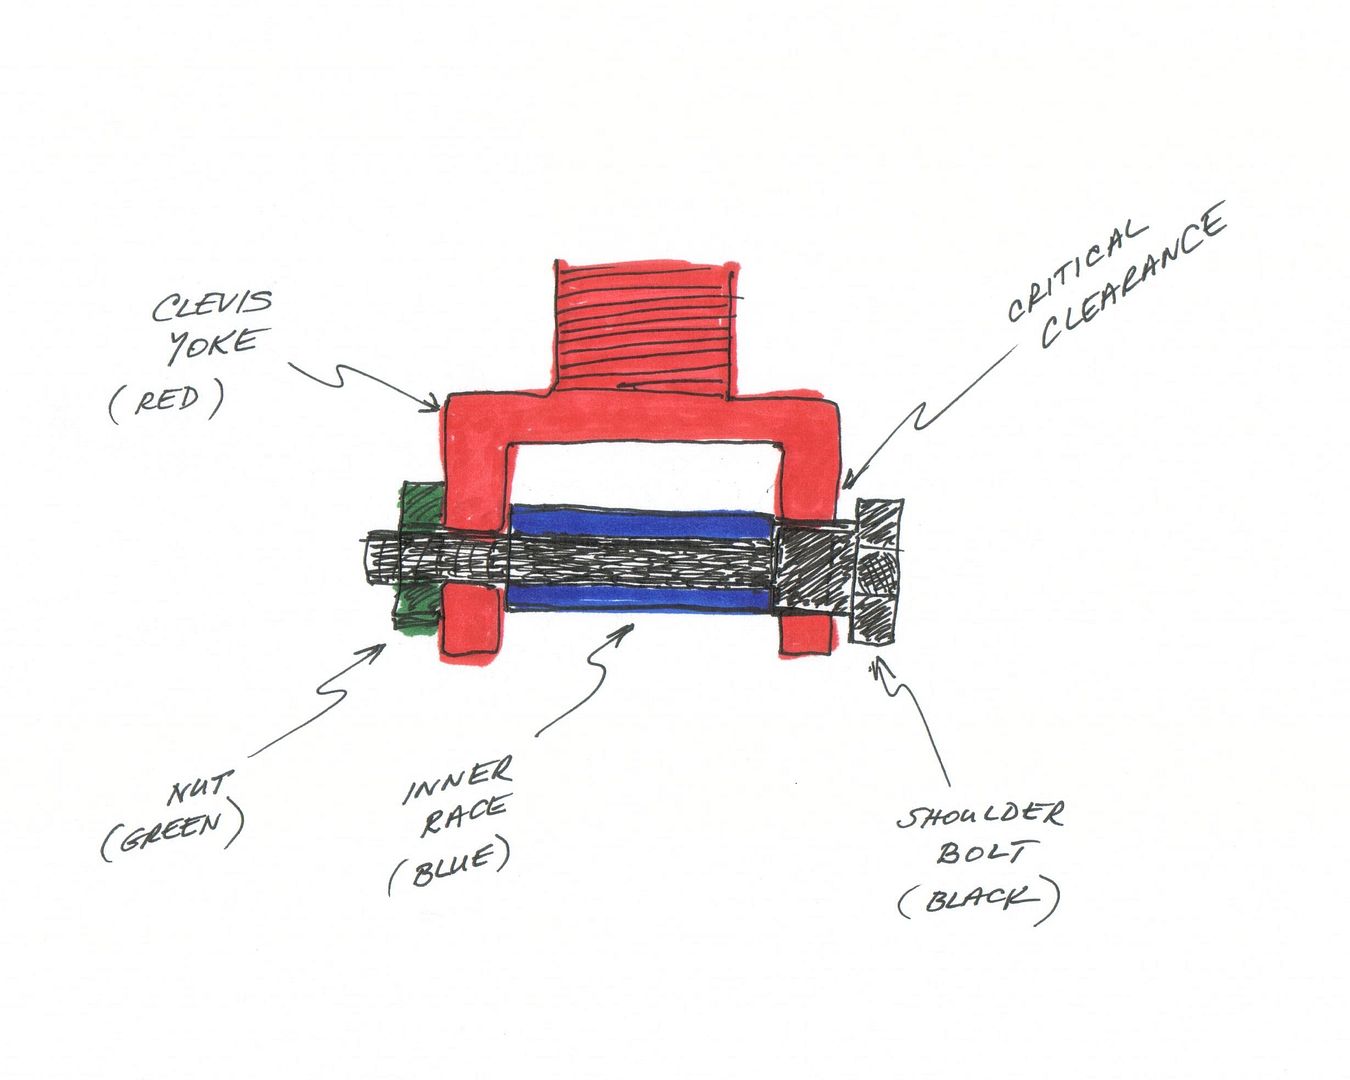
Here's 1000 words worth of cross sectional diagram on this clevis

Penske%20Clevis.jpg


If the head of the bolt doesn't have the clearance shown abopve it will squeeze the two sides of the clevis yoke together, and the part will (eventually) fail. The guys that were incorrectly using the Wilbers bolts did not have a shoulder at all, so those bolts were really pinching the sides of the clevis yoke together, as eflyguy's was. The length of the inner race and shoulder of the bolt needs to be long enough to maintain some amount of that critical clearance.

If you were going to install a shim is would be between the blue inner race and the black shoulder bolt and would need to be the same (or smaller) outside diameter as those two parts are. Note that the shoulder bolt may be a slightly smaller diameter than the shoulder is as the inner race is not supposed to fit through the large hole of the Clevis yoke.

 
Last edited by a moderator:
My reasoning for the washer idea and hesitation is this....... any washer on the right side (in my picture) pushes the pivot spacer left, so how much washer?
No, I would not add any shim (that's what it would be technically, not a washer) on the right side of your photo. I would put it on the left side, between the shoulder of the bolt and the inner bearing race.

It's OD would have to be equal to or smaller than the OD of the inner race and bolt shoulder. The bearing race would still be in the original, correct position as it butts into the clevis yoke on the small hole side, and the bolt's head would be spaced further away from hitting the yoke and putting any pressure on it, which there should be none of.
I would agree left side is better if the shim is same diameter as the pivot spacer and the bolt shoulder, which are also the same 16mm. That diameter will allow it (if it has to be thicker) to protrude into the larger hole of the clevis and become part of the bearing surface (i.e., maintain the full bearing surface in the softer metal).... a few thou wouldn't matter on a shim of smaller diameter, but better to have a full bearing surface. Maybe overthinking it, but if it had to be thick, I'd look for a properly machined spacer instead of a shim. Need thickness of clevis leg vs. bolt shoulder plus gap to spacer as in elflyguy's case.

OTOH, in flflyguy's case a 12 mm ID shim of much larger OD would work as long as it filled the gap as in a slide fit into the clevis. It would matter less what the bolt shoulder is, because it couldn't squeeze the clevis.

BTW, that's a MUCH better looking clevis.

 
Last edited by a moderator:
Some more information for you Giant tech heads to wrap your mind around. I just got off the phone with Penske. Was having a hard time getting the bike to "feel" the same before I started this process. Asked them about the baseline settings and where to start with the adjustments. Been watching youtube all day learning about Hiw to set up a bike suspension. So obviously I messed with some settings. I would tinker, go out for a test ride, then come back and tinker again. Same route each time. It is about 13 miles round the loop. One section in particular is so horrible that I usually ride in the opposite lane because they fixed that a few years ago. The regular lane is busted/uneven concrete with heaves in the joints they have tried to fix. Basically it mimics cobblestone.

While on that section, I noticed the suspension getting progressively worse through the 4 mile stretch. It was okay at the begin, but by the end it was horrible. Long story short, my rebound on the shock is letting out too slowly to account for the massive repeating bumps. The shock is packing up and becoming fully compressed. So I dialed out some more and the problem was slightly better but not fixed all the way. Through conversations with Penske, and some testing of different settings, then riding and reporting back to him at Penske, we(he) figured out that my shock is not flowing oil fast enough to allow a proper return before the next bump happens.

One more diagnostic test in the garage indicated the problem. As I sat on the bike with my kid holding it up. I slammed my butt down on the seat and compr saws the rear shock. I quickly set it in the kickstand and you could feel and see the shock uncompressing in stages.

So as soon as the trip to SFO is over, I need a service done. We thought that the compacting of the shock in combination of the highway speed expansion joint may have caused the broken clevis. The Penske guy also said that sometime the valves get junk or debris in them. My shock prob has the o-rings that have broken down. A new type is now being used to alleviate that according to Penske.

So maybe it was not the clamping problem all along. Have fun TECH heads. Thanks again for all the advice. I will check back later to see what you all say. I truly am in awe of your technological expertise. Anyone know a good shock rebuilder close to me. If not, George check your inbox soon!!

 
Last edited by a moderator:
Your description almost sounds like a bent piston rod or whatever it's called. The uneven "sticky" release of rebound is not normal, even in an improperly adjusted shock.

 
Tom, I think there is debris in the shock valves. It reacts perfectly when I bounce on it but the fluid cannot move through the tiny spaces unless the rebound dampening is all the way open. It could be a bent rod but the shock moves freely when the least amount of compression compression and rebounding is set. So that makes me think it shouldn't be a bent rod. But then again I certainly know way less than nearly everyone regarding mechanical things.......and women, and math, and well u get what I am saying.

 
Your description almost sounds like a bent piston rod or whatever it's called. The uneven "sticky" release of rebound is not normal, even in an improperly adjusted shock.

Oh wait! With this line it could be related to the failing relay arm bushing issue I confessed to. That's a sticky issue that prematurely blows shocks. Maybe it breaks clevises too.

OP, have YOU checked all your bearings?
 
Last edited by a moderator:
Good idea, Iggy. I wonder if the relay arm is dry (or bad bearings) and, with the right combination of shock amplitude and frequency, gets in a bind?

I looked at mine (gen III) and don't see a grease fitting.

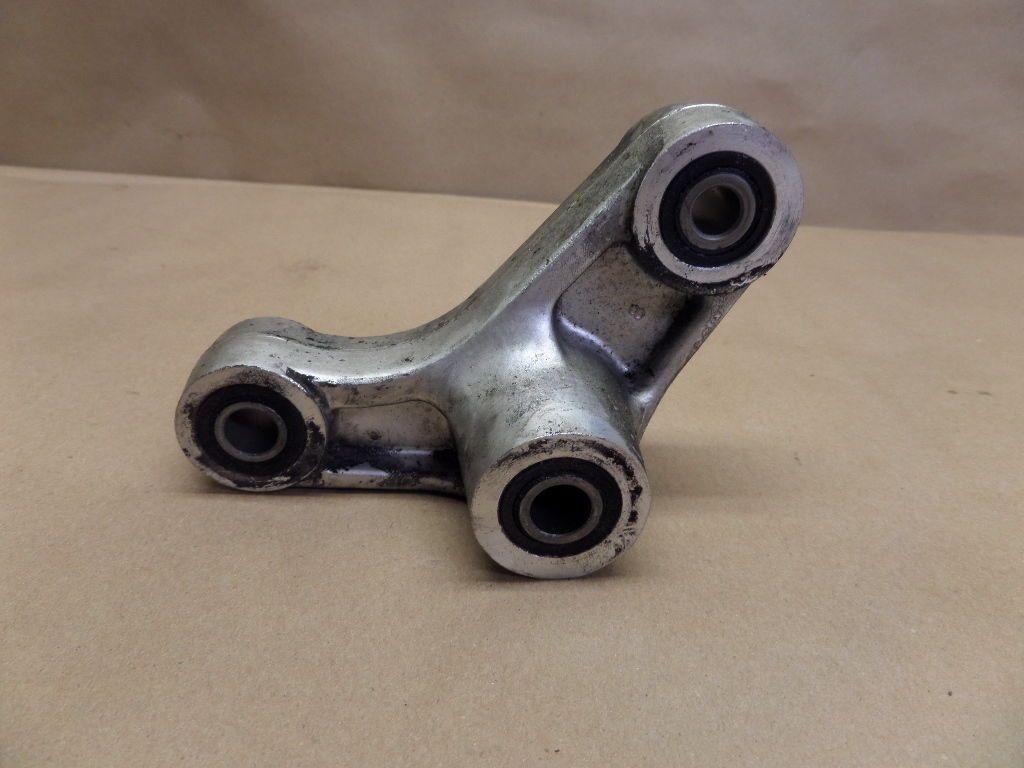
What type of bearing is in that relay arm? I would suspect a sealed roller bearing, but in the image, taken from one for sale on Ebay, it looks like it's not bearings at all, but just rubber bushing with a metal liner. If so, that could be easily lubricated - no?

s-l1600_zpsmzjqityq.jpg


s-l1600-2_zpspplav9bm.jpg


Last edited by a moderator:
^^^

Pants, there is a metal collar and needle bearings inside. You are seeing bearing seals in the pic, not rubber bushings.

 
Hmmm - well, it was a thought. In outboard motors, I've prolonged the grenading of sealed roller bearings buy gently prying the seal up, and using a grease syringe to insert a little grease into the bearing. I don't see that solution in this application.

Well Josh - you can pick one up from ebay for about $30.00. Overnight shipping would be pricey, I'm sure. You have no idea if the one you are buying is in better shape, but chances are, it won't have 70,000 miles on it.


Now turning to safety - If Josh's problem is these bearings, and one disintegrates while he's on the road at SFO, will he fall? I don't think so, but I can find plenty of things to second guess myself.

Edit - addressed above

Well - it kind of reads like we've beat this dead horse to death. Ride on, my bro. I'll see ya this week!!!!

 
Last edited by a moderator:
Pants, to service the relay arm, one pushes out the bushing spacers, pack with grease, reassemble...... unless you find rust, etc. you have to clean up, or in bad cases, new parts. The rubber bits you see are grease seals.

There have been various threads in the past on how to remove centerstand, etc. to get the whole job done.

 
Last edited by a moderator:
Oh crap. 90K miles with the original shock, no service to the entire undercarriage. Pulled apart and greased the sidestand twice. I have my third air filter sitting on my work bench waiting to be installed. Replaced a brake pad here or there( I can't remember which). Replaced the coolant once myself and by the dealer once because he had to drain it to do some sort of service. Bled the brakes only because the dealer insisted I would die if I didn't. Replaced the fork springs and oil for the same reason.

How exactly do you spell ANAL RETENTIVE?!

Ride more, worry less anyone?

JSNS

 
The clevis on my FJR was replaced in May. I was not aware of this thread until last Saturday. Nice thread.

I spoke with Eric Trinkley at Penske today. He is very helpful and supportive. I approached this wanting to avoid a second broken clevis. I was looking to clarify two things. Does Penske have a special bolt (answer no) and what is the recommended torque value.

Eric and I discussed the following points.

1. Does Penske have a special bolt? No use the stock bolt.

2. What is the recommend torque value for the bolt using their aluminum clevis. The FSM recommendation is for a stock steel clevis and bolt configuration. Eric recommended the FSM torque value.

3. Yamaha stock bolt is too short as two threads do not protrude the nut when tightened. This can lead to over torquing. Furthermore the Yamaha stock nut locking feature is at the end of the nut. I am going to look for a a nut with a nylon locking. Generally the lock feature of nylon lock nut engages sooner than the lock feature of the factory nut. Hopefully I can find one and add some blue locktite.

4. When the bolt is fully inserted the bolt's minor machined diameter engages 0.125" into the clevis's small diameter. This leaves about 0.175" of unsupported space in the clevis' small diameter. (the width of the clevis is 0.300"). This means only 41% of the machined surface of the bolt is engaged into the clevis' small diameter.
5. The small radius at the bottom of the threaded boss provides a stress concentration leading to fatigue failure. See post 71 on page 4 on the Forum. Kudo's to those on the forum who noted this; TomInPa, Guarald and others.
6. Eric confirmed the shock bushing is the only feature preventing bending of the clevis during tightening. The bushing tolerance out of Penske's control.

Eric confirmed the design could be improved. It is the only design where Penske has experienced failures. If more of these are brought Eric's attention would help get traction for a updated design.

From TomInPa's post. Here is Eric contact info.

Eric Trinkley

Motorcycle Department

Penske Racing Shocks

Custom Axis Shocks

150 Franklin Street

Reading, PA 19602

United States

Office: 610.375.6180

Fax: 610.375.6190

www.penskeshocks.com

www.customaxisshocks.com

 
Last edited by a moderator:
Sounds like they could use a little design modification. Here we are thinking that we were making mistakes on the install and it is at least partly due to their inadequate design.

Yeah, you can ignore minor stuff like this and other routine maintenance stuff and get away with it for a long time. But when it bites you in the ass when you're on the road in east BFE, it can be a major PITA. You buy your ticket and you take your chances.

 
Last edited by a moderator:
...3. Yamaha stock bolt is too short as two threads do not protrude the nut when tightened. This can lead to over torquing. Furthermore the Yamaha stock nut locking feature is at the end of the nut. I am going to look for a a nut with a nylon locking. Generally the lock feature of nylon lock nut engages sooner than the lock feature of the factory nut. Hopefully I can find one and add some blue locktite.

...
I would not suggest using Loctite on a Nylock nut. It should not be needed and the Loctite might interact with the plastic - I know it will embrittle ABS plastic and some other polymers. Even if it didn't degrade the nylon, I don't think it would stick well anyway.

Otherwise, good information from Penske!

 
Last edited by a moderator:
Sounds like they could use a little design modification. Here we are thinking that we were making mistakes on the install and it is at least partly due to their inadequate design.
Yeah, you can ignore minor stuff like this and other routine maintenance stuff and get away with it for a long time. But when it bites you in the ass when you're on the road in east BFE, it can be a major PITA. You buy your ticket and you take your chances.
And, when something like corrosion in the brake/clutch system hits you due to water absorption, it will tap your wallet for a hell of a lot more than a bottle of brake fluid and 15 minutes of your time.


Latest posts

Top