Install location for Nautilus horn

Yamaha FJR Motorcycle Forum

Help Support Yamaha FJR Motorcycle Forum:

This site may earn a commission from merchant affiliate links, including eBay, Amazon, and others.
Sorry I'm late to the party. Was traveling for the last couple of weeks. Everything work out okay with the installs???

 
Worked great Mogan, thanx for your help and pic's they were referred to and used. I hope to post some pic's on my install w/in the next few days.

 
Worked great Mogan, thanx for your help and pic's they were referred to and used. I hope to post some pic's on my install w/in the next few days.
Wrong post / Ignore

 
Last edited by a moderator:
I might just supply all the parts needed, and give instructions on how to modify the two pieces. MUCH easier that way.
Hi, RandyI'm very much interested in how your Compact Nautilus install project is progressing. Your idea of splitting the compressor and horns to minimize installation space is pretty neat. Do you have any pictures you can share with us?

Cheers...

(And as far as making a profit on any parts/installation kit, it is a mere pricing exercise. ;) )

 
I haven't had a chance to get to the install yet, since I took advantage of the nice weather and rode instead.

I promise I'll document the install with pics so others can modify theirs the same way. I decided not to make up a whole kit to sell. Just not worth it. I WILL, however, be happy to make the custom wiring harness for my type of install once I get the measurements from mine.

 
Ok I got the pic's from my nautilus install project along w/a couple other farkle install pic's. I'll try and get them over to a host site and transferred over here to this thread maybe as soon as tomorrow. ;)

 
Ok, I am probably going to have to put this together in a couple posts. I am at work so I can only do this when time allows. The pic's start already into the installation process. Both the right and left lower fairings have already been removed at this point. My choice of install locations was on the original left lower existing factory mount bracket, (left as if sitting on the bike) under the glove box.

The first pic is a close up of the right upper fairing (right as if sitting on the bike). Under this right upper black cowel sits the battery. You can see the positive battery (red) post connector cover at the bottom of the pic. Just over the top of the red cover you will see the Bostch relay (this came w/FJRandy's wiring harness) I mounted the relay using the existing bolt in the upper fairing frame. I had to put a washer behind the bolt to fill in a small gap. There appear to be numerous locations to mount this relay out of the way inside this fairing, you could even use a zip tie if you wanted. This place just looked neat and clean to me so I chose to attach it there.

The long red positive unconnected power cord is the other end of FJRandy's harness. I left it hanging there until after I got everything else finished before the final connect. As you might imagine there is a negative lead as well but it's just not seen in this pic. From here I ran the harness back behind the dash (behind the windscreen motor) in the picture, out and down the left side. I ran the harness through the dash before I made any permenant connections of any kind.

The one thing I did not show is a connect FJRandy has built into his harness. This connect will plug into the old (in my case-right horn--that you will remove--since you no longer need) the positive and negative connects from the old horn plug in will connect to the new FJRandy harness. This is necessary to enter the existing electrical loom.

63828524-M1.jpg


Ok I have edited here. I did not realize the pic below showed the connects to "enter the electrical loom", but they are there. If you look just behind the negative disconnected battery post you will see them, they have pink insulators (just in front of the right front fork) they aren't connected to anything in this pic. These are the connects you attach to the power supply that leads to the right horn. Just unplug the right horn--you will see it below the battery my 04 had a pink/purple wire and a brown wire. I connected FJRandys red wire to the pink/purple and the black to the brown. Then I just took off the right horn--it was no longer connected to anything.

63828519-M1.jpg


Ok here is the other end of FJRandy's harness. This is the end where I made the connection to the new Nautilus horn. You can see the stock horn is removed and the factory mount bracket. Inside that bracket is a rubber bushing. It is sufficient for the stock horn as they are much lighter in weight. It is insufficient for the Nautilus. I re-enforced by installing a washer (fit to size of the bushing) both on the inside and outside of the bushing. It made a dramatic difference!!!!!!! You may have to bend the stock bracket by pushing in or pulling out, to custom fit your horn.

63828515-M1.jpg


Here is the side view of the new horn, it is mounted vertical---I do not have a superbrace so vertical mount worked fine for me. This pic also does not show the washers I put inside and outside of the bracket bushing. I took the horn off after this pic and installed the washers. I wanted to show this side view because the mount bolt that comes w/the horn is too long. I had to grind the bolt down to shorten the length. I actually took the horn off after this pic and shortened to bolt even more than what is shown in this pic.

63828527-M1.jpg


Here is another view more from the front of the horn.

63828533-M1.jpg


The next two pic's show the inside left lower fairing cowel. I had to use a dremmel tool to cut out the area shown in order to allow room for the larger horn. Now this was about the hardest and most time consuming part of the whole process. Cut a little and re-install--check and mark and re-cut a little more and re-install--check and mark and re-cut----anyway you get the idea what it takes to get a custom fit w/this plastic. I bet I did this a dozen times until I got it just right.

63828540-M1.jpg


63828554-M1.jpg


Ok, here you can see my old, fat, curly gray headed ass putting all this back together. Once I got the horn hooked up I made all my connections and did a test :eek: :eek: man that's a loud ass horn!!!!!!!!! I tightened up the battery post connections and began made double sure everything I worked on was tight and checked them a second and third time and then started putting the plastic back on.

63828560-M1.jpg


Here is the last pic of the horn installed w/the lower fairing and cowel in place. The pic of course is taken from the front.

63828599-M1.jpg


The rest of these are just fun pic's. I also installed that same day w/help of my neighbor, Tray, a set of Moko GSG sliders, passenger leg extenders and muffler guards both from Wildhair, BMW sport grips, vista cruise and heli risers. So here are the sliders:

63828593-M1.jpg


Last edited by a moderator:
Next fun farkles are the muffler guards and passenger extenders from Wildhair:

63828574-M1.jpg


63828568-M1.jpg


next are the BMW sport grips and the vista cruise:

63828577-M1.jpg


63828582-M1.jpg


63828590-M1.jpg


This last pic is my baby all farkled up and happy and purring like a kitten:

63828602-M1.jpg


I hope these pic's help anyone who might consider adding this farkle. It's prolly one of the best safety features you can add. I also hope admn will give me a free future pass ;) 
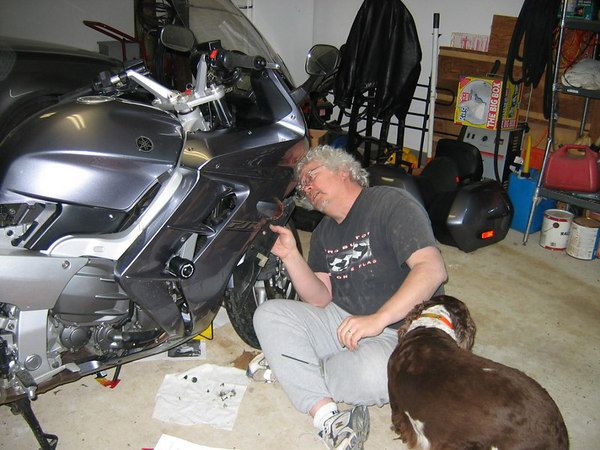
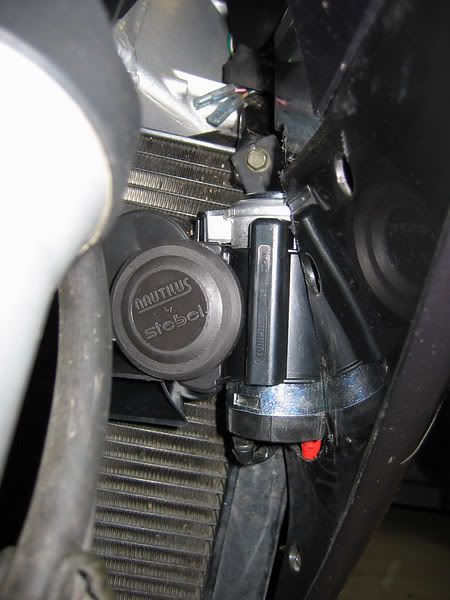
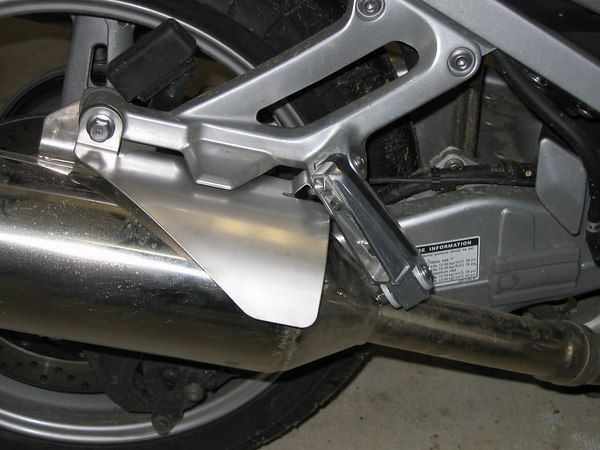
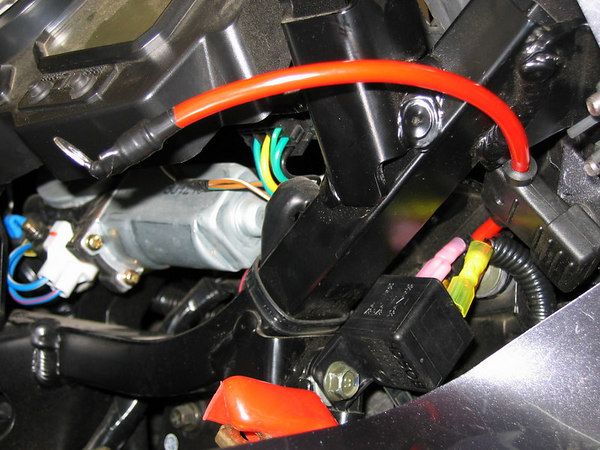
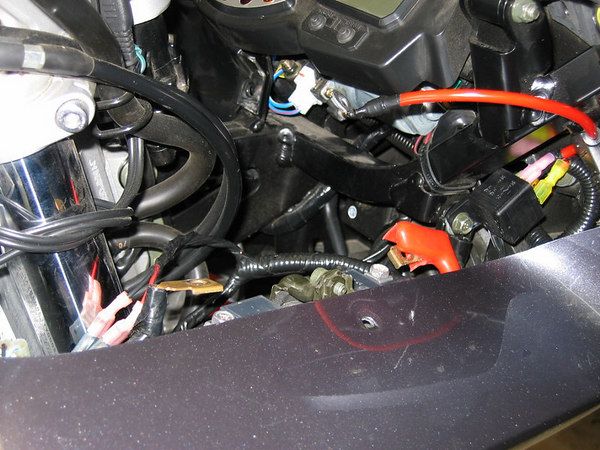
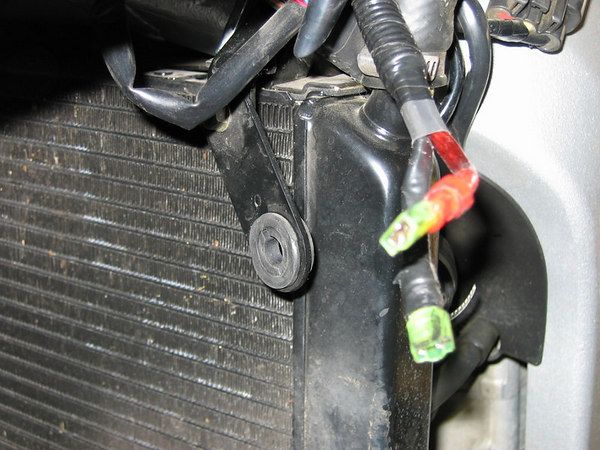
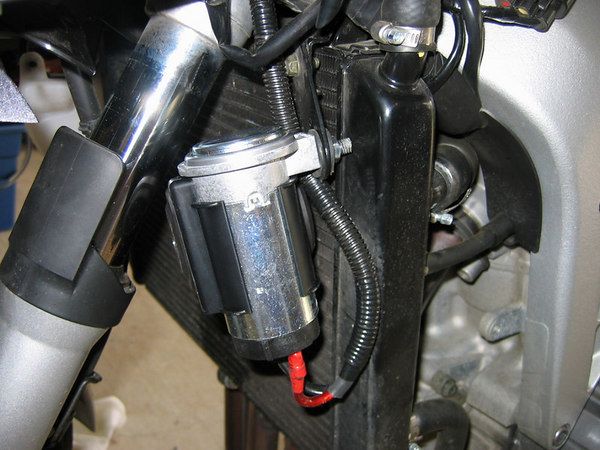
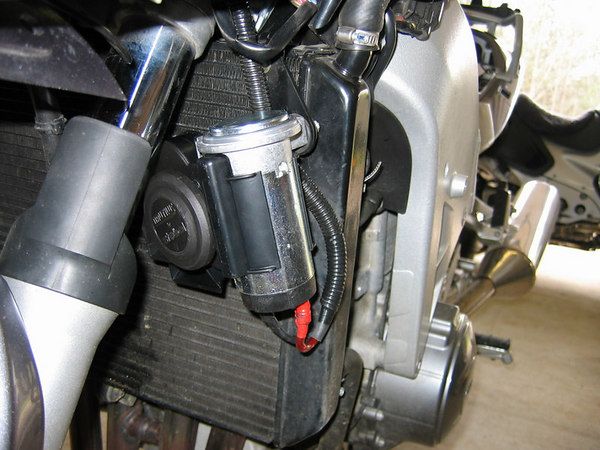
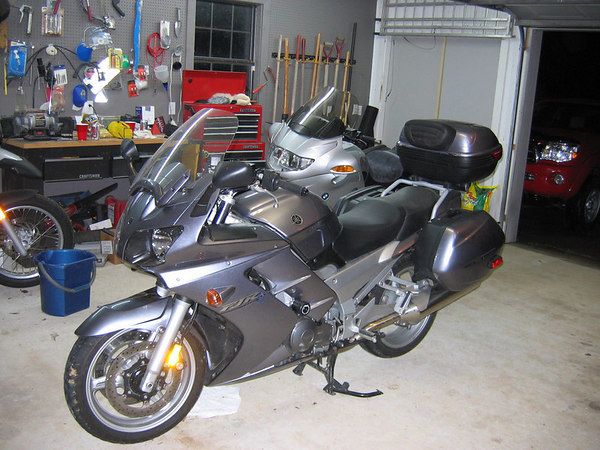
This was not a difficult process but it did take all day.

 
:D For those of you without ABS: The compressor portion of the Stebel horn will fit great right under the tool box. There is even a hole in the bracket located there that will take the bolt for the compressor without mods. Then you just need to route a hose to where the horn portion is mounted. Randy will have to make a longer harness, if he ever stops riding all weekend.

I mounted the horn just foward of my right foot on the right side of the bike. Yes Randy, I blew the hair off of my right leg. Good to see you last weekend bud ;)

BobJ

 
Excellent writeup and pics, donalb! Thanks for the cheap plug. ;)

Yes, Bob and I rode together last weekend, and I took mental notes on his horn install. Mine is a different approach, just to make the compact Nautilus fit WITH PLENTY OF ROOM in the factory horn location. I've already set up the two pieces. I just haven't gotten around to making custom brackets to mount the compressor on the right fact horn mount and the horn on the left fact horn mount.

This setup solves two issues.

1.....wire length. The distance from the battery to the comp is about 12" if you're lucky.

2.....air line length. The air line that has to be added when the two pieces are separated is approx. 16". This allows the horn to still fire almost instantly, as opposed to a short delay when a longer hose is used.

If I can get away from installing these damn backup cameras on customers' cages, I'll get on the horn project.

BTW......I WILL be doing a dB test on the Magnum Blasters already installed, and the compact Nautilus after it's installed. My ears can't tell a difference in volume between the ones I've heard already. And it won't be at 4" either! Ridiculous how they would advertise a 4" reading. I'll be taking a measurement at 10', a little more realistic.

 
Last edited by a moderator:
Did Randy ever come up with a kit for installing the Stebel Nautilus Compact by separating the compressor? I see this thread was active last spring. Did it move somewhere else?

 
Nice Rumble - I bought a wiring harness from Randy for that install. Even though I've had it for a couple of months, it's still waiting for me to get off my butt and do it. The harness is a first class piece of work - no kidding! All I have to do is connect it to the battery and then plug in a couple of wires and that's it. I bought the Nautilus Compact air horn. To install it's easy to separate the compressor from the horn - you literally just pull it apart (have to pull up on a plastic retaining tab). Connect the two over the radiator with fuel line connecting to the horn parts with fuel line hose clamps. You do need to fabricate mounting brackets and cut the interior black plastic parts to get the pieces to fit up and away so you don't whack them with the forks. As I said, I'm must waiting for lousy weather so I don't feel guilty wrenching instead of riding.

Try searching to find the link for this install - I have it saved as a favorite on my home computer and will be happy to post it tonight.

in fact, here it is: Randy Compact

 
Last edited by a moderator:
Nice Rumble - I bought a wiring harness from Randy for that install. Even though I've had it for a couple of months, it's still waiting for me to get off my butt and do it. The harness is a first class piece of work - no kidding! All I have to do is connect it to the battery and then plug in a couple of wires and that's it. I bought the Nautilus Compact air horn. To install it's easy to separate the compressor from the horn - you literally just pull it apart (have to pull up on a plastic retaining tab). Connect the two over the radiator with fuel line connecting to the horn parts with fuel line hose clamps. You do need to fabricate mounting brackets and cut the interior black plastic parts to get the pieces to fit up and away so you don't whack them with the forks. As I said, I'm must waiting for lousy weather so I don't feel guilty wrenching instead of riding.
Try searching to find the link for this install - I have it saved as a favorite on my home computer and will be happy to post it tonight.

in fact, here it is: Randy Compact
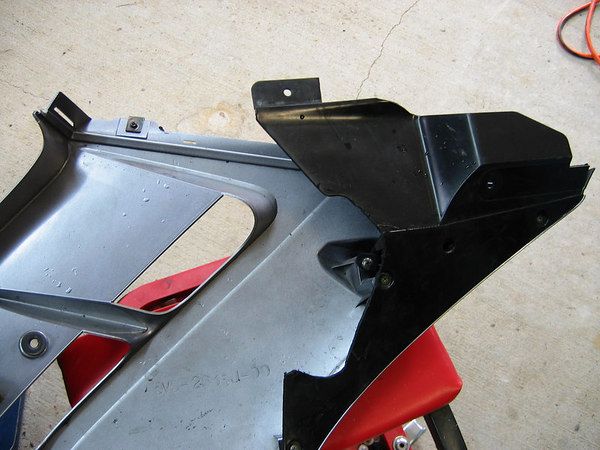
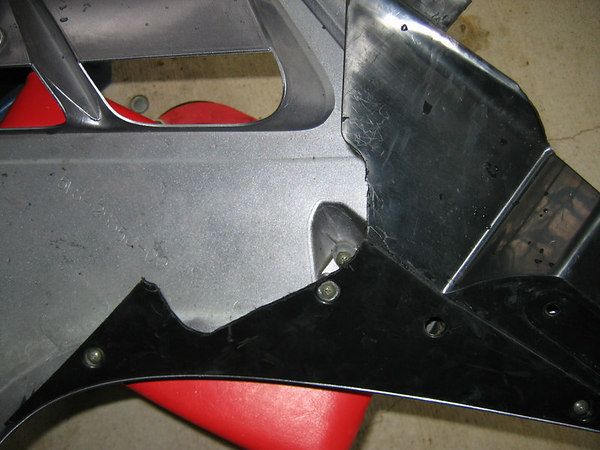
I saw the install that donaldb did with his pics. Is there another install with pics that shows the 2 separated?

 
Good timing, I forgot about this thread. In a couple weeks I'm re-working a lot of my farkles and among them swapping out the PHIDs for Soltecks and installing dual compact nauilus's

 
Top