Installing cruise control this weekend...

Yamaha FJR Motorcycle Forum

Help Support Yamaha FJR Motorcycle Forum:

This site may earn a commission from merchant affiliate links, including eBay, Amazon, and others.
So, can someone point me to where the brown brake wire is?
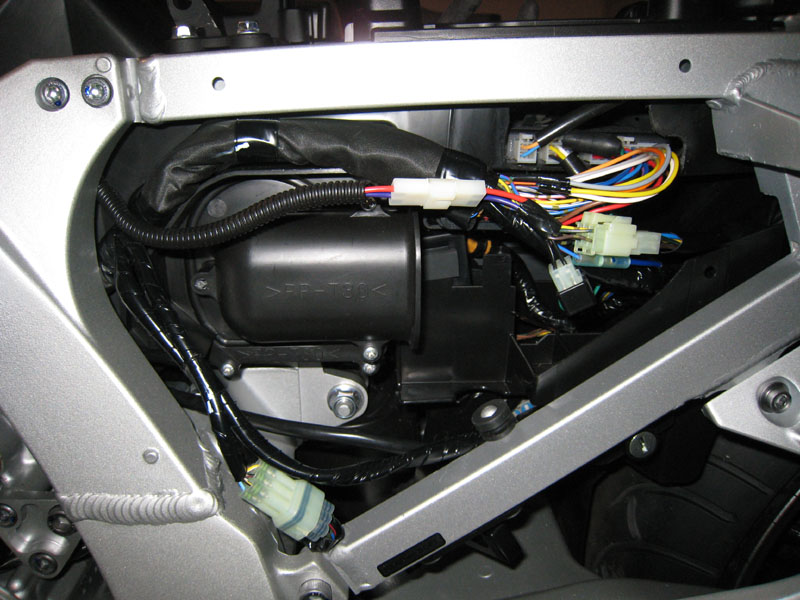
Here's where I tapped into the brake wires:

brake_connection.jpg


You can see the purple and red AVCC wires heading up to the front of my bike through that plastic tube. I added a 2-wire connector to those wires so that it's not permanently attached (can be removed for maintenance if necessary). To the right of my two-wire connector is where I soldered my connections, which is just to the left of a stock 6-wire connector. Those 6 wires are the the tail wiring (signals, brakes, etc). The wire colors are different on the two sides of that connector. I believe most people tap into the wires on the right side of that stock connector, up in the tail area somewhere. That's probably where you'll find the brown wire.

If in doubt (which you seem to be), test all 6 of those wires yourself by sticking needles/pins through the insulation to the wire and touching a multimeter to the needles/pins to find which one gets 12V when the brake is engaged.

 
So, can someone point me to where the brown brake wire is?
I assumed it was in the harness running along the left side (with the yellow & blue, green, & black) and that si where I tapped. However, that is in fact the left turn signal! that would explain the lack of 12 volts...

Edit:

Is this where the elusive brown wire is?

PB030002.jpg
Here's my 2 cents. Tapping into the right side of the bike is a waste of time (at least for me it was). Tapping into the left side of the bike works like a dream. Three wires yellow and blue from the wiring harness and orange from the ECU. Took all of ten minutes and works like a charm. I don't know how people are tapping into the right side cause I would actually have to see a picture of it to prove to me it works.

 
Last edited by a moderator:
So, can someone point me to where the brown brake wire is?
Here's where I tapped into the brake wires:

brake_connection.jpg


You can see the purple and red AVCC wires heading up to the front of my bike through that plastic tube. I added a 2-wire connector to those wires so that it's not permanently attached (can be removed for maintenance if necessary). To the right of my two-wire connector is where I soldered my connections, which is just to the left of a stock 6-wire connector. Those 6 wires are the the tail wiring (signals, brakes, etc). The wire colors are different on the two sides of that connector. I believe most people tap into the wires on the right side of that stock connector, up in the tail area somewhere. That's probably where you'll find the brown wire.

If in doubt (which you seem to be), test all 6 of those wires yourself by sticking needles/pins through the insulation to the wire and touching a multimeter to the needles/pins to find which one gets 12V when the brake is engaged.
Works like a charm and much easier to get to.

 
Those low voltages look like what you would get with an LED tailight installed. If you put the relay in you should get zero, the idea being the 0.113 volts is not enough to trigger the relay, 12volts is.

Another thought, I seem to recall that at least one installer had to replace the resistor that is in inline in the (somebody fill in the right color here) wire for similar issues.

 
...Another thought, I seem to recall that at least one installer had to replace the resistor that is in inline in the (somebody fill in the right color here) wire for similar issues.
[SIZE=18pt]OOHHHH -- DON'T DO THAT!!![/SIZE]

Two different signal systems. The resistor is part of the coil signal and the AVCC Red and Purple wires are power and brake light signal. The resistor was altered, removed and relocated trying to fix a flaky cruise issue that was later solved by the now (in)famous rflucher DIP switch 7 enhancement.

I've PM'ed Shawn with some tips. We need to keep in mind that the Gen I brake wiring is simply a FJR Brown & Yellow wire hookup, but the Gen II uses a brake light relay. The Brown power wire that goes to the brake light relay is the same as any other ignition switched power that is sourced through the Signaling System fuse.

 
Last edited by a moderator:
Never mind :) Ion correctly is pointing out that your errant voltages are not in the wire I indicated, that resistor is in the tach signal.

 
Last edited by a moderator:
Edit: I see V65 came to his senses while I was drafting this scathing and insulting reply ;) Note that he has altered his origingal post but I managed to snag his words in the quote tags below.

The last paragraph of this retort is still valid and true about making any voltage readings on the FJR.

=======================

...I'm not getting you response. The instance I am thinking of the resistor was faulty and needed replacement with an identical resistor, what's wrong with that?
Simply replacing the 20k Ω resistor with another 20k Ω resistor in the Blue AVCC wire is fine. It's just that the resistor is in the wire that connects to the coil. Shawn was asking about the voltage on Yellow/Green FJR wire that connects to the Purple AVCC wire.

When the brake peddle is not pressed the Brake Light relay's internal contact is open which will leave the Y/G wire 'floating' except for the tail lights which are connected to ground and should drop the voltage on the Y/G wire to very nearly 0.000 volts.

I would mention that where the DMM is grounded will make a difference in the voltages being read. If the DMM were grounded to the frame or worse, a sub frame the voltage readings will be off a bit. In a perfect world the DMM would have the black lead grounded directly to the battery or clipped to the ground lug where it connects to the engine block.

 
Last edited by a moderator:
Edit: I see V65 came to his senses while I was drafting this scathing and insulting reply ;) Note that he has altered his origingal post but I managed to snag his words in the quote tags below.
The last paragraph of this retort is still valid and true about making any voltage readings on the FJR.

=======================

...I'm not getting you response. The instance I am thinking of the resistor was faulty and needed replacement with an identical resistor, what's wrong with that?
Simply replacing the 20k Ω resistor with another 20k Ω resistor in the Blue AVCC wire is fine. It's just that the resistor is in the wire that connects to the coil. Shawn was asking about the voltage on Yellow/Green FJR wire that connects to the Purple AVCC wire.

When the brake peddle is not pressed the Brake Light relay's internal contact is open which will leave the Y/G wire 'floating' except for the tail lights which are connected to ground and should drop the voltage on the Y/G wire to very nearly 0.000 volts.

I would mention that where the DMM is grounded will make a difference in the voltages being read. If the DMM were grounded to the frame or worse, a sub frame the voltage readings will be off a bit. In a perfect world the DMM would have the black lead grounded directly to the battery or clipped to the ground lug where it connects to the engine block.

I see now why some folks wait for tech sessions to do things like this... :)

For clarity, when I have checked the voltage on the purple wire, i have touched one probe to the back of plug on the servo and the other to the ground on my fuse block (whic goes directly to the battery). Regardless of where I ground the probe, I seem to get the 0.113 reading.

In the latest posts and PMs, I see it may be possible I am tied into the wrong yellow ire (although voltage does go to 12 vdc when brake is activated) - the yellow wire I tied into is in the harness on the left side of the bike mid-way back (https://i168.photobucket.com/albums/u178/GordonFJR/Cruise%20install/IMG_9705.jpg stolen from FJRCarShopGuy)...

 
Hang in there Shawn! I really want to see this relay for the AVCC with a Kisan tailblazer combo workout as I'm going to install the same set up this winter. Thanks for the updates.
Trust me, it works fine.

 
Assist:

IMG_9705.jpg


And this one I stole from UselessPickles:

brake_connection.jpg


Shows that you do have the correct Yellow brake wire.
Thanks Ion for the assist... and I get the same 0.113 reading on the side where UP tied in....

Sooo, i think I may be good.... I'll put the tank back down and go to the test road and see if the CC will engage.

I still have the fast idle (~1500rpm) to work out - a local FJR buddy came by and we did a TBS, but we couldn't get the idle down. Don't think it is a vacuum leak as the idle is pretty smooth. More reading on that tonight.

Going to take a break - have been getting 'the look' that indicates I need to spend some time with the family... :rolleyes:

 
Good luck on the road test!

As far as the high idle -- you may have to reset all the throttlebody screws and do the sync over again. I'm assuming that you have the idle adjust screw all the way in and still have 1.5k rpm. This often happens when 1) the idle speed isn't adjusted continuously during the sync process and 2) when doing the sync the throttlebody screws are allowed to back almost all the way out chasing an absolute vacuum level instead of an equal vacuum level between the cylinders.

When you get a chance read the whole thread.

 
^^^^ Shawn, also be sure that the CC cable bead chain isn't too tight at the throttle tang, i.e. no slack at all and the CC is holding the throttle open at idle. Just thinking out loud.

 
Last edited by a moderator:
FWIW, my install went smoothly since I didn't have much to do with it :rolleyes: but my idle ended up a little higher when done despite no tension on the chain. I have my idle adjuster all they way out now and it idles right where it should but have no more room for adjustment. Have no idea what caused idle to increase...

 
I had the increased idle issue when I did my install earlier this year on my 09. I used the cotter pin to attach the beaded chain to the throttle tang. After messing with the idle adjustment didn't help, I opened it back up and found that one edge of the cotter pin was situated such that it was between the throttle tang and the tab that it rests on, causing it to not be fully released. I just had to reach in with some needle nose pliers and move the cotter pin around the edge of the tang . . . all fixed! Make sure your throttle rests all the way back on that tab at idle.

 
Edit: I see V65 came to his senses while I was drafting this scathing and insulting reply ;) Note that he has altered his origingal post but I managed to snag his words in the quote tags below.
Stupid electrons moving at the speed of light and all. ;)

 
^^^^ Shawn, also be sure that the CC cable bead chain isn't too tight at the throttle tang, i.e. no slack at all and the CC is holding the throttle open at idle. Just thinking out loud.

Hahaha... Good thought - it is almost like you know me already! That is how we got the idle down from 3k! it was like WHAT THE HECK - shut it off before it blows!! Then I realized what had happened...

I don't know what the record is, but I have to be getting close to one of the longest installs in recent recorded history - plus probably rank pretty high on the number of goofs! I hope you guys are getting a bit of a chuckle out of this... :)

Next time I am flying one of you experts in... ;)

Make sure your throttle rests all the way back on that tab at idle.
I'll check that in the AM...

Need to get this going - I have been on vacation this week and the honey-do list is getting backed up and SWMBO is starting to get antsy about it!

 
Ok, I hope you are sitting down... As of 0850 Central,

[SIZE=24pt]I had cruise!!!![/SIZE] :yahoo: :yahoo:

I hope you guys know how much I appreciate all the help, PMs, encouragement, etc. - someday I hope I can return the favor...

I still need to work out the high idle issue, but that should be a snap.

Weather is gorgeous the next 3 days - I have a lot of riding to catch up on ... See ya' on the road somewhere... B)

[SIZE=8pt]PS - the other day when I said I was ready to rip the cruise out, you all knew I was kidding right? [/SIZE]

 
What did you find that was causing the problem?
Fred, other than my own learning curve, I would say it was tieing in the red wire from the servo (that requires 12 volts) to the brown wire in the brake harness where the yellow wire is also (that brown wire had very little voltage and as I finally discovered yesterday was in fact the lef turn signal wire!). In a PM yesterday afternoon, Ionbeam, pointed out that that was valid for Gen I, but not for Gen IIs. He directed me to any switched power source and viola!

The confusion was 100% my fault for not making sure folks new I had a Gen II bike and I apologize for that and the spam of posts...

 
Top