2nd/3rd Gen Mirror Spacers & LED Light Brackets

Yamaha FJR Motorcycle Forum

Help Support Yamaha FJR Motorcycle Forum:

This site may earn a commission from merchant affiliate links, including eBay, Amazon, and others.
Yeah, I do actually have risers on there already. You are right... without some sort of risers the Strom guards are a no-go.
They are the Genmar type (clones). Simple spacers that come with longer bolts for the bars that I found on Amazon. They get the bars up just enough to have the hand guards clear the front cowling, with the added effect of blocking the inner third of the stock mirrors.
wink.png
Do you have a link to the risers. A little more rise would be welcome, especially if I get to use the handguards again. Amazing how you take something for granted then do with out. I had forgotten just how good they are from shielding your hands from rain and cold.

I was going to go for the Heli-bridge until I realized I'd have to ditch my stem mounted TechMount. I don't want the GPS on my bars.

Come to think of it, I'll have to buy new handguards. I sold the ones off my 04 already :/

 
Yeah, I do actually have risers on there already. You are right... without some sort of risers the Strom guards are a no-go.

They are the Genmar type (clones). Simple spacers that come with longer bolts for the bars that I found on Amazon. They get the bars up just enough to have the hand guards clear the front cowling, with the added effect of blocking the inner third of the stock mirrors.
wink.png
Do you have a link to the risers. A little more rise would be welcome, especially if I get to use the handguards again. Amazing how you take something for granted then do with out. I had forgotten just how good they are from shielding your hands from rain and cold.

Actually, it was on FleaBay: Link to Bar Risers for $55 shipped

I bought so many little things for the new bike I got cornfuseled...
confusedsmiley.png


Drilling the holes out (slightly) larger in the subframe, then using "Joint Connection Nuts" from the back side would be the quickest and easiest. The holes wouldn't be a problem in reversal as there is plenty of room for some washers under the flange nuts on the stock mirrors.
And them there's the ~6mm spacer(s) that would go behind the WynPro bracket to space it out for the recessed area. The upper half of the bracket will be spaced away from the faring by 4-5 mm when the lower half is flush with it.

But drilling out the holes of the subframe goes back to modifying the bike instead of the farkle. Might it be possible to find extensions with short enough female collars which could then double as the needed spacers in that recessed area?

 
Yes, using the *** nuts would require a small modification to the subframe, but at least it isn't the frame itself (subframe could be replaced if you screwed it up), and isn't that big of a deal really. The mirror holes are already elongated slightly oval, so you would just be reaming out the narrower sides of the oval holes.

But I see what you are saying. That would require cutting the FZ1 mirror studs off to a short length and using some coupling nuts and threaded rod to make the studs longer. The distance from the bottom of the mirror to the sub-frame would be about 6mm for the recess, plus the thickness of the light brackets (say 6mm) plus there are two ferrules in the two rubber ovals that sandwich the front faring. That might allow enough room for a round coupling nut.

Those FZ1 mirrors are not cheap to replace at ~$70 each nowadays. Wouldn't want to be chopping them off without a solid plan.

 
Progress report on the FZ1 mirror Aux Light mounting bracket project.

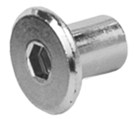
I procured a small quantity (10 each) of some 6mm, internally threaded, "Furniture Connector Cap Nuts" (I'll refer to these as FCCN from here on) in both 15mm and 18mm shank lengths. These would be needed to extend the reach of the studs on the FZ1 mirrors to allow for the added thickness of the Aux Light brackets plus the additional spacers required to clear the recessed mirror mounting area in the 3rd Gen FJR front faring surface.

17-7-Catalog_Image.jpg


Dave from WynPro (08FJR4ME) sent me a custom made set of his Anti-Vibe Brackets, made completely flat. I gave them a quick couple of coats of rattle can black.

100_4865.jpg


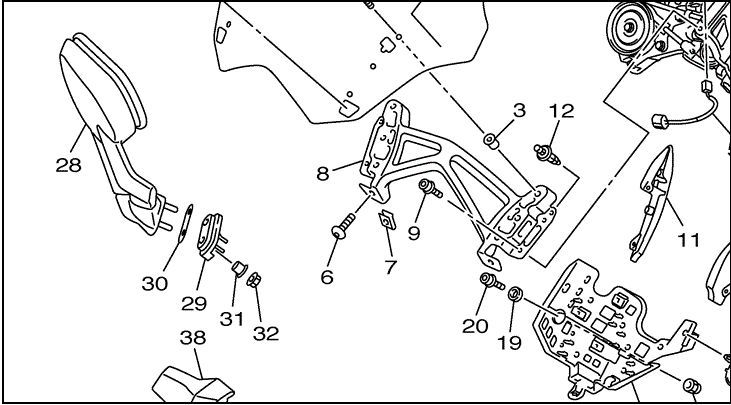
Yesterday, I set out to find out how difficult it will be to get these to work on a 3rd Gen. Here's a reference diagram of the parts of the third gen stock mirror mount:

2013MirrorMounting.jpg


28 - Mirror (doh!)

29 - Plate #1

30 - Plate #2

31 - Collar

32 - Flange Nut

After removing the mirrors, here is what you'll be looking at:

100_4741.jpg


The rubber surface you can see from the outside is just the 3mm thick "Plate #2" (#30 in the parts diagram) and can be easily lifted off and removed. It is just loosely fit onto the two aluminum collars (#31).

Our goal is to remove the two collars from the other half of the rubber mounting, "Plate #1" ( Item #29) to allow room for the new FCCNs to extend up through the frame, faring and rubber mounts. You'll need to do that from the inside.

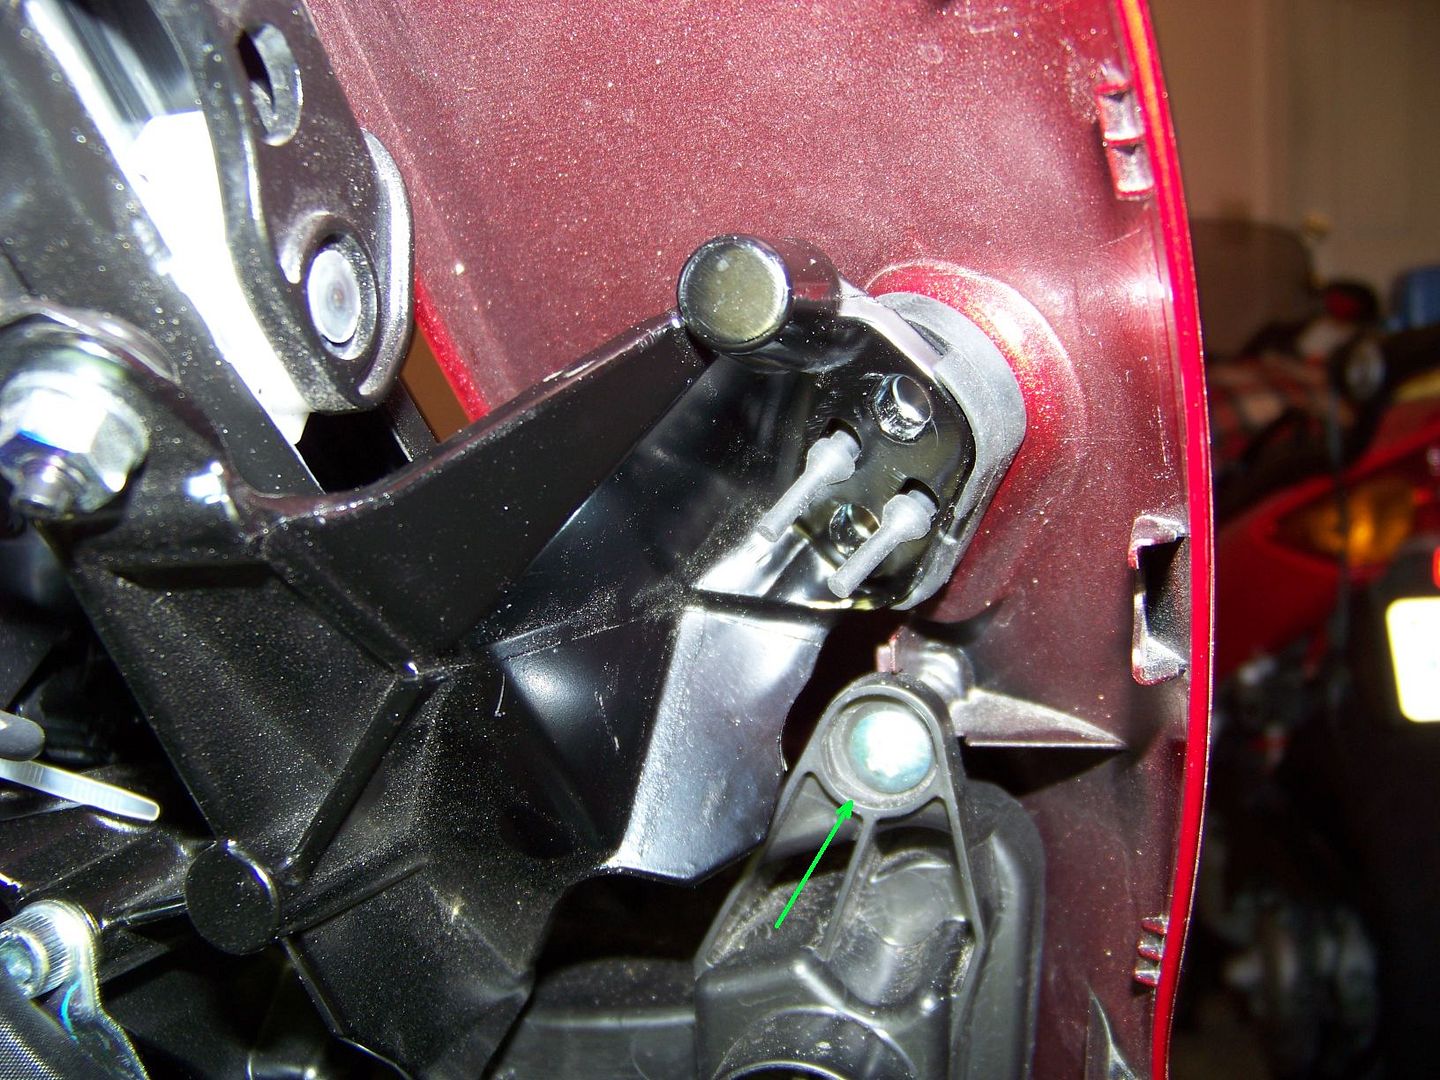
100_4869A.jpg


The trick for getting Plate #1 with the two collars removed is to first take out the philips head faring screw indicated above. This will allow you to flex the painted faring away from the subframe just enough to yank the rubber piece out.

Here is is removed from the bike and the collars removed from the Plate #1. The two nipples are a loose fit in the subframe so it can easily be removed and reinstalled, though its a bit fiddly to get the long nipples threaded back through the holes.

100_4870.jpg


Once you have the rubber parts removed this is what's left. You can now see directly down to the mirror mount holes in the subframe, which will also need to be enlarged slightly to accommodate the FCCNs :

100_4866.jpg


Photo above is prior to drilling. You can see that the holes are somewhat oval shaped. The casting is also kind of rough. Before disassembling I had made a note that the mirrors previously sat in the lowest part of the oval holes, so I would need center the hole enlargement toward that end.

The OD of the FCCNs are just under 8mm, so I used an 8.5mm drill bit. It became immediately obvious while drilling that the subframe is an aluminum casting, which explains the recent rash of broken subframes on 3rd gens. It is also pretty easy to drill out the mounting holes just using a hand held drill.

Once you have the holes enlarged, you'll want to replace the "Plate #1" between the subframe and tupperware, without the two collars installed, and then put Plate #2 back on top from the outside. Without the two collars there is nothing to hold Plate #2 in position, so we will probably want to attach it somehow (double sided tape) in the future.

By fiddling around with a combination of nuts and washers I found that we need ~ 10mm of spacer between the mirror mounting and the AntiVibe bracket. Essentially we will want to make up some 10mm thick aluminum spacers that are shaped identically to Plate #2. I'll be sending those dimensions (and maybe one of my Plate #2's) to Dave so that he can make up a set from aluminum, which will give us the largest possible surface contact area to the rubber mounting, and allow the greatest amount of stability for the entire mounted assembly.

Here are the pics of how it will look. The bracket will extend down along the front surface of the front faring, just like on the earlier FJR Generation versions. Obviously you would put your Aux Light's bracket mounting screw in the small hole at the bottom (countersunk on the back side).

100_4872.jpg


The bracket will be spaced a small amount away from the surface of the faring, which will eliminate any concerns over rubbing the painted faring surface underneath the bracket.

100_4874.jpg


The photo above was taken with ~8mm of spacers installed. I want to increase the spacer thickness to 10mm, which will allow better clearance from the faring, and allow more room for the FCCNs to be used and be able to compress the rubber mounts without bottoming out internally, to provide full stability.

There you have it. Next step is to get some of the 10mm spacers made up, give them a beta test, and they should then be ready for distribution.

The questions yet to be answered are:

Will the assembly be "rigid" enough after having removed the two aluminum collars?

I suspect they will be because the holes in the Anti-Vibration Brackets are large enough that the collars were not really supporting the prior versions either. The contact of the AVBs with the front faring of earlier generations only supported the brackets in one direction. I think the mirror mounting itself will be adequate to support the brackets and a lightweight LED light housing.

Is this too much work, and too invasive of an installation procedure, for just some aux light mounts?

Consider that the FZ1 mirrors can be used right out of the box, without drilling the subframe. The drilling of the subframe is not an "irreversible" mod. You are only enlarging the holes to be about the same size as the widest part of the original oval. So, You can still go back to using the mirrors without the Anti-Vibration Brackets and the stock flange nuts, or go back to using the stock mirrors, if you wanted.

 
Last edited by a moderator:
Thanks for all your effort, and for the great photo essay.

I'm standing by, with FZ1 mirrors in hand, to be your Beta Test subject.

Where did you procure the FCCNs?

 
I got them from a guy in Hong Kong that I found on eBay. Wasn't able to find the 6mm ones anywhere in the US in a small quantity, and didn't want to buy a gross of them in case it doesn't pan out.

I would envision that Dave would buy them in bulk and provide them in the "kit" with the brackets, spacers and light mounting hardware. I'll need to run an alpha test on them with the new spacers to be sure they will be stable enough. I'm sure that you will be at the top of the Beta test list, John.
wink.png


Last edited by a moderator:
Is there a reason not to make the spacer even thicker to provide more clearance between the aux. light bracket and the cowling? I'm thinking that a heavier light and dirt road combination could cause contact with the fairing.

 
Is there a reason not to make the spacer even thicker to provide more clearance between the aux. light bracket and the cowling? I'm thinking that a heavier light and dirt road combination could cause contact with the fairing.
As I mentioned, I want the space to be increased by about 2 more millimeters from the photo as shown. It may be hard to see in that shot, but there are about 2 mm of space there, so the final result should be about 4mm. These brackets should not move that much. If they did they would be useless.

The design is intended only to support a lightweight LED light, like Justin's LR4s or the ADV Monster 4 LED light head equivalent. I would not try and hang a heavier light, like any of the HID type lights, from these brackets. The bracket is purely being cantilevered from the 6mm mirror studs. Putting a heavier weight on these would undoubtedly cause problems for the mount. Contact with the faring paint would be the least severe of the possible problems. Id be more concerned for the possibility of metal fatigue, breaking the aluminum subframe that is supporting them.

 
I don't think the aluminum will be able to handle the weight/vibration combo. My prediction is that you will end up with a cracked or broken subframe over time.

 
Seems as though those fasteners are a UK item. I found them on the interweb but nothing in the USA yet. I already have

plans tonight but I will get to work on the spacers over the next few days.

Dave

 
Last edited by a moderator:
Seems as though those fasteners are a UK item. I found them on the interweb but nothing in the USA yet. I already haveplans tonight but I will get to work on the spacers over the next few days.

Dave
Dave, the guy in Hong Kong was very reasonable, and the shipping a non-event both time and cost wise. We could try contacting him and seeing what his price for a larger quantities would be. But let's not get too far ahead of ourselves just yet. We need to be sure the mod will be successful before tooling up for full production. There are still a few uncertainties to be ironed out.

email sent with the spacer dimensions. Let me know if any part of it isn't clear

 
Seems as though those fasteners are a UK item. I found them on the interweb but nothing in the USA yet. I already haveplans tonight but I will get to work on the spacers over the next few days.

Dave
I spent a couple hours searching. All I could find through a domestic source was fractional sizes, no Metric.

 
If weight of the mirror plus light is a concern, why not simply place a piece of rubber between the bracket and the fairing? That would take a lot of stress off the sub frame.

 
And yet, it is miraculously able to hold the chunky stock mirror up just fine.
I hope am wrong with my prediction. I see several differences with how the "chunky stock mirror" is mounted (i.e. flush, covering a larger surface area) and what you all will be doing.

As I am fond of saying, you are all big boys and girls, do what you want to do.

 
Top