You are using an out of date browser. It may not display this or other websites correctly.
You should upgrade or use an alternative browser.
You should upgrade or use an alternative browser.
Hardest two hours I worked since starting this job
- Thread starter RadioHowie
- Start date


Help Support Yamaha FJR Motorcycle Forum:
This site may earn a commission from merchant affiliate
links, including eBay, Amazon, and others.
Patriot
Isabella is Lazarus
Hot as a mofo, too. 98 degrees in the garage when I got home. What's this "cold weather" I keep hearing about?Good for you Howie. I would feel bad for all the trouble you guys had but I can see from the pictures you guys are wearing shorts. fukers.
We had a "cool snap" a week ago....low of 68, high of 88, but it quickly disappeared and record temps for an October followed. It was 105 degrees here Saturday afternoon, and hasn't dropped below a high of 94 since Thursday 10/7. :angry2:
Hit 92 today on the way to MS to deliver the bike (89 now)...saw the engine sitting on the floor...looked good on the outside...at least everything was there including PAIR...starter, stator, clutch all there...really does look complete less fuel injection...even the back of the engine shaft protective housing was pristene :yahoo:Glad you chimed in on the heat issue. It's been "middle of July" hot for the last week and a lot of our Northern Brethern probably think I was handing them a line of ****.Nice job RH!
Oh, and +1 on the FL heat. Stupid, silly hot lately. Doesn't feel very Octobery.
-BD
Folks, it REALLY is "middle of July" hot here in Florida right now. Last Friday night, at the high school football game broadcast, it was 96 degrees at 9:30pm. :dribble:
Right now, not so bad.....83 degrees.
fingers crossed and sacrificed a chicken to the engine before I left...then ate the KFC in the van on the way home

RadioHowie
I Miss Beemerdons!
:thumbsupsmileyanim: :yahoo: :clapping:
Damnation, son!
I sure hope I never have to go through this ****.
(Knocking feverishly on all species of wood within my reach...)
You're doing great, man. Keep it up.
And when you get up here on that Phoenix, the beer and lobstahs are on me.
I sure hope I never have to go through this ****.
(Knocking feverishly on all species of wood within my reach...)
You're doing great, man. Keep it up.
And when you get up here on that Phoenix, the beer and lobstahs are on me.
RadioHowie
I Miss Beemerdons!
When does "Mud Season" officially end? Middle of May, ain't it?Damnation, son! I sure hope I never have to go through this ****.
(Knocking feverishly on all species of wood within my reach...)
You're doing great, man. Keep it up.
And when you get up here on that Phoenix, the beer and lobstahs are on me.
ionbeam
2 FUN
Indeed, if you make it up here I'll buy you a dinner to celebrate No More Tears Motorcycling.When does "Mud Season" officially end? Middle of May, ain't it?Damnation, son! ...You're doing great, man. Keep it up.
And when you get up here on that Phoenix, the beer and lobstahs are on me.
The seasons are: Snow; Mud; Black Fly/Mosquito; Foliage -- I highly recommend Foliage which is usually 4 days in October, then it's back to Snow.
We aren't really into sheep and only rarely have matinees but we do have these:


$159.99
FLAVOR Men Brown Leather Motorcycle Jacket with Removable Hood (Large (US standard), Brown)
FLAVOR Leather


$24.37
Fuel Tank Sticker Motorcycle Stickers for Yam&aha FJR1300 FJR 1300 Tank Pad Protector Decal Emblem Side Fairing Symbol Adventure
nanyangshixianpushangmaohanggerenduzi


![Decrum Motorcycle Jacket Men - Mens Leather Jacket | [1100065] Austin Brown, XL](https://m.media-amazon.com/images/I/41HqZSRj6LL._SL500_.jpg)


$176.39
$209.99
Milwaukee Leather SH1408 Men's Sporty Crossover Vented Black Motorcycle Leather Scooter Jacket - Large
Amazon.com


$11.99
$16.99
QUKOPSE Winter Leather Gloves for Men,Touchscreen Snow Driving Gloves with Cashmere Lining for Motorcycle Driving Riding
enshizhouchonglinshangmaoyouxiangongsi


$64.99
Edwards Oil Change Kit fits 2003-2020 Yamaha FJR1300 Sport Touring
Edwards Motorsports & RV's


$98.16
25-1775 Replacement for All Balls Wheel Bearing Kit (25-1775) for Yamaha FJR1300 03-16 FJR1300ES 14-18
Otisdelilah Auction

$91.99
Edwards Maintenance Kit fits 2003-2020 Yamaha FJR1300 Sport Touring
Edwards Motorsports & RV's


$16.19
$17.99
MELASA Fleece Lined Winter Cycling Beanie with Holes for Glasses - For Men, Women
HNXCHUANG

$17.99
$19.99
MOREOK Winter Gloves -10°F 3M Thinsulate Warm Gloves Bike Gloves Cycling Gloves for Driving/Cycling/Running/Hiking-Black-L
MOREOK-US (Ships from USA)


Sweet picture, Ion. But where's the turkeys?
This morning a gaggle of about 8 or 10 went through my back yard (turkeys not cows) and really set off the 2 labbys.
But back to radioSteve: Yeah man, you come up here with that AIW chic and the Patriotic guy there'll be some massive seafood orgies.
Make it happen!!
Oh, and bring your lady along too. We never hear much about her, but she obviously has to be a saint to put up with your BS.
Last edited by a moderator:
wfooshee
O, Woe is me!!
I think fall happened today. Finally. Thunderstorm woke me up in the wee hours, and right now it's 70 outside. In the middle of the afternoon! Still muggy as hell, though. I see on the weather map that it hasn't quite reached Howie's neck o' the woods, yet, but hold on down there! It's coming!Folks, it REALLY is "middle of July" hot here in Florida right now. Last Friday night, at the high school football game broadcast, it was 96 degrees at 9:30pm. :dribble:
Right now, not so bad.....83 degrees.
RadioHowie
I Miss Beemerdons!
Right on the money, Walt....the "front" is about 2 hours away...could be a wet night at the football stadium tonight.I think fall happened today. Finally. Thunderstorm woke me up in the wee hours, and right now it's 70 outside. In the middle of the afternoon! Still muggy as hell, though. I see on the weather map that it hasn't quite reached Howie's neck o' the woods, yet, but hold on down there! It's coming!
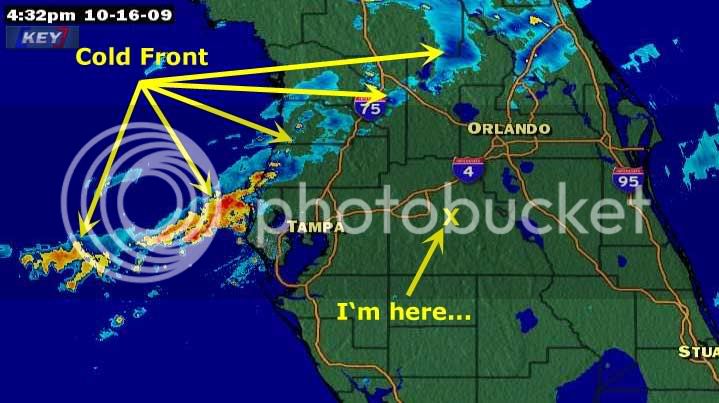
But OH MY it's gonna be nice and cool working on Frankenbike tomorrow. The whole day is MINE and I should get a shitload of work done!
'Howie
Patriot
Isabella is Lazarus
yep, rained last night and dropped into the 60's with lotsa wind today...66 and sunny now...kite flying weather :yahoo:
chrisflock
FJR nose gunner
Perfectly seasoned, though some will prefer a dash of 'That's what she said.'OUT is 10 times easier than getting it back in. Maybe 20 times easier.
Like switching from the girlfriend to Madonna?not to mention you're going from a very tight place to a very loose place.
Also, the title of this thread can provide another dash of flavor.
Last edited by a moderator:
manwhoride
Well-known member
Okay, I usually stay clear about the lack of weather in SoCal because in San Diego our average temp is 69 degrees. Today Oct. 16th the thermometer is pushing 98. with evenings down in the 40's. Yeah, It don't suck to be in San Diego at the moment. Of course I don't know anywhere else as I am a native and it wasn't until I was thirty years old did I see snow fall out of the sky....80 here and a sauna humidNice job RH!
Oh, and +1 on the FL heat. Stupid, silly hot lately. Doesn't feel very Octobery.
-BD
Glad you chimed in on the heat issue. It's been "middle of July" hot for the last week and a lot of our Northern Brethern probably think I was handing them a line of ****.
Folks, it REALLY is "middle of July" hot here in Florida right now. Last Friday night, at the high school football game broadcast, it was 96 degrees at 9:30pm. :dribble:
Right now, not so bad.....83 degrees.
RadioHowie
I Miss Beemerdons!
[SIZE=18pt]Saturday Update 10/17/09[/SIZE]
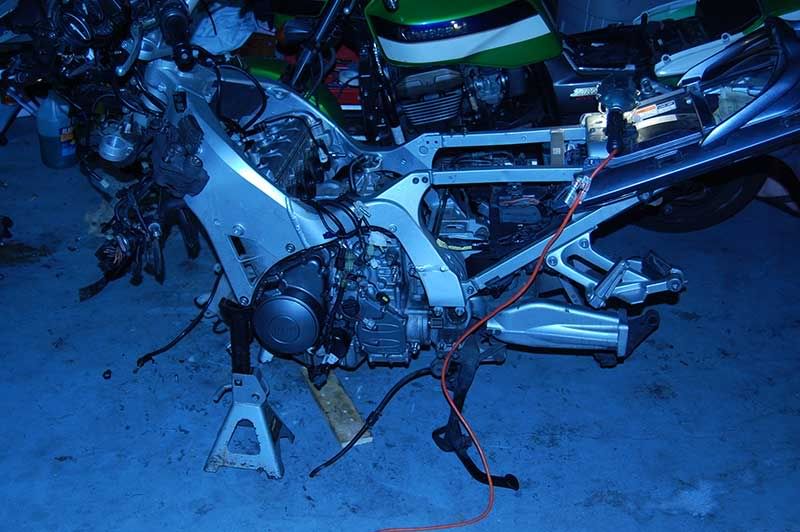
When we last left Project Frankenbike, Wednesday night 10/14, I nearly killed myself putting that 300 pound 10 gallon motor inside a 9 gallon frame. This was the result of that night's work:
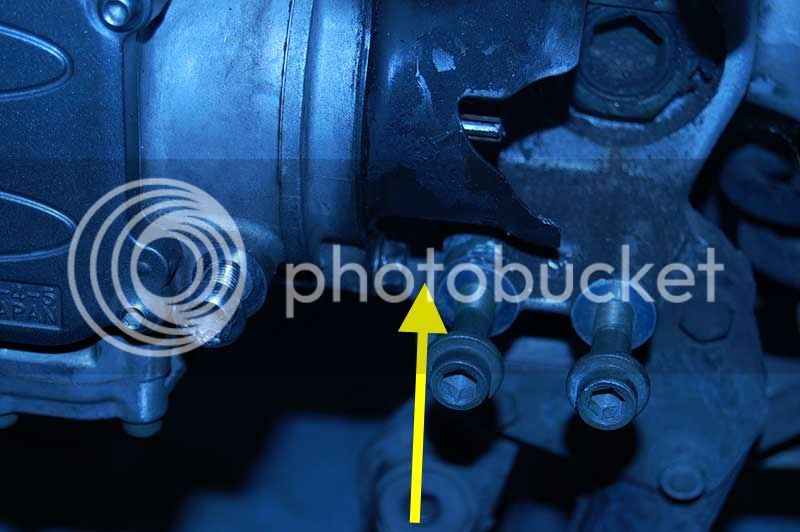
One tiny problem. If you look REAL close at the output shaft at the bottom rear of the motor, you see I left something out:
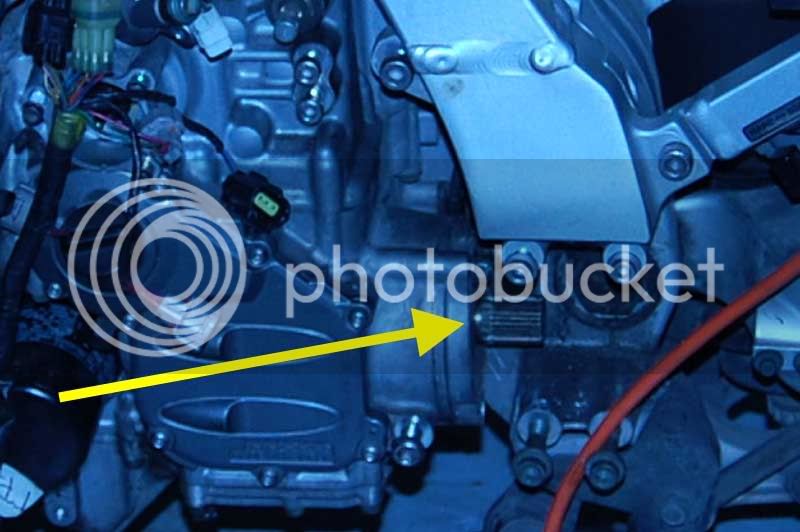
It's the smegma-shield to protect the U-joint from mud, rain and varmint guts. The one on the motor was accidentally damaged during the install. Not only was it bent to hellandgone due to an unplanned gravity event, it kept getting hung up on the sidestand mount, thereby doubling the difficulty level of the install. So I pulled it off with all intentions of putting it back on after the motor was installed.
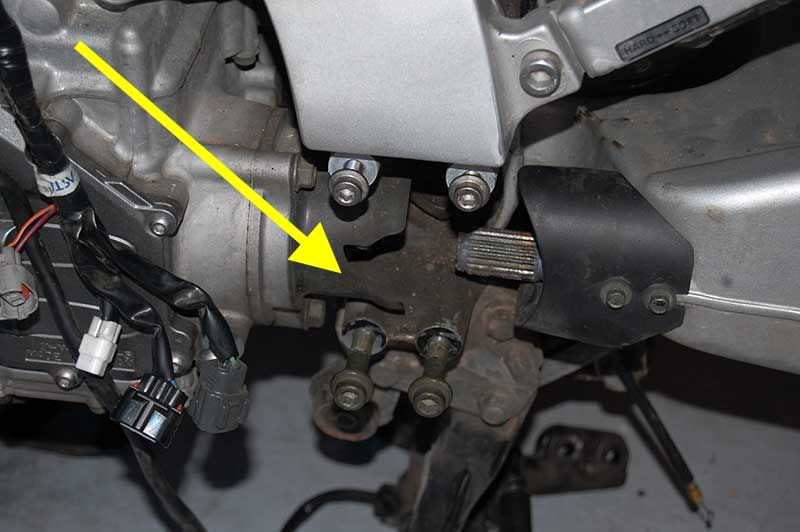
One problem....you can't install it with the motor in-frame! The bolts holding the dust shield in place are about 1 1/2 inches long. Unfortunately, the clearance between the engine case and the sidestand mount, part of the frame, is only 1/2 inch: You can't finagle that bolt in no matter how you try:
Now at this point, I'm faced with two choices...leave the dust shield off and have my U-joint grind itself into oatmeal in a few thousand miles.....or pull that effin' motor and bolt it on.
It took me about 1 ciggy and a cup of coffee to decide to pull the motor back out. I am NOT going to compromise a single step of bringing Frankenbike back to life, so out it comes. I tried removing the rear motor mounts, hoping there would be enough "give" to pivot the back end of the motor down far enough to put the dustshield on, but no-go.
All the motor mounts had to be removed to lower the motor far enough to re-install the dustshield. Unnecessary extra work? I dunno, but like I said...no compromise!
So now I'm back where I was Wednesday night. Damn. Time to put the motor BACK in the frame. Still no hoist, Eric....but I did figure out an install method that was simple and fast.
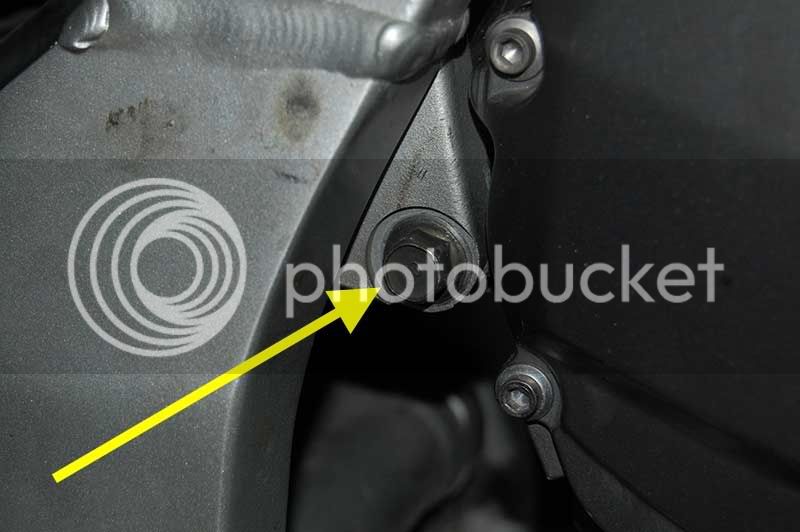
With the motor sitting flat on the floor, you can't simply lower the frame over the motor, since the centerstand, exhaust mounts and bottom of the shock will hit the floor long before the frame is low enough for the motor mount holes to match up.
BUT, if you tilt the motor forward about 30 degrees, using a block of wood to keep it from tipping completely over, the rear motor mounts are raised more than enough that two people can pick up the frame, and slide it forward and down over the motor and the rear motor mounts line up perfectly. Install the long bolt through the frame and the upper rear motor mount...
Put the nut on the other end.....
Now the other long bolt through the lower rear motor mount and screw it into the frame.....
Now install the two top-rear motor mounts.....
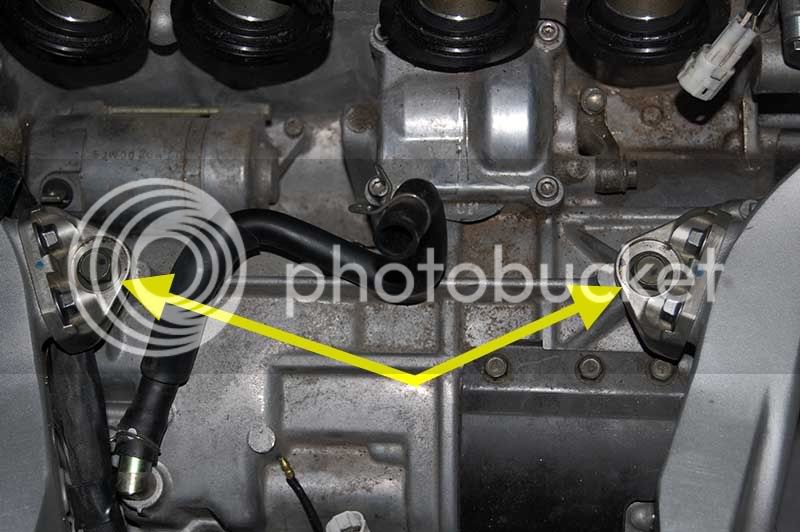
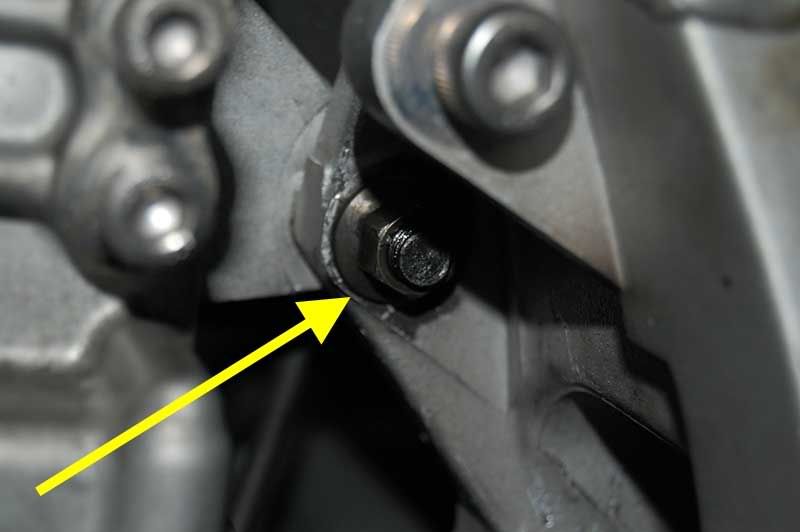
And snug everything up. Just past finger tight. No more, because you still have the four motor mount bolts to insert through the frame spars -- 2 on the left, two on the right.....
The clearances to insert the frame spar bolts are VERY close...that's why you don't want to tighten down the rear and top mounts too tight at first. You may need to wiggle the frame some to get the holes in the frame to line up perfectly with the threaded lugs on the motor. The clearances are THAT tight.
Now it's important to torque all the motor mounts in a particular order. As those of you who have installed sliders on Gen I bikes know, you torque down the left side spar bolts first, THEN the right side. There's a good reason.....the left side bolts pull the frame tight against the left side of the motor. The two right side spar bolts tighten down on a bushing that pulls flush up tight against the motor, THEN the pinch bolts on the frame are tightened to lock the right side frame spar to the motor. You can clearly see the bushings underneath the bolt heads and the pinch bolts for the final tightening.
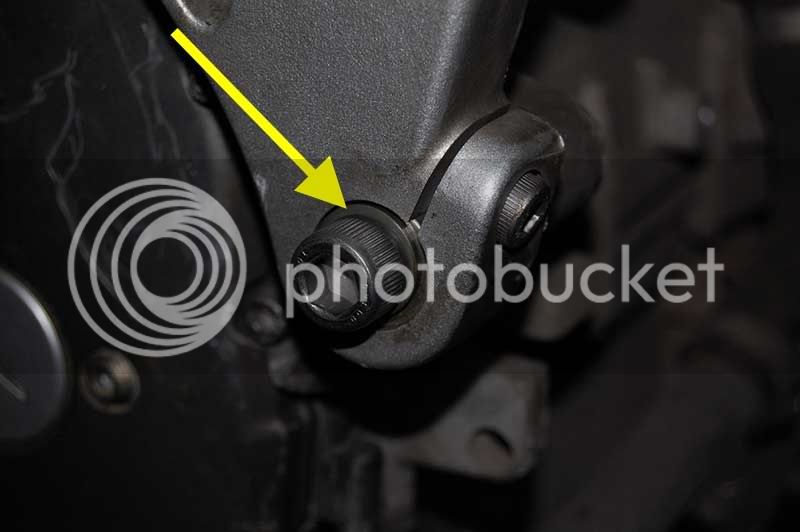
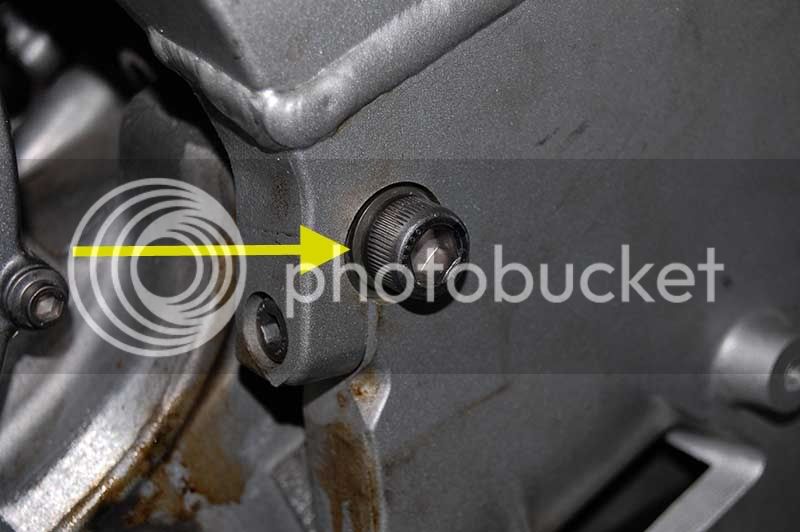
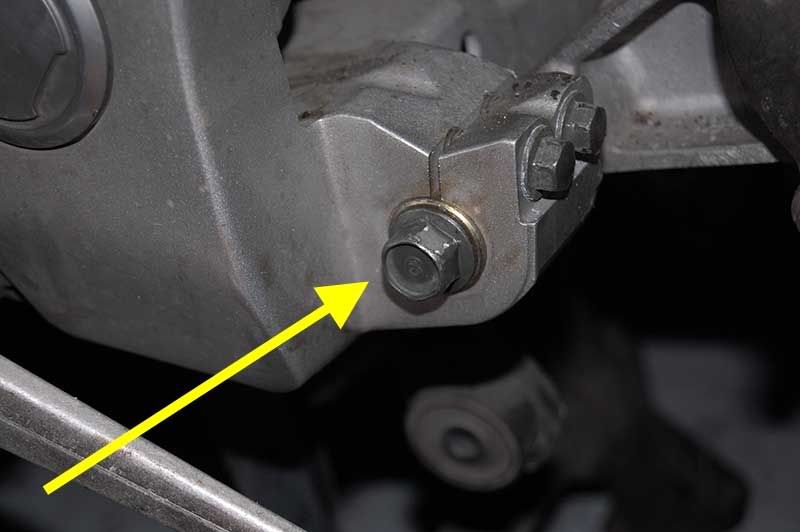
The same bushing/pinch bolt arrangement is used on the bottom-rear through bolt mount.....
Now go check the torque specs on the upper-rear bolt/nut, and the two top/rear mounts.
You're done rehanging the motor.
(again)
Bolt the clutch slave back on.....

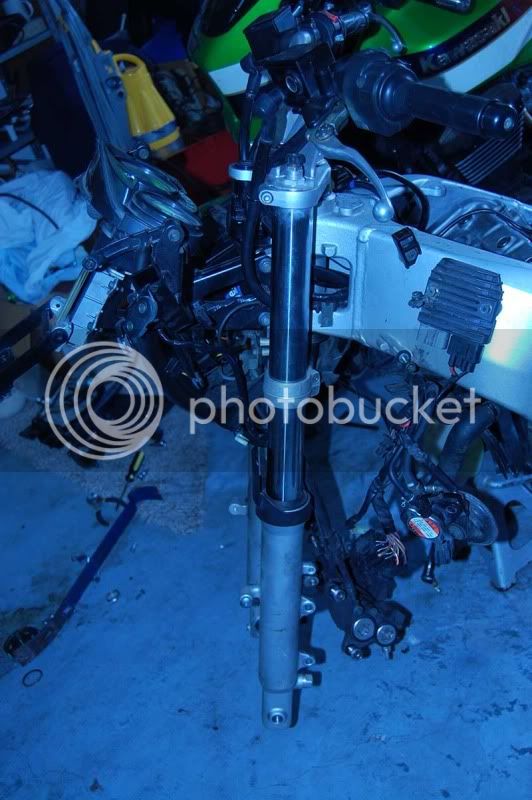
.....stick the forks back on.....
.....put the front wheel back on.....
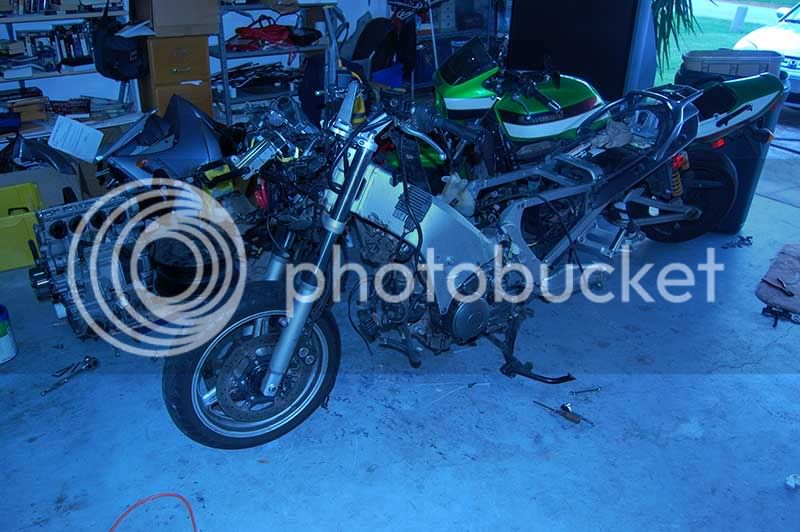
.....and I'll be damned if it ain't startin' to look like a motorcycle again!
Tomorrow, exhaust system and cooling system.
'Howie
When we last left Project Frankenbike, Wednesday night 10/14, I nearly killed myself putting that 300 pound 10 gallon motor inside a 9 gallon frame. This was the result of that night's work:
One tiny problem. If you look REAL close at the output shaft at the bottom rear of the motor, you see I left something out:
It's the smegma-shield to protect the U-joint from mud, rain and varmint guts. The one on the motor was accidentally damaged during the install. Not only was it bent to hellandgone due to an unplanned gravity event, it kept getting hung up on the sidestand mount, thereby doubling the difficulty level of the install. So I pulled it off with all intentions of putting it back on after the motor was installed.
One problem....you can't install it with the motor in-frame! The bolts holding the dust shield in place are about 1 1/2 inches long. Unfortunately, the clearance between the engine case and the sidestand mount, part of the frame, is only 1/2 inch: You can't finagle that bolt in no matter how you try:
Now at this point, I'm faced with two choices...leave the dust shield off and have my U-joint grind itself into oatmeal in a few thousand miles.....or pull that effin' motor and bolt it on.
It took me about 1 ciggy and a cup of coffee to decide to pull the motor back out. I am NOT going to compromise a single step of bringing Frankenbike back to life, so out it comes. I tried removing the rear motor mounts, hoping there would be enough "give" to pivot the back end of the motor down far enough to put the dustshield on, but no-go.
All the motor mounts had to be removed to lower the motor far enough to re-install the dustshield. Unnecessary extra work? I dunno, but like I said...no compromise!
So now I'm back where I was Wednesday night. Damn. Time to put the motor BACK in the frame. Still no hoist, Eric....but I did figure out an install method that was simple and fast.
With the motor sitting flat on the floor, you can't simply lower the frame over the motor, since the centerstand, exhaust mounts and bottom of the shock will hit the floor long before the frame is low enough for the motor mount holes to match up.
BUT, if you tilt the motor forward about 30 degrees, using a block of wood to keep it from tipping completely over, the rear motor mounts are raised more than enough that two people can pick up the frame, and slide it forward and down over the motor and the rear motor mounts line up perfectly. Install the long bolt through the frame and the upper rear motor mount...
Put the nut on the other end.....
Now the other long bolt through the lower rear motor mount and screw it into the frame.....
Now install the two top-rear motor mounts.....
And snug everything up. Just past finger tight. No more, because you still have the four motor mount bolts to insert through the frame spars -- 2 on the left, two on the right.....
The clearances to insert the frame spar bolts are VERY close...that's why you don't want to tighten down the rear and top mounts too tight at first. You may need to wiggle the frame some to get the holes in the frame to line up perfectly with the threaded lugs on the motor. The clearances are THAT tight.
Now it's important to torque all the motor mounts in a particular order. As those of you who have installed sliders on Gen I bikes know, you torque down the left side spar bolts first, THEN the right side. There's a good reason.....the left side bolts pull the frame tight against the left side of the motor. The two right side spar bolts tighten down on a bushing that pulls flush up tight against the motor, THEN the pinch bolts on the frame are tightened to lock the right side frame spar to the motor. You can clearly see the bushings underneath the bolt heads and the pinch bolts for the final tightening.
The same bushing/pinch bolt arrangement is used on the bottom-rear through bolt mount.....
Now go check the torque specs on the upper-rear bolt/nut, and the two top/rear mounts.
You're done rehanging the motor.
(again)
Bolt the clutch slave back on.....
.....stick the forks back on.....
.....put the front wheel back on.....
.....and I'll be damned if it ain't startin' to look like a motorcycle again!
Tomorrow, exhaust system and cooling system.
'Howie
Patriot
Isabella is Lazarus
good deal...sorry about the friggin shaft guard...that was one of the first things I looked at on my new used motor on Thur.
Pristine :yahoo:
Pristine :yahoo:
Brodie
Darksider #16 - and Proud of it !
Looking good Howie!
Even though you may have been mumbling choice words about yourself under your breath, it's much better than having the bike completed without it and knowing you should have done it right.
Keep paying attention to detail and you will be happy as hell with it when your'e heading down the road.
Brodie
Even though you may have been mumbling choice words about yourself under your breath, it's much better than having the bike completed without it and knowing you should have done it right.
Keep paying attention to detail and you will be happy as hell with it when your'e heading down the road.
Brodie
Grumpy
Well-known member
Hell Howie, it's beginning to look naked instead of anesthetized! Congratulations!
7xray
Well-known member
That's great Howie. I am in awe of your ability and stick-to-it-ness to be able to do all that and document it too.
It's wonderful.
Cheers,
Fred
It's wonderful.
Cheers,
Fred
wfooshee
O, Woe is me!!
Aw, man, I can only imagine the feeling when you found that missing splash guard. I think we heard the vocabulary exercise up here in the panhandle! (Mighta been jets at Tyndall, or the airport half a mile south of my house, but I think there were words in the noise. . . . .)
I thought I'd been set back when the airbox wouldn't go on, and I discovered the throttle bodies hadn't gone on straight, the bottoms weren't on all the way which tilted them up about 5 degrees. Had to pull lots of stuff and get those back into place, lost a half hour or 45 minutes, but I sure didn't have to pull no frickin' motor to get back on schedule!
Good on ya for seeing it through, and not using a shortcut that would come back and haunt you later!
TestPilot
Well-known member
Pity I didn't see this thread earlier - I could have told you that's how they do it at the factory :yahoo: :clapping: :yahoo:[SIZE=18pt]Saturday Update 10/17/09[/SIZE]
So now I'm back where I was Wednesday night. Damn. Time to put the motor BACK in the frame. Still no hoist, Eric....but I did figure out an install method that was simple and fast.
With the motor sitting flat on the floor, you can't simply lower the frame over the motor, since the centerstand, exhaust mounts and bottom of the shock will hit the floor long before the frame is low enough for the motor mount holes to match up.
BUT, if you tilt the motor forward about 30 degrees, using a block of wood to keep it from tipping completely over, the rear motor mounts are raised more than enough that two people can pick up the frame, and slide it forward and down over the motor and the rear motor mounts line up perfectly. Install the long bolt through the frame and the upper rear motor mount...
..........
'Howie
Thanks for the detailed posts, and I hope it's all done soon. Oh, and change the blue light in your garage to daylight - it's easier to see what you're doing
Similar threads
- Replies
- 11
- Views
- 2K
- Replies
- 3
- Views
- 2K
- Replies
- 0
- Views
- 2K
- Replies
- 7
- Views
- 1K