Rear shock linkage maintenance

Yamaha FJR Motorcycle Forum

Help Support Yamaha FJR Motorcycle Forum:

This site may earn a commission from merchant affiliate links, including eBay, Amazon, and others.
Well a shock sock from Traxxion would have stoped the external crud and stones, and not that expensive. I would buy one if I were you.
I have been running the Greece made hugger since I saw the first post on it. I do beleive it helps also.

I am not a fan of the socks. Goes back to my dirt bike days, because you can blow a seal and not see it leak. I want to see it weeping oil right a way so I can repair sooner than later. The sock hides that observation.

 
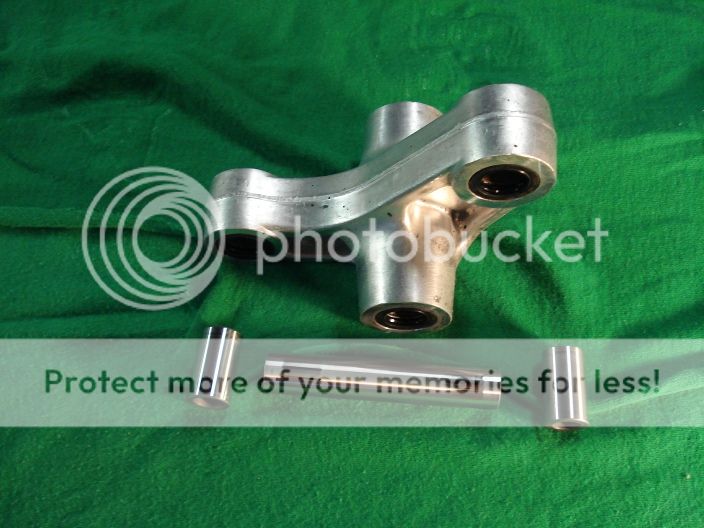
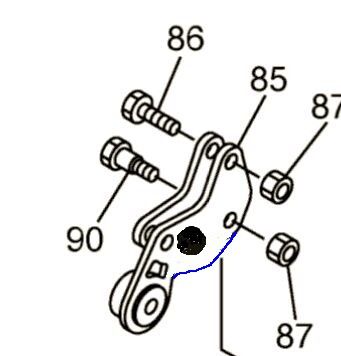
I chose yesterday as my rear linkage disassembly and re-lube day. The bike is now 9 years old and has >75k miles on it. The only other time that I had done this maintenance was 2 years ago at 45k miles. The pivots, especially the wider spaced ones at each end of the dog-bones, do tend to get some one-sided wear on them. By that I mean that you will see marks where the needles had been rubbing only on one side of the inner race circumference. That's because these bearings are only required to rotate a few degrees throughout the full articulation of the suspension, so that is the only part of it that is supporting the weight of the bike.
Mine at 75k look pretty much the same as they did at 45k, which is much like the photos posted by wmadoty here. His might have been looking a little worse as my worn spots just looked shiny, not blackened, but that may be a camera artifact. The key thing is that they look the same 30k miles later, and so long as they still rotate smoothly with no signs of corrosion (rust)or other water / salt damage they should be good for another round.

At first maintenance the bearings had the same appearance as in his photo report, very little in the way of lubrication. But I used a generous amount of water resistant, marine wheel bearing grease in there the last time and it was still in good evidence yesterday. So I just cleaned out the old and gobbed on some new. My conclusion is that they just do not use very much grease on these pivots at the factory.

I had picked out the plastic like waxy spacer material the last time, thinking that it was some sort of congealed grease. Those bearings certainly seem no worse for that 30k miles later, so I guess that is a non-issue. Makes more room for some good grease I guess too.

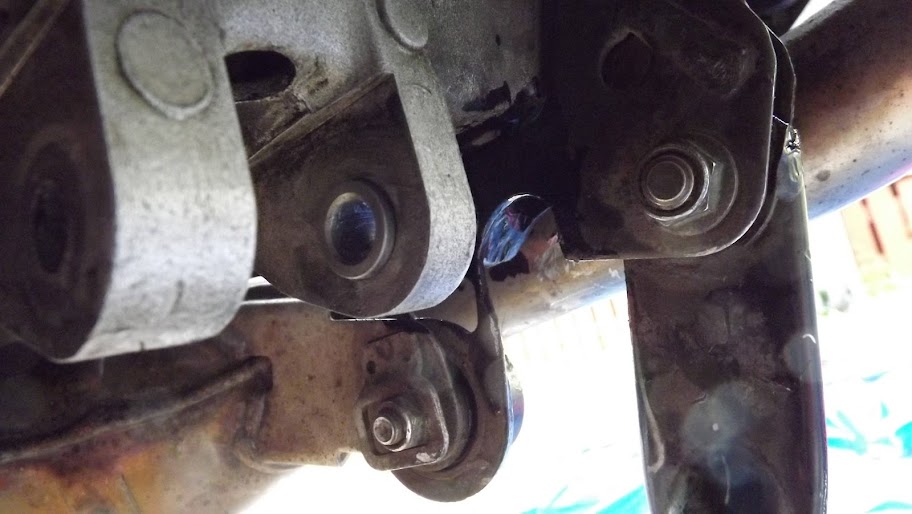
I used the technique described earlier by Donal here to get that frozen spacer out of the upper relay arm pivot frame tab. It worked great, and now that I've cleaned and greased it I'm hoping it comes out a bit easier next time. So, no need to cut or reverse that bolt after all.

But there is no way around removing the center stand if you want to get to that upper front pivot without taking a grinding wheel to it like Queensland Ken described here. And removing the center stand is what makes this job such a PITA. I would seriously consider doing all but that one pivot the next time just so I don't have to remove the center-stand. Evidence seems to support that it is the two ends of the dog bones that get the worst of the wear for some reason. Either that or maybe reducing the side-stand bracket by 50% with a grinder wouldn't be so bad in comparison?

Oh, and I just used the typical black iron pipe stand and two ratchet straps from the sub-frame to the stand to hold the bike up without the center-stand, and the bike didn't even try to take a SkooterG nap. :tonguesmiley:
I expect to see the same thing next time because I am using a good marine based grease.

 
I wonder if anyone has ever thought to drill and tap some zerk fittings in here:

RelayArm_zps50c90f14.jpg


Tom,

I gave that path some serious thought the first time I had my relay arm out. Going into the center (dogbone) shaft area would be easy given the straight forward route for pressurized grease to get to each side bearing surface. Getting grease into the two end bearing via a zerk fitting is not so easy. Ther is no easy path through either the inner or outer bearing races. I think the only way would be to remove the needle bearings from the bearing outer race, then drill a hole through the outer race (small, maybe 3/32", (2.5mm)) then pack the needle bearings back in place. Drill and tap the relay arm for a zerk fitting and re-install the bearing so that the holes line up. Check first to locate the zerks where you could actually get to them while installed on the bike. Also choose a location on the relay arm where a tapped hole would not significantly reduce the structural integrity of the relay arm. If only Yamaha would share their structural analyses with us....

Lubrication: I would imaging that the shaft seals would pass grease through the seal surface before blowing out of the housing. That would be a major detriment to doing this job and would have to be proven first I think.

If I decide to tackle that kind of thing, certainly I'll share the experience here. But don't hold your breath.

 
TomInCAhttps://www.fjrforum.com/forum//index.php/user/21394-tominca/, there was a guy in Austrailia that decided the Yamaha had missed the boat by not equiping this part with Zerk Fittings. He added them. Once put together he had trouble accesseing some of the fittings with his gun. He did the Relay Arm and the Swing Arm. He never posted a followup and the mod was not widely accepted on the bord he was posting on. He was a hightly respected member of whatever forum I was viewing at the time.

 
I've tried it in the UK as an experiment but reverted back to standard as it didn't stop the bearings corroding. The centre bearing is easy to do but the two end bearings present a problem. You can't drill the outer race of the bearing as suggested as its a hardened precision bearing face and by drilling it you will destroy its integrity.

I removed the bearings, drilled and tapped the linkage and ground two small channels from the hole to almost the edge of the housing but stopped the channels inside the seals. This gave the grease a route from behind the bearing to the edge of the seal but I found the grease was more likely to force its way out past the seal rather than into the bearing.

 
I've tried it in the UK as an experiment but reverted back to standard as it didn't stop the bearings corroding. The centre bearing is easy to do but the two end bearings present a problem. You can't drill the outer race of the bearing as suggested as its a hardened precision bearing face and by drilling it you will destroy its integrity.I removed the bearings, drilled and tapped the linkage and ground two small channels from the hole to almost the edge of the housing but stopped the channels inside the seals. This gave the grease a route from behind the bearing to the edge of the seal but I found the grease was more likely to force its way out past the seal rather than into the bearing.
Damn! This just proves, if you ask a crazy enough question, someone here will have been crazy enough to give an experienced answer.

Wow! Thanks for saving me from sallying forth on this zerk adventure.

Um, you've been a member here since (what's older than dirt?), so what does your user name mean in English?
not_i.gif


Last edited by a moderator:
I'm really starting to give more credence to Queensland Ken's solution of grinding away part of the right side, center-stand bracket. Being able to do this whole job with the bike securely on the center stand would make this much easier to do, easy enough to revisit it every 15 or 20k miles instead of waiting for the inevitable rust to take over.

I guess what we'd really need to know is how much will that weaken that bracket, and how much mechanical load is being put on the (weakened) bracket when using the stand. Someone with a mechanical engineering background could probably figure that out pretty easily, but that is definitely not me.

If it does weaken the part too much, maybe a re-design of a larger right side bracket, but with the appropriate hole provided in it could be retrofitted?

 
Fred, it seems the center-stand bracket is what gets ground.down, and from what I can tell, the modification does not leave much structure. It's a $55 part so it isn't hard to repair, but if it collapses the consequences aren't pretty. I am more concerned what happens as the part flexes and fatigues over time.

paulw16.jpg


stand.jpg


Approximate cut-out

stand2.jpg


from%2520LHS.jpg


Last edited by a moderator:
Fred, it seems the center-stand bracket is what gets ground.down, and from what I can tell, the modification does not leave much structure. It's a $55 part so it isn't hard to repair, but if it collapses the consequences aren't pretty. I am more concerned what happens as the part flexes and fatigues over time.
paulw16.jpg


stand.jpg


Approximate cut-out

stand2.jpg


from%2520LHS.jpg
A fella weld a doubler on it to strengthen.

 
Fred, it seems the center-stand bracket is what gets ground.down, and from what I can tell, the modification does not leave much structure. It's a $55 part so it isn't hard to repair, but if it collapses the consequences aren't pretty. I am more concerned what happens as the part flexes and fatigues over time.


Yup, that's exactly what I said: "grinding away part of the right side, center-stand bracket."

And I agree that if the bracket is weakened enough to fail, it will result in a dropped bike. But structural analysis of the bracket should tell whether it would be likely to fail.

If so, maybe a replacement bracket could be designed and installed allowing access. Something like this:

Centerstandbracketmod.jpg


Such a mod would require removing the center stand once (which could be done with the rear wheel still supporting the bike and it sitting on the side stand) and retrofitting the new center stand pieces, instead of having to remove it and kluging some kind of a way to suspend the bike up in the air every time you wanted to grease those pivots.

 
I've tried it in the UK as an experiment but reverted back to standard as it didn't stop the bearings corroding. The centre bearing is easy to do but the two end bearings present a problem. You can't drill the outer race of the bearing as suggested as its a hardened precision bearing face and by drilling it you will destroy its integrity.I removed the bearings, drilled and tapped the linkage and ground two small channels from the hole to almost the edge of the housing but stopped the channels inside the seals. This gave the grease a route from behind the bearing to the edge of the seal but I found the grease was more likely to force its way out past the seal rather than into the bearing.
Damn! This just proves, if you ask a crazy enough question, someone here will have been crazy enough to give an experienced answer.

Wow! Thanks for saving me from sallying forth on this zerk adventure.

Um, you've been a member here since (what's older than dirt?), so what does your user name mean in English?
not_i.gif
Fudgejerkin (FJ) was a cartoon character used by the UK FJOC in its early days. 1188cc is the capacity of my beloved 1988 FJ1200, I just combined the two.
smile.png


And I agree that if the bracket is weakened enough to fail, it will result in a dropped bike. But structural analysis of the bracket should tell whether it would be likely to fail.
If so, maybe a replacement bracket could be designed and installed allowing access. Something like this:

Centerstandbracketmod.jpg


Such a mod would require removing the center stand once (which could be done with the rear wheel still supporting the bike and it sitting on the side stand) and retrofitting the new center stand pieces, instead of having to remove it and kluging some kind of a way to suspend the bike up in the air every time you wanted to grease those pivots.
You kinda cheated the thickness of that bottom line, no? In a perfect FJR world, that is the way it "should" be built.

stand3.jpg


Last edited by a moderator:
That was what I was meaning to convey (and even used a different color to show the added area). These would be some custom made, replacement brackets that are taller in the vertical dimension, so that even with the missing access hole area they'd remain strong enough to support the bike.

Get it?
wink.png


Last edited by a moderator:
What if we drill a 1/16" hole down the center of the bolt from the head side, far enough to reach the center of the brg(maybe 1.5"). Then drill in from the side in 2 or 3 places . Then put a angle zerk fitting in it. Then it could be greased easilly.

This may be hard to do and I don't know how much it would weaken the bolt.

 
Fred, it seems the center-stand bracket is what gets ground.down, and from what I can tell, the modification does not leave much structure. It's a $55 part so it isn't hard to repair, but if it collapses the consequences aren't pretty. I am more concerned what happens as the part flexes and fatigues over time.


Yup, that's exactly what I said: "grinding away part of the right side, center-stand bracket."

And I agree that if the bracket is weakened enough to fail, it will result in a dropped bike. But structural analysis of the bracket should tell whether it would be likely to fail.

If so, maybe a replacement bracket could be designed and installed allowing access. Something like this:

Centerstandbracketmod.jpg


Such a mod would require removing the center stand once (which could be done with the rear wheel still supporting the bike and it sitting on the side stand) and retrofitting the new center stand pieces, instead of having to remove it and kluging some kind of a way to suspend the bike up in the air every time you wanted to grease those pivots.
Seems to me like this is a great opportunity for some FJR Forum member with the skills required to make/modify this braket to provide a great service to the comunity and make some cash along the way.

 
Top