Swapping Stator Cover Problems

Yamaha FJR Motorcycle Forum

Help Support Yamaha FJR Motorcycle Forum:

This site may earn a commission from merchant affiliate links, including eBay, Amazon, and others.
I've replaced my cover (FZ6-same set up, same issues) twice.

Its a super loctite used .

A heat gun set medium to high at the aluminum cover itself (around the bolt) for 15 seconds or

so will make the loctite loosen and it'll come out fairly easily.

The stator bolts were the same, had to add heat and they came out without a problem,.

I re-used all the original bolts as they weren't damaged.

Too late now, but I didn't even un-plug the stator cover from the wiring harness.

I put a short, STRONG stool next to the bike, popped the cover off and set it

on the stool and worked right there. Saved lifting the tank, finding the harness, etc,

piece of cake..

For the new cover, just put a clean, doubled over towel on the stool to the new cover

looking new...

 
Thanks for the reminder re: JIS bits. Those screws are most affirmatively the JIS type. My impact screwdriver had such a bit.

Side note - 25 years ago, I bought a snap on dead blow hammer for some kind of ridiculous price. It's a great tool for this kind of work.

 
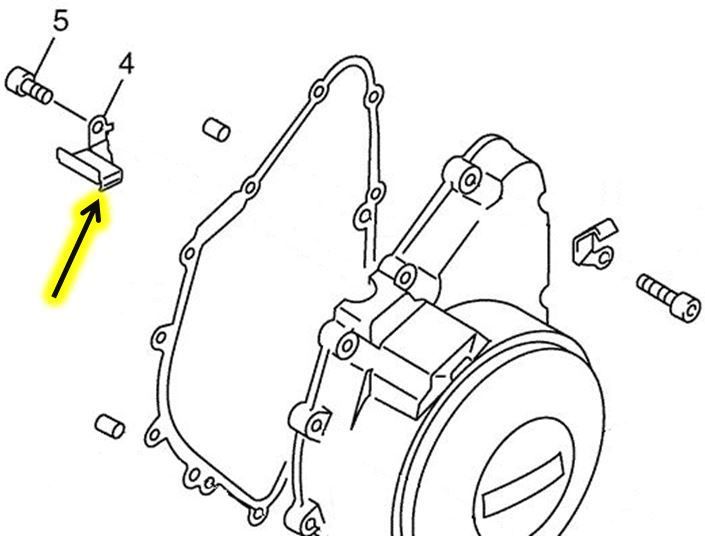
I used an impact driver to remove the LARGE Phillips screw that retained the stator wire bracket on my Gen 1. For everything else there was my pneumatic impact wrench. BRRRRTTTT -- whizzzzz and the bolts just flew out. The bracket was just slightly bent during assembly at Yamaha and just that little bend let the tip of the bracket lath a band on my stator. When people were first installing ElectroShit stators they commonly mentioned a short squealing noise when they started the engine... I think I know what they were hearing.

Stator%20Wire%20Hold%20Down_zpsj5qvtjqs.jpg


Untitled_zpshp3vuxbh.jpg


Last edited by a moderator:
I've replaced my cover (FZ6-same set up, same issues) twice.
Its a super loctite used .

A heat gun set medium to high at the aluminum cover itself (around the bolt) for 15 seconds or

so will make the loctite loosen and it'll come out fairly easily.

The stator bolts were the same, had to add heat and they came out without a problem,.

I re-used all the original bolts as they weren't damaged.

Too late now, but I didn't even un-plug the stator cover from the wiring harness.

I put a short, STRONG stool next to the bike, popped the cover off and set it

on the stool and worked right there. Saved lifting the tank, finding the harness, etc,

piece of cake..

For the new cover, just put a clean, doubled over towel on the stool to the new cover

looking new...
Yep. I didn't disconnect mine either, no need.

https://www.vesseltools.com/hand-tools/screwdrivers/motorcycle-restoration-repair/motorcycle-repair-kit/flypage_sku.tpl.html

This is the set I have. The black and silver one has a built in impact driver. Works great.

 
Last edited by a moderator:
I need to pick up a JIS bit today, although there isn't much left of the screw. I did try heat on the case using a MAPP torch and it was not pinpoint enough. I was worried about the stator wiring and stopped using it. I have a pneumatic impact driver and will get a T30 bit for it and see if I can persuade the stator bolts out. So that's a T30 and JIS on the shopping list. I would love to have it, but $80 for that Vessel tool kit is not happening.

This turned into a much bigger ****-show than I ever figured. I guess if something can go wrong, it will. Hopefully this thread helps others prepare for the potential hassles of this job before they take off the cover. I also did not disconnect the harness and used a milk crate and box to support the stator next to the bike. Lots of good suggestions here.

 
The JIS bits are the way to go, but another option for better grip is to put some valve grinding compound on a regular philips tip for better bite. May be too late for your screws though. BTW, Vessel has JIS bit sets including the larger impact driver sizes: https://www.vesseltools.com/industrial-bits/bit-sets/view-all-products.html I just bought the bits and a #2 from them to cover my needs.

You can also get Vessel tools here:

https://www.rjrcooltools.com/shop_item_detail.cfm?subcat_ID=138

For more info on JIS vs Philips, here's a good article:

https://www.vesseltools.com/hand-tools/screwdrivers/jis-japanese-industrial-standard/view-all-products.html

 
Last edited by a moderator:
I've replaced my cover (FZ6-same set up, same issues) twice.
Its a super loctite used .

A heat gun set medium to high at the aluminum cover itself (around the bolt) for 15 seconds or

so will make the loctite loosen and it'll come out fairly easily.

The stator bolts were the same, had to add heat and they came out without a problem,.

I re-used all the original bolts as they weren't damaged.

Too late now, but I didn't even un-plug the stator cover from the wiring harness.

I put a short, STRONG stool next to the bike, popped the cover off and set it

on the stool and worked right there. Saved lifting the tank, finding the harness, etc,

piece of cake..

For the new cover, just put a clean, doubled over towel on the stool to the new cover

looking new...
Yep. I didn't disconnect mine either, no need.

https://www.vesseltools.com/hand-tools/screwdrivers/motorcycle-restoration-repair/motorcycle-repair-kit/flypage_sku.tpl.html

This is the set I have. The black and silver one has a built in impact driver. Works great.
I have a couple of screw driver torx bits for light duty, but a decent set of 1/4" drive torx bits are

the way to go. Put on a ratchet, plug into an impact hand hammer tool, etc.. Way MORE LEVERAGE than just

a screwdriver style...

There's No way I would have gotten it off without heat and the 1/4" drive ratchet with the torx bit..

https://www.sears.com/craftsman-evolv-7-pc-torx-reg-bit-socket-set/p-00901005000P?plpSellerId=Sears&prdNo=3&blockNo=3&blockType=G3

 
There's No way I would have gotten it off without heat and the 1/4" drive ratchet with the torx bit..
https://www.sears.com/craftsman-evolv-7-pc-torx-reg-bit-socket-set/p-00901005000P?plpSellerId=Sears&prdNo=3&blockNo=3&blockType=G3
3/8"? My set is 3/8" drive, I also have a set of hex bits like that too. These are some of my common 'go to' tools when working on the FJR. I have a confession, I'm a tool junkie, I have been acquiring tools for the last 45 years. I have a habit of going for the good stuff which fits well and lasts.

 
Last edited by a moderator:
There's No way I would have gotten it off without heat and the 1/4" drive ratchet with the torx bit..
https://www.sears.com/craftsman-evolv-7-pc-torx-reg-bit-socket-set/p-00901005000P?plpSellerId=Sears&prdNo=3&blockNo=3&blockType=G3
3/8"? My set is 3/8" drive, I also have a set of hex bits like that too. These are some of my common 'go to' tools when working on the FJR. I have a confession, I'm a tool junkie, I have been acquiring tools for the last 45 years. I have a habit of going for the good stuff which fits well and lasts.
Actually, there's one or two 1/4" drive and the rest are 3/8" drive.

As I re-call, my FZ (likely the same as the FJR) used the 1/4" driver torx.

I have one kinda buggered up, I ground down some, till I can get back to Sears(that's if they have one in stock, usually not)

 
I used an impact driver to remove the LARGE Phillips screw that retained the stator wire bracket on my Gen 1. For everything else there was my pneumatic impact wrench. BRRRRTTTT -- whizzzzz and the bolts just flew out. The bracket was just slightly bent during assembly at Yamaha and just that little bend let the tip of the bracket lath a band on my stator. When people were first installing ElectroShit stators they commonly mentioned a short squealing noise when they started the engine... I think I know what they were hearing.
Stator%20Wire%20Hold%20Down_zpsj5qvtjqs.jpg


Untitled_zpshp3vuxbh.jpg
An older 2006 thread mentioned that even a small bend in that bracket could cause this. Mine is badly distorted now, so waiting for the parts seems the best idea for now. If they are not here by the end of the Labor Day weekend, i might change my mind.

 
I like to use air impact wrenches instead of the manual hammer variety. That way I can really push the tool into the screw and then pull the trigger. Its easier to avoid cam out. I would get allen or torx bolts to replace the phillips heads. You can match the grade (5 or 8?) to maintain the strength.
Bolt grade is not issue when the torque setting is just about 6 ft lbs. Damn things are welded into the case with red loctite for the past 11 years, and nothing I have done has broken it free.

The video for a Gen III uses a 5 mm allan for the wires and T30 for the torx. The wires are retained on mine by a phillips that offers a lot less grip. Clearly, the newer bike has bolts that are much easier to release.
Pants, I'm going to try the soldering iron and impact driver. I have already orders some parts as backup, as I expect to strip the heads and end up drilling this sucker out.
That is probably a JIS head on the screw and not a Phillips. The Phillips head is designed to allow the driver to "cam" out to avoid too much torque during assembly line builds. The JIS doesn't have that feature.
This is useful. Gotta git me one of those JIS bits...of course there isn't much for it to fit into anymore.
If you replace them with something soft like grade 2 then in a few years when they are welded in the case they will break off if you need to do the job again. The difference in cost is penny's. Why not upgrade to better hardware like Torx? The factory did!

 
Last edited by a moderator:
My replacement bolts arrive tomorrow. I attempted using impact drivers, including a Vessel JIS impact for the clip and T30 pneumatic impact drivers with heat for the bolts. No dice! The last resort was to drill off the screw heads. Even after drilling off the bolts retaining the stator, I could not remove the unit from the case, so I purchsed a couple 1/4" x 4" full thread bolts and inserted them through the extra holes, threading a bolt under the stator using a magnet to hold the nut. Then tightened the bolt forcing the stator upward, and off the generator case mounting lip.

The carnage when done, revealed lots of big shards of aluminum from the original damage as well as a lot of iron filings from drilling the bolts. The JB-Weld repair is visible on the bottom of the case with an extrusion of JB-weld entering the case and a huge crack and fragmented aluminum at the 5:30 position in the picture below. This project proves, that if anything can go wrong, it will. I have never been so totally frustrated by a repair that should have been simple. This is a Gen I bike, and the video and descriptions of removing stators from Gen III bikes do not apply.

CE549B2D-870D-4713-BC3C-0DF8ED842E5D.jpg


If the collective approves, I will give the stator a rinse in mineral spirits and blow-down with compressed air to remove any metal filings, then use BLUE Loc-Tite to fasten the new bolts.

 
Last edited by a moderator:
For reassembly of small screws equal or less than M6 (1/4"), I would use loctite 222 instead of the 242. Here is an application guide from loctite: https://www.na.henkel-adhesives.com/us/content_data/LT4460_Motorcycle_Application_Guide.pdfYour break/prevail torque is 53/30 for 222(purple) vs 106/26 for 242(blue).
Reading the application guide, the red thread lock for the stator is incredible over-kill.

A permanent threadlocker for fasteners up to 3/4" (20 mm) in diameter. High lubricity for easy assembly.
Excellent for preventing rust and corrosion in extremechemical/environmental conditions.
We need to maintain the stator. Doing what was done to mine makes it impossible to fix on the road, and makes the whole generator cover assembly disposable. I know others have done the swap. This one was not possible without destructive removal.

That really sucks,Tom. Hope you get it all worked out. Maybe you shouldn't have dissed the Browns.


I never heard of Brown Loc-Tite. What kind of **** is that? Sounds like a sure loser to me. Hope you're enjoying MNF. Currently Steelerz14, WSH 6. BTW, you look great in Black and Gold Klim gear.

 
Last edited by a moderator:
That's pretty funny Tom, one year I went to a tailgate party,in the Muni lot, when the Steelers were in town, and wore a yellow and black Northface jacket...that didn't go over very well.

 
My replacement bolts arrive tomorrow. I attempted using impact drivers, including a Vessel JIS impact for the clip and T30 pneumatic impact drivers with heat for the bolts. No dice! The last resort was to drill off the screw heads. Even after drilling off the bolts retaining the stator, I could not remove the unit from the case, so I purchsed a couple 1/4" x 4" full thread bolts and inserted them through the extra holes, threading a bolt under the stator using a magnet to hold the nut. Then tightened the bolt forcing the stator upward, and off the generator case mounting lip.
The carnage when done, revealed lots of big shards of aluminum from the original damage as well as a lot of iron filings from drilling the bolts. The JB-Weld repair is visible on the bottom of the case with an extrusion of JB-weld entering the case and a huge crack and fragmented aluminum at the 5:30 position in the picture below. This project proves, that if anything can go wrong, it will. I have never been so totally frustrated by a repair that should have been simple. This is a Gen I bike, and the video and descriptions of removing stators from Gen III bikes do not apply.

CE549B2D-870D-4713-BC3C-0DF8ED842E5D.jpg


If the collective approves, I will give the stator a rinse in mineral spirits and blow-down with compressed air to remove any metal filings, then use BLUE Loc-Tite to fasten the new bolts.
 
The only thing I can approve of is.....

Don't tip over **** head!! Then you won't have to deal with this ****.


That is all.

 
The only thing I can approve of is.....
Don't tip over **** head!! Then you won't have to deal with this ****.

That is all.
I did a perfect Stop, Drop and Roll! You'd have loved it, and other than the bike, all I had to show for it was grass stains.


Latest posts

Top