Warm and Safe Heated gear and the new wireless controllers

Yamaha FJR Motorcycle Forum

Help Support Yamaha FJR Motorcycle Forum:

This site may earn a commission from merchant affiliate links, including eBay, Amazon, and others.
Thanks for the info, looks like an extension will need to be ordered, I'd prefer that over cutting and splicing.

I figure some disassembly is in order but want to verify for those that have already done this.

Do I need to pull the plastic on the right side if I want to run the wires under the plastic or is there room to fish it to the seat/tank location without having to do this?

Thanks.

 
I lifted the tank to get the most direct routing under the tank, so that required removing the plastic tabs on both sides as well as the 2 10mm tank hold-down bolts. No need to remove the rear tank bolt.

 
Drew,

You can tilt the tank up by removing the two front bolts (prop it up w/ a 2x4) and you'll have plenty of room to route your wires without pulling the right side tupperware. Don't forget to remove the fasteners on the small black panels below the tank.

 
Speaking of amazing service, I contacted Mike on this issue a few minutes ago, noting that I originally had to use the Y-cable to get enough length, even with a direct path from battery under tank. Within seconds he replied:

I am beginning to think I need to include a long and short battery or at least have the option. But right now it is 34inch. So you are saying 4 ft.


Thanks

Mike Coan
 
Last edited by a moderator:
If it's as easy as stated, I may go that route (lifting the tank). That would definitely be the most direct route. If I do that, I can get the wires installed and everything in use while I wait for the extension wire.

That is a quick response from Warm-N-Safe, hopefully he'll go that direction. As a guess, I'd say 4' would be minimal, that should get you enough to be off the bike when hooking up.

Thanks for all the help guys.

 
Because I knew that I would want to power two sets of heated gear, I elected to build and install a Power Distribution Box under the seat. The battery power pigtails that you get with these liners is long enough to reach from under the seat with no extra extensions. Here's a link to my write-up.

 
Because I knew that I would want to power two sets of heated gear, I elected to build and install a Power Distribution Box under the seat. The battery power pigtails that you get with these liners is long enough to reach from under the seat with no extra extensions. Here's a link to my write-up.
I like this idea Fred. You installed an in line fuse for your PDB, did you keep the in line fuse on your heated gear wire as well? I'm assuming you cut off the o-rings and just stripped the ends of the pigtails to wire it into your PDB?

 
I did the same thing, except used a Fuzeblock under the pillon seat with power from the battery via 12 gauge primary wire and inline 30 amp fuse. Anytime you run a hot wire to an accessory, power distribution block or fuse block, be sure to include an inline fuse with enough capacity to run the circuit, as close to the battery as practical. If you're running electric heated clothing, that is at least a 20 amp fuse. It doesn't hurt to double-protect by leaving the fuse inline to the liner as well, but you can cut-off the ring terminals.

 
Last edited by a moderator:
I like this idea Fred. You installed an in line fuse for your PDB, did you keep the in line fuse on your heated gear wire as well? I'm assuming you cut off the o-rings and just stripped the ends of the pigtails to wire it into your PDB?

Yes exactly right. The 30 amp fuse that feeds the PDB is as close as possible to the battery and it's primary job is to protect the heavy gauge wire running to the box. I then left the individual in-line fuses on the heated gear pigtails and just clipped off the ring lugs. I believe those are 15 amp fuses as supplied by First Gear.

If you opt for a Fuzeblock (like Tom mentions above) you'll still need to install the 30 amp main fuse back at the battery and run the heavy gauge feed wire. You could then cut off the individual in-line fuses in each pigtail, or leave them in there. I have a Fuzeblock under my seat on my V-strom as I power everything off of that. It is nice having the relay built into the Fuzeblock to switch the loads on and off with the ignition. But the PDB is about $60 cheaper. ;)

One other point worth mentioning: The maximum fuse size that you can use in an application is based on the gauge of the wiring being protected, not by what the end device needs. Fuses protect wiring from going up in flames, not devices from cooking themselves. If your device consumes less that that maximum amount then it's fine to put a smaller fuse in, but never bigger.

PS - Here is a link to a good wire size chart for automotive applications. You'll notice that, with our very short run lengths, we motorcycle farklers tend to oversize our wiring quite a bit. For instance, if you plan on running a 5 foot wire length you can carry up to 24 amps on a tiny 18 gauge wire.

For the run from the battery to a fusebox with a 30 amp fused maximum draw (capable of delivering 420 watts if the alternator was), you could get away with only using 16 gauge wire. I used 12 gauge wire because I already had a bunch of it laying around.

 
Last edited by a moderator:
FYI - I had mucho problems with a bad wireless controller originally but Mike did come through after I was just about to return and I have had no issues at all with this gear in 1.5 years. I won't ride without it now.

Yes, the power harness is way to short. I can just barely plug in while standing next to the bike.

 
Yes, the power harness is way to short. I can just barely plug in while standing next to the bike.
I never really thought about that before.

But why would you want to plug in while standing next to the bike?

Can't you reach your cord when seated? :unsure:

Seems to me that if the cord was long enough to plug in before mounting the bike that there would be a lot of cable flopping around...

 
Last edited by a moderator:
The jacket has about1-1/2 feet of cord and I keep the harness socket close to the bike. As Fred says, there are some disadvantages to having a cord flopping around. The problem with the harness is that it is too short for bikes that have a battery located in the front of the fairing like the FJR. Most bikes have a battery under the seat and the harness is fine.

If you want extra cord to stand on the pegs and next to the bike add an extension and keep it in the right pocket. Does anyone recall if the coiled cord extensions cause a problem? I know Mike advocates keeping cords as short as possible to minimize resistance. I find my jacket cord is too short to allow me to stand on the pegs, so I think that might be something I'll add.

 
Last edited by a moderator:
Here's a link to my write-up.
Well I installed Fred's version of a PDB on the bike today. I ran the battery wires under the tank and placed the PDB in the tool kit tray under the rider seat, stuck there with some strong velcro. I ran both the high and low from the battery, chose not to use the frame as the ground. The power jack is popped out on the left side of the bike between the seat and the tank. I had no wire so I had to buy that with all the parts he mentions in his link, total of about $23 for everything, about 3 hours from start to a warm liner. I'll know tomorrow if I have everything sync'd up right, I think it'll be in 20's on the way to work. Thanks for the post Fred and your input as well Tom.

Something I'm unsure of is temperature control of the gloves. I'm assuming the gloves will be at the same temp as the liner since they just plug into the liner sleeves, is this correct? Is there another hookup to get the gloves on their own temp setting? I have the dual remote heat troller.

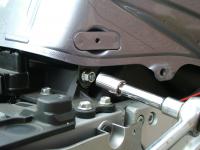
I did get one surprise. I pulled off the trim piece that is between the tank and the seat and noticed the tank bolt at the rear of the tank had no nut on it and the bolt was not completely pushed through the hole it is supposed to be in. I did take the bike to get the ignition and the ECU recalls done, I'm assuming that's where the nut ended up, I haven't taken the tank off. Anyone know the size of the nut for this bolt? It's a 12mm head on the bolt.

Thanks for the fix guys.

 
Something I'm unsure of is temperature control of the gloves. I'm assuming the gloves will be at the same temp as the liner since they just plug into the liner sleeves, is this correct? Is there another hookup to get the gloves on their own temp setting? I have the dual remote heat troller.
The way the jacket liner comes wired is to run off of a single controller. The down side to that configuration is that I find that the gloves do require a higher setting than the liner, at least with my 90 watt liner. I can barely turn on the liner control without overheating. The gloves I need turned up considerably further. I probably should have got the 60 watt liner for myself. But I digress...

There is a small zippered compartment on the inside lower left side of the liner. Inside you will find two connectors mated together. Break those apart and pull out the female side (it's a longer cord) and let it hang. That is the Y-harness going off to the glove connectors in your sleeves. You'll just plug that into the second controller pigtail so you can control the liner and gloves separately.

I've made it a habit to plug the glove cable into the Gold colored controller connector, so that the Gold knob controls the Gloves. ;)

I did get one surprise. I pulled off the trim piece that is between the tank and the seat and noticed the tank bolt at the rear of the tank had no nut on it and the bolt was not completely pushed through the hole it is supposed to be in. I did take the bike to get the ignition and the ECU recalls done, I'm assuming that's where the nut ended up, I haven't taken the tank off. Anyone know the size of the nut for this bolt? It's a 12mm head on the bolt.
I assume that you are talking about #16 and #17 in this parts breakdown diagram, right? If so, that nut is only 99 cents from Yamaha. I do not know what the thread size or pitch is, but you could just pull out the long bolt and bring it with you to the hardware store.

 
I assume that you are talking about #16 and #17 in this parts breakdown diagram, right? If so, that nut is only 99 cents from Yamaha. I do not know what the thread size or pitch is, but you could just pull out the long bolt and bring it with you to the hardware store.
Those are the parts. It shouldn't be too painful to get the bolt out and run it to the hardware store, thought I'd ask anyway. Stayed nice and warm on the way in to work this morning, temp was pretty steady at 28F for most of the ride, got down to 24F in a couple places. The bad part was I had started to break out in a sweat getting geared up so it was a cool start. My fingers got a little cold but hands, arms and core were warm. As you said, the gloves need to be warmer than the liner, I'll make that adjustment when I get home tonight.

 
I did get one surprise. I pulled off the trim piece that is between the tank and the seat and noticed the tank bolt at the rear of the tank had no nut on it and the bolt was not completely pushed through the hole it is supposed to be in. I did take the bike to get the ignition and the ECU recalls done, I'm assuming that's where the nut ended up, I haven't taken the tank off. Anyone know the size of the nut for this bolt? It's a 12mm head on the bolt.

Thanks for the fix guys.
When you run to the hardware store, I'd suggest getting a self locking nut. That way it won't back out in the future and you can do what I do, which is to just lightly snug up the self locking nut so that you can lift the tank without loosening that nut.
And get a washer to suit, the original nut has a shoulder

(Click on image for larger view)


Last edited by a moderator:
To re-awaken this thread... I haven't been able to ride much over the past couple months due to the wife having health issues and me staying home so I haven't had gotten much use out of the WnS gear but I have used it a couple times and again this morning on the way to work. I've noticed a hot electrical smell when I stop the bike, not a burning electrical smell, like fried wires, more like something has gotten kind of hot. Has this been a typical experience for those that have used this gear before? From what I can tell, the smell isn't coming from the bike, seems to be more from the liner. The gloves and liner both heat up nicely.

 
I've never had heated gear before...but that sounds scary. The last thing I want while being wrapped in heated gear is a hot electrical smell.

Heated gear users please chime in...

 
On very hot days, I have had a hot rubbery burn smell (just enough to notice) coming somewhere from the engine compartment and have never been able to pin it down. Never had it when cool or cold. Older style heated gear was a string of heating wire strung throughout the garment. Newer ones have finer wire or a type of woven carbon-like material. It could be if the gear is newer, it has to get rid of the newness smell out of the materials. The key is it should not get hot enough to burn you, and if it is, ask for a replacement. Might be a hot spot at a connection point for example. Warm & Safe are good about working with you.

 
Top