Brackets for aux lights

Yamaha FJR Motorcycle Forum

Help Support Yamaha FJR Motorcycle Forum:

This site may earn a commission from merchant affiliate links, including eBay, Amazon, and others.
I haven't priced a set of FZ1 mirrors. I just assumed that spacers could be made for about a third of the cost, plus there is less waste because you’re not tossing perfectly good mirrors in the trash.
What does a pair of FZ1 mirrors cost?
I didn't toss my OE Gen1 mirrors even though I have no use for them. I'll probably sell them in the classifieds or eBay them off at some point. I may be able to cover the cost of my FZ1s since I only paid $34.58ea plus $10 for shipping from University just this past summer.

I'm still very interested to see what you come up with. Keep up the great work.

PS - I do like the swirly look in the plastic too. :)

 
I haven't priced a set of FZ1 mirrors. I just assumed that spacers could be made for about a third of the cost, plus there is less waste because you’re not tossing perfectly good mirrors in the trash.
Trash? I'll have you know mine are in the FZ-1 mirror boxes, stored with other "replaced" parts.


What does a pair of FZ1 mirrors cost?
$150 and change. IIRC, they're about $75 each. One of the best upgrades I did to my '05.

We used to be able to buy them on ebay or take-offs fromthe FZ-1 guys who were replacing them with narrower mirrors. The NewGen FZ's changed mirrors, so those options faded.

 
Joe

I have about 1/4 inch worth of stud protuding from the nuts on the inside of the fairing in the stock configuration. Roughly about 5 to 6 threads, or about the width of the nut.

Hey in case I never said it, "congradulations" on your graduation! What kind of degree did you end up with? Also thanks for walking me through the google photo posting. It was pretty easy the second time around.

I'm off now for the test drive, my in-laws are coming this week and this weekend was the putting up the xmas stuff. But I shouldn't be missed for a couple of hours. Any excuse is a good excuse to go for a ride.

 
JoeI have about 1/4 inch worth of stud protuding from the nuts on the inside of the fairing in the stock configuration. Roughly about 5 to 6 threads, or about the width of the nut.
That's what I thought. Those studs are longer.

Hey in case I never said it, "congradulations" on your graduation! What kind of degree did you end up with? Also thanks for walking me through the google photo posting. It was pretty easy the second time around.
Thank you. I have a B.S. in Management from the University of Wisconsin-Stout. I was thinking about adding a post about it in Completely Off-topic Discussions. It seems my days as a toolmaker are numbered. Pretty soon, I'll be "off the bench". *sniff*

You did a nice job with those photos!

 
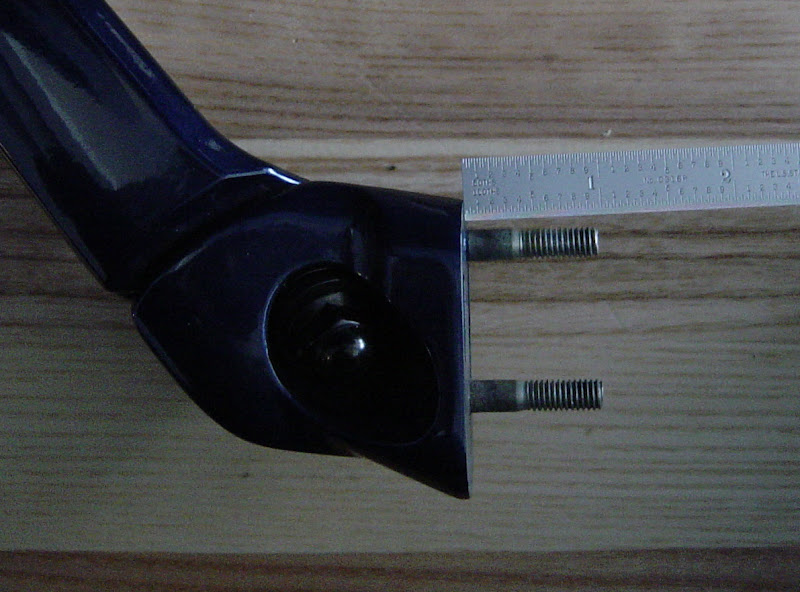
The steel rule in the photo is a six inch scale. They don't show up too well in the photo, but the graduations are in .010" and .020".

DSC03489_cropped.JPG


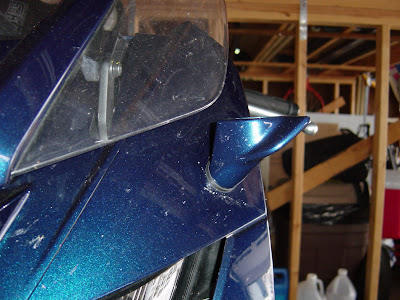
The studs on jet mechanic's mirrors are approximately 9mm longer (about .350") than what I have on my '06.

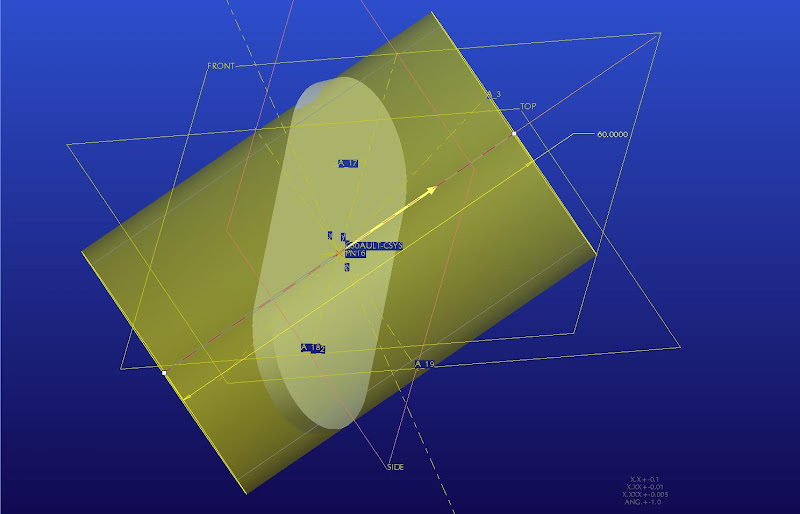
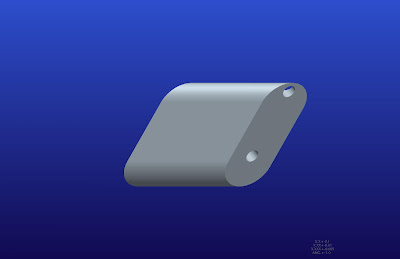
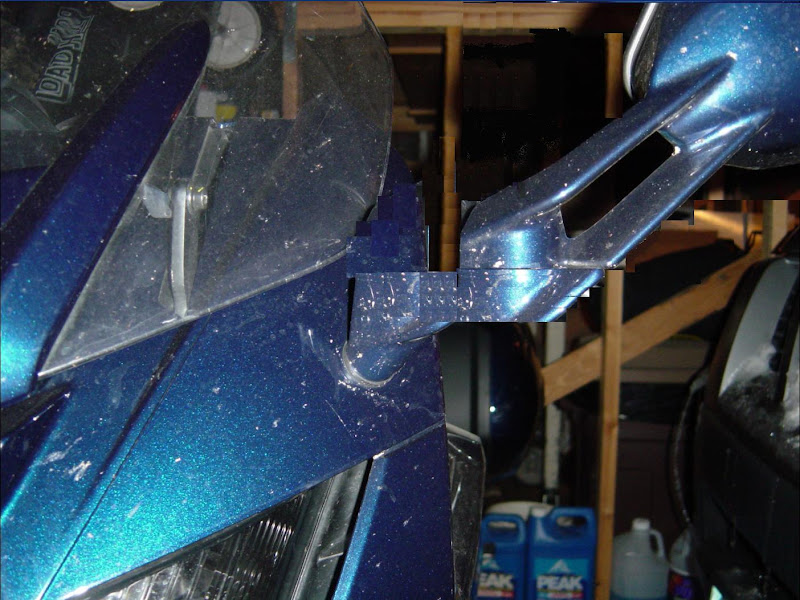
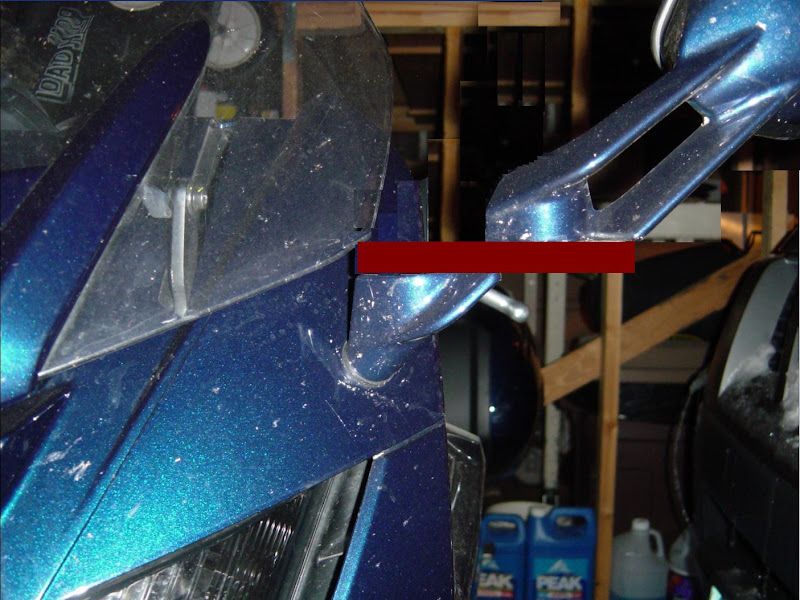
Next, I took the measurements of the angles on the fairing and tried to plug them into a CAD model. The line we are interested in is 45 degrees to the ground and 90 degrees to the centerline of the bike (front to rear). We want not only this centerline, but we when we make our diagonal cut on the spacers, we want the surfaces to follow the dimensions of the mirror base and rubber vibration dampener.

If that makes any sense, (or if it doesn't) I offer this:

left_fairing_mount.prt.2.JPG


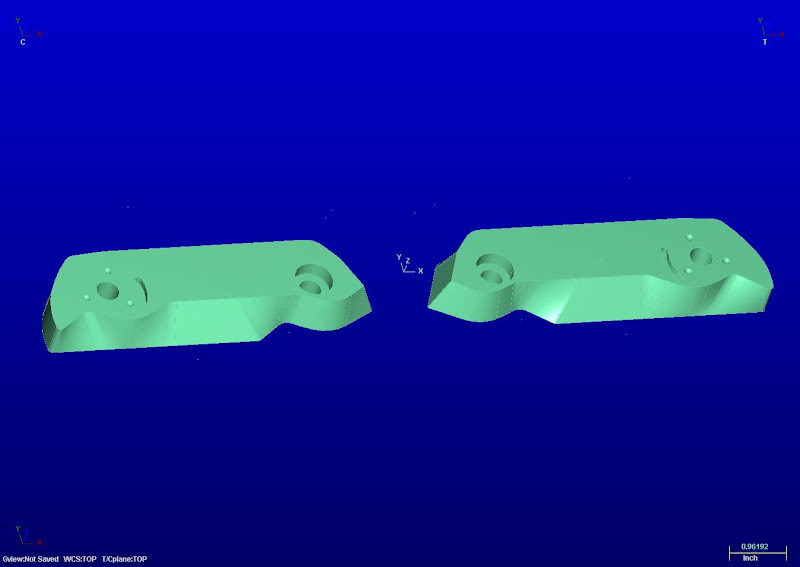
The light oval in the middle is an approximation of the rubber vibration dampener. The yellow arrow is the direction we need the mirror to move if we want an improved rear view. The transparent yellow form is an oval and about 2" (50mm) tall. I took a break after getting that far. Tomorrow I'll cut the ends parallel to the planes on the face of the dampener and add holes for the mirror studs and threaded posts where the bracket will mount to the fairing.

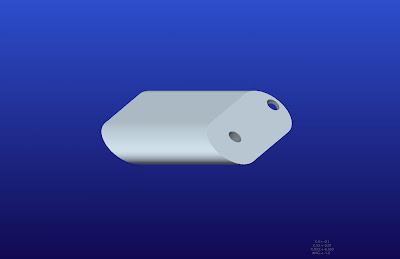
Remember the pasta? Maybe picturing that will help. The oval shape is produced first, the ends are cut, and those surfaces either get drilled for the mirror studs, or drilled and tapped for the fairing mount studs. This whole deal will require two special fixtures, one each for the secondary operations.

And,.. I still don't have an HID mount or the camera mount!

 
Last edited by a moderator:
This is what the bracket would look like if we moved the mirror out away from the center line of the bike and parallel to the ground. This is a front view (as if looking at the bike's left mirror spacer), and a top view (standing closer to the bike and looking down).

Before anybody replies "that'll never work", I already know that.

left%20mount%20parallel%20to%20ground.JPG
left%20mount%20parallel%20to%20ground-top.JPG


I'm trying different angles and sharing the results.

I can't believe the discussion "Airplane on Conveyor Belt" was viewed three times as much as this thread. :blink:

 
left%20mount%20parallel%20to%20ground-top.JPG

I'm trying different angles and sharing the results.
This one shows the most promise. I think moving the mirror outward and back will we best. That would approximate the changes we OldGen owners get with the FZ-1 mirrors and keep the mirror face closer to the rider.

I can't believe the discussion "Airplane on Conveyor Belt" was viewed three times as much as this thread. :blink:
Because here are a lot of owenrs of OldGen bikes....and plenty of Winter-bound owners looking for an opportunity to vent. :dribble:

 
Last edited by a moderator:
Offsetting the angle of the spacer is a challenge because in addition to figuring out the angles, hole locations, etc. I have to be able to machine the part when I'm done designing it.

Then, if it's going to difficult to make, and end up looking like hell… That sort of seems like a waste of time.

I just took the mirror assembly apart, separating the mounting bracket from the mirror housing arm. A single nut holds them together. Be careful if you decide to take yours apart. There are about 8 spring washers in there.

Anyway, I'm sitting here estimating how complicated making new brackets would be.

Here's a simple solution for you:

1.) Leave the brackets on the fairing

2.) Revove the the mirror housing arm at the bracket joint.

3.) Add an offset spacer in there. Picture a thick "8" or infinity symbol

 
On the GenII mirrors, this is what the lower mounting bracket looks like:

DSC03539.JPG


DSC03540.JPG


I added the silver lines for reference.

Making a new lower bracket would be complicated and would end up looking something like this:

DSC03426_Bracket.JPG


(unlikely to win any design awards)

This shows what I started wondering about 11 days ago:

DSC03426_Cantilever.JPG


Does anyone else think the cantilever (red block in lower photo) might work? If so, which end should pivot? If it pivots on the lower bracket (where the mirror did originally) the upside is being able to get the bike through a narrower opening. The downside is the potential for more vibration in the lights and mirrors. I'm not sure there would be more vibration, but there are spring washers in there.

 
The cantilever version II certainly looks simpler without having to deal with subframe mounting and fairing angles. Are you thinking

Delrin or aluminum? The detent holes and pivot channels might wear quickly with Delrin. And maybe a bit thicker than shown for strength, a bit more height shouldn't matter.

Pivoting on the lower mount would be optimal, vibration dealt with by varying number and thickness of the spring washers, and/or a rubber gasket.

Thanks again Joe, this is appreciated.

 
Joe,

I think you are really on to something here. I think if you radius the edges and have them painted body color, like in the photochop image, they won't look so bad.

In addition to the mirror being moved out, this extension could be made to accomodate hanging lights below the mirrors. That would be awesome and may also improve the aesthetics some.

The pivot point would have to be moved to the outer connection, so the bracket and any hung lights would remain stationary to maintain beam alignment. The only trick then would be devising the lower half of the pivoting mount on the outer half of your brackets.

 
DSC03426_Cantilever.JPG

Does anyone else think the cantilever (red block in lower photo) might work? If so, which end should pivot? If it pivots on the lower bracket (where the mirror did originally) the upside is being able to get the bike through a narrower opening. The downside is the potential for more vibration in the lights and mirrors. I'm not sure there would be more vibration, but there are spring washers in there.
There was an '07 in the Stagecoach Inn, Stockton AL parking lot yesterday that had done this. I did not get a chance to meet the owner.

 
Joe,

I agree with Fred. Putting a couple of curves on the extension to make it more aesthetic would be nice.

Sandwiching aux light mounting brackets between the extension and the lower mount would be almost like mounting them to the fairing and help reduce vibrations.

Putting the pivoting point to the outside might or might not cause more vibration, a test ride would decide that. I'm still happy to be the guinea pig if needed.

 
Joe,I agree with Fred. Putting a couple of curves on the extension to make it more aesthetic would be nice.

Sandwiching aux light mounting brackets between the extension and the lower mount would be almost like mounting them to the fairing and help reduce vibrations.

Putting the pivoting point to the outside might or might not cause more vibration, a test ride would decide that. I'm still happy to be the guinea pig if needed.
Sorry it took so long to get back to you. This is what I've come up with:

Both%20brackets%20in%20Mastercam%201.JPG


As far as aesthetics, the curves should line up perfectly with the lower bracket on the fairing (on one end) and the mirror arm (on the other end).

The brackets will be approximately 1 3/4" X 6" X 5/8". The hole with the counterbore is to accommodate a 10mm shoulder bolt. That will be the pivot point and the existing spring washers should work well with these brackets. The outer mirror will not pivot (that may change later) the indentations you see are clearance pockets.

They should work. There is room in the center for threaded holes for RAM mounts, or lights, or whatever.

I'll try and get them cut this week-end, and in the mail to jet mechanic next week. I'll need a volunteer with auxiliary lights. Should I cut a second (or third) set this weekend or wait to get jet mechanics feedback?

I'm hungry and I need a beer. (I go home now)

 
Joe,

If the brackets work, I'll buy a set of aux lights a bit earlier than planned.

As far as mounting of the aux lights goes, do you prefer to see a threaded rod type mount going thru the bracket or a bent flat stock bracket sandwiched someplace? Since I'll be buying them just for this project I can go either way.

Maybe some of the other members can comment on which way would be the "preferred way". Or does the mounting depend on which lights are purchased?

I just don't have any experience with aux lights so any opinions are appreciated. Also comments on which aux lights to purchase (and where to purchase) would be appreciated. I'll start doing some research to see whats out there. I'll start with the 3 that madmike2 mentioned earlier.

 
Joe,If the brackets work, I'll buy a set of aux lights a bit earlier than planned.

As far as mounting of the aux lights goes, do you prefer to see a threaded rod type mount going thru the bracket or a bent flat stock bracket sandwiched someplace? Since I'll be buying them just for this project I can go either way.

Maybe some of the other members can comment on which way would be the "preferred way". Or does the mounting depend on which lights are purchased?

I just don't have any experience with aux lights so any opinions are appreciated. Also comments on which aux lights to purchase (and where to purchase) would be appreciated. I'll start doing some research to see whats out there. I'll start with the 3 that madmike2 mentioned earlier.
I think the final mounting configuration on these brackets is totally dependent on which lights are purchased.

I was hoping one of the knowledgeable members would chime in and volunteer to mount their lights on these brackets.

If no one offers, I'll just cut the brackets with no auxiliary light mounting holes and mail them to you. I might be able to get them anodized, but I won't know until next week. I don't want to spend money to anodize prototypes, but I may be able to include them with another job. If so, they will be black.

I was considering adding a 1/4-20 tapped hole in the center because I know a RAM mount will work with that and I'd like to have FJRFencer try mounting a camera on one of the brackets <Link>. Plus a 1/4-20 can easily be opened up to accommodate a larger diameter mounting stud in the future.

This is a tough crowd.

Is this mike on?

 
Last edited by a moderator:
I think the final mounting configuration on these brackets is totally dependent on which lights are purchased.I was hoping one of the knowledgeable members would chime in and volunteer to mount their lights on these brackets.
That would depend on them owning a NewGen bike. Most of us who have been here for awhile have OldGen bikes and have our lights mounted already.
Hanging lights that far outboard of the subframe might put quite a strain on the lower mirror stalk. A couple of lbs. of weight hanging in 70 mph winds might not be the best choice. On the OldGen mirors there was no choice because the stalk didn't allow much design option. The current available bracketry sandwiches under the mirror base and keeps the mass closer to the fairing. This is also helpful in case of a tip-over.

I was considering adding a 1/4-20 tapped hole in the center because I know a RAM mount will work with that and I'd like to have FJRFencer try mounting a camera on one of the brackets. Plus a 1/4-20 can easily be opened up to accommodate a larger diameter mounting stud in the future.
Options are always a good thing. I'd think that a lightweight remote camera would mount easily and the predrilled hole for that is okay. Any lights will be too large to fit in that narrow space so an extended bracket would be required.
 
Mike,

So with your experience the best way to mount the aux lights will be a bracket mounted between the mirror lower base and the fairing?

I looked at all the lights you mentioned in your earlier post (#6), Due to it being right after the holidays, my seat going out to Russell in 10 days, plus a couple of other financial commitments, I can't afford to buy PHID's, but will buy halogen lights to start. My goal is just to make sure there are no interference/ mounting issues with the brackets.

Any recommendations?? I guess that I should give a little more specifics on how I drive. I do drive at night quite often. Some highway, but mostly on back country roads with very few straight areas. I guess I'm looking more for lights that let me see more of what is on the sides of the roads than straight ahead. It seems that a 4 in diameter light seems to be the common size. The Hella 500, cornering pattern, looks the most promising, but any personnel experience would be appreciated.

If I can mount the lights at the same time that Joe sends the brackets, the pictures would provide a better representation of what else can be mounted to the brackets.

 
Top